
Shed
Building a Shed From Scratch
11 - September - 2019 - 07:00
In the summer of 2017, my wife and I ended up buying the house that we had been renting for five-or-so years. This had a few advantages in that we already knew all the things that were wrong with the place and we also had a long list of improvements that we would make, if given the chance. Pretty much at the top of my list was tearing down the ramshackle shed in the back yard and replacing it with one that was larger, weatherproof and secure. This would allow me to relocate much of the clutter in the garage out to the shed and not have to worry about it getting wet or being stolen.
While there are lots of great shed solutions out there, such as TuffShed, that allow you to purchase a kit and put it together yourself, I was pretty specific about what I wanted in a shed and it wasn’t a kit. I really wanted something that had a bit of a mid-century look to it, in order to match our 1951 house and I had a pretty specific space in which to fit this shed.
Although I build lots of buildings for movies, that in no way translates into me knowing how to actually build a building in my back yard. Accordingly, I spent some time hunting for plans online and ended up purchasing a set of plans from https://www.icreatables.com/ for their ‘8x8 Modern Shed’ Once I had those in hand, I had to do a bit of reconciling against my actual needs shed-wise and what I was willing to spend on said shed. I didn’t need nearly as many windows as the plans called for, both because I didn’t want people to be able to see what I was storing in the shed and because I didn’t want to have to buy a bunch of new windows. I did, however have a store nearby that sells used and surplus doors, windows and misc construction things.
With my measurements in hand, I went to the store, and found a door that was the proper size and a single sliding window that I could adapt to fit above the door, mostly for light and ventilation purposes. I placed an order at a nearby lumber store and a few days later they dropped off about a million pounds of wood in front of our house, which my amazing wife dragged into the garage while I was at work.
In all, it took me something like 9 days of solid work to tear down the old shed and build up the new one, which was about 5 days longer than I was expecting. Learning!
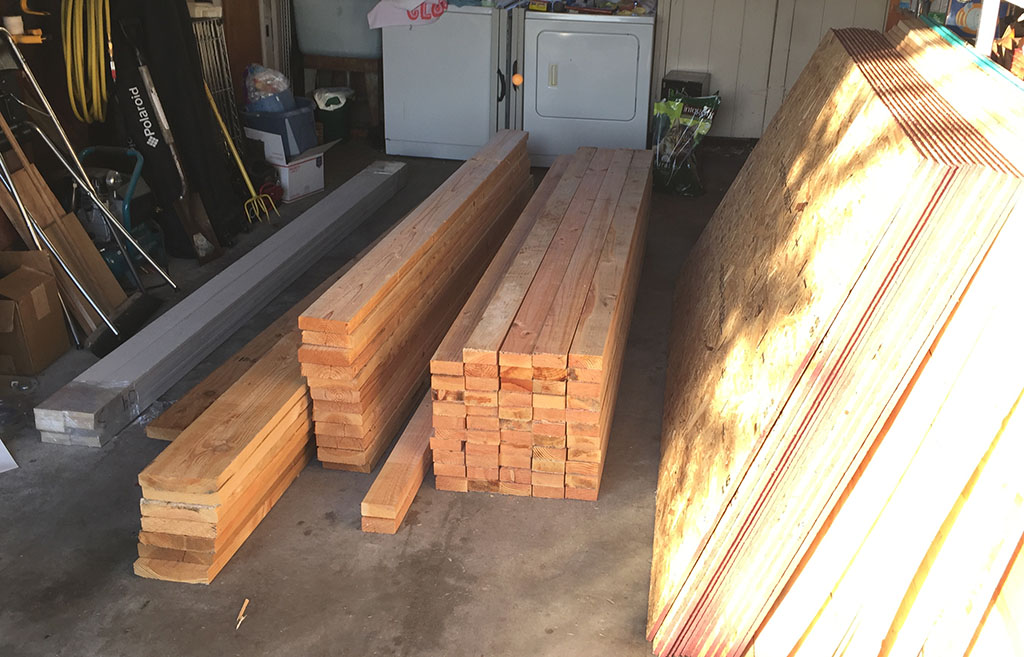
On a bright and sunny Saturday morning, I started with this pile of lumber, a mixture of 2x4s, 2x6s, 2x8s, some chip board sheet goods and some trim boards:
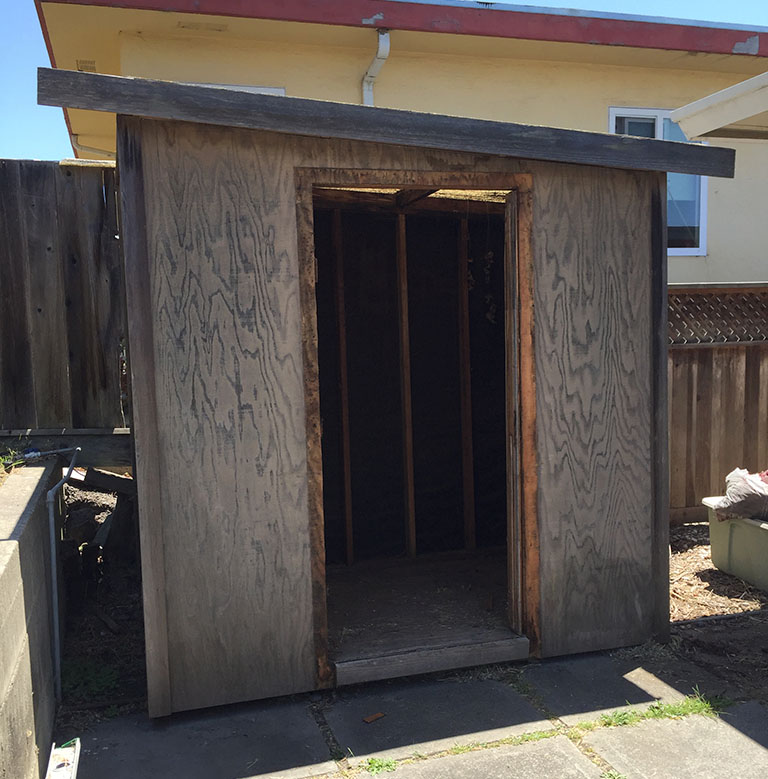
Here’s the old shed that I was replacing. I forgot to get a picture before I started tearing it down, so here it is after I already removed the door (it was an interior door that had warped and was coming apart from getting wet over the years).
After demolishing the old shed, I cleared and leveled out the area underneath. The helpful assistant dog also gave it a very thorough sniffing.

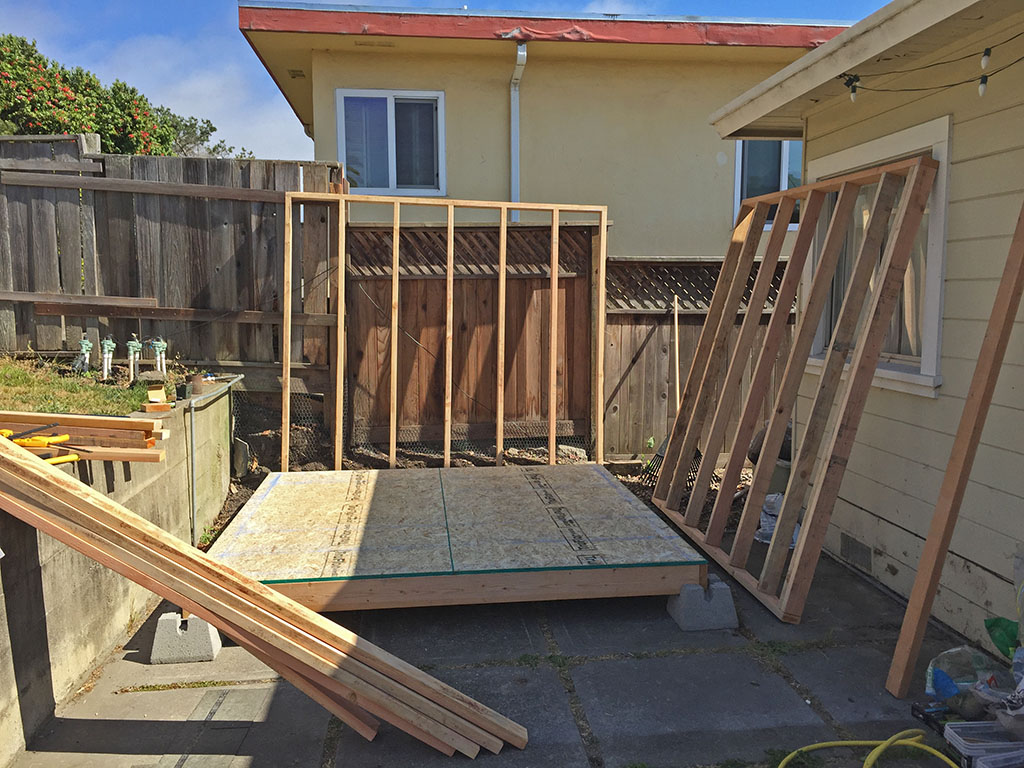
I used deck footers as my ‘foundation’ since I didn’t want to pour concrete and wanted to get it up above the ground just a bit. These were readily available at the local big box store and seemed well suited to the job. I used compacting gravel under the back two blocks, in order to get everything level and square.

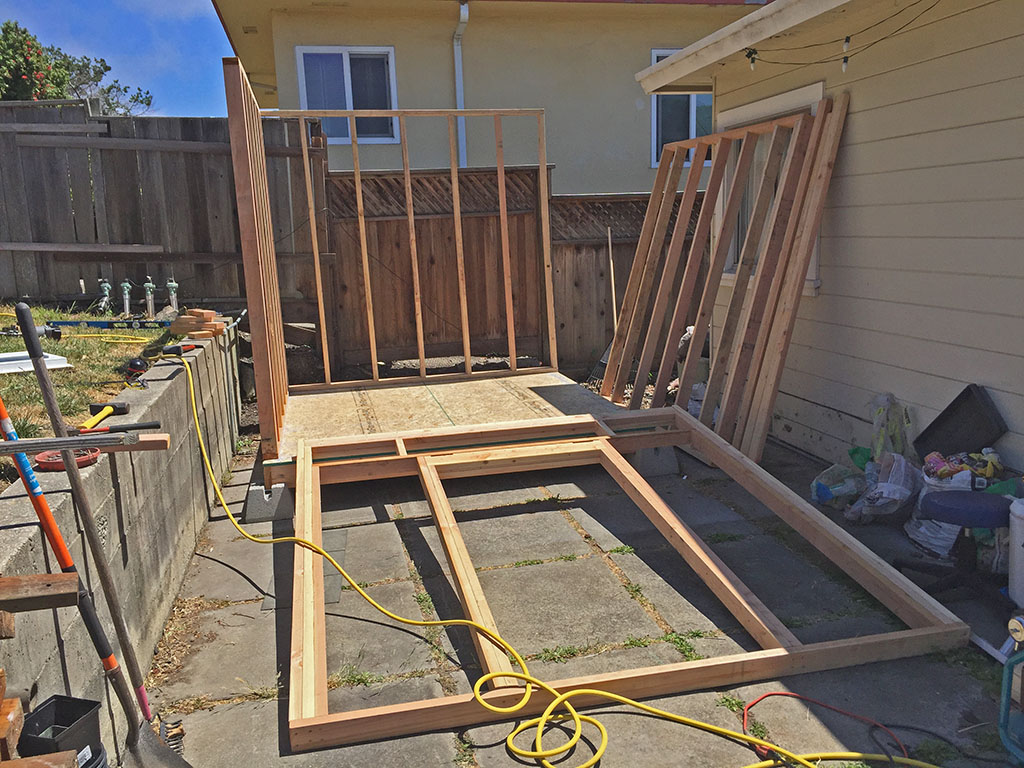
Here you can see the framing well under way. It’s pretty much put together like a house, which is probably way more than I needed for a shed, but I’m a fan of over-engineering. I figure that if I build it strong the first time, I won’t have to fix it later.
It was around this time that I discovered how heavy all the green lumber was, when it was all nailed together into a wall. Most of my previous building experience had been using kiln-dried lumber from Home Depot, which is significantly lighter, since all the water has been cooked out. I didn't realize that the standard from a lumber yard was going to be 'green' lumber, meaning that it hasn't been dried, so still has all that water in it. This makes it heavier and also means that it'll shrink a bit as it dries.
You might also notice the bright yellow pneumatic hose in this photos. I already had an air compressor, so I bought a fairly inexpensive framing nailer and I cannot recommend it enough! There is no way my arm would have held up to pounding in that many nails by hand (did I mention that I sit in front of a computer all day?).
This is the one that I purchased and it served me well: https:www.amazon.com/gp/product/B0032JTDPO
It’s also worth noting that for the most part, I was building this by myself. There were a few occasions that I found myself unable to lift, stabilize and square-up walls all by myself, so I dragged my wife out to help a bit, but generally it was just me putting this thing together.
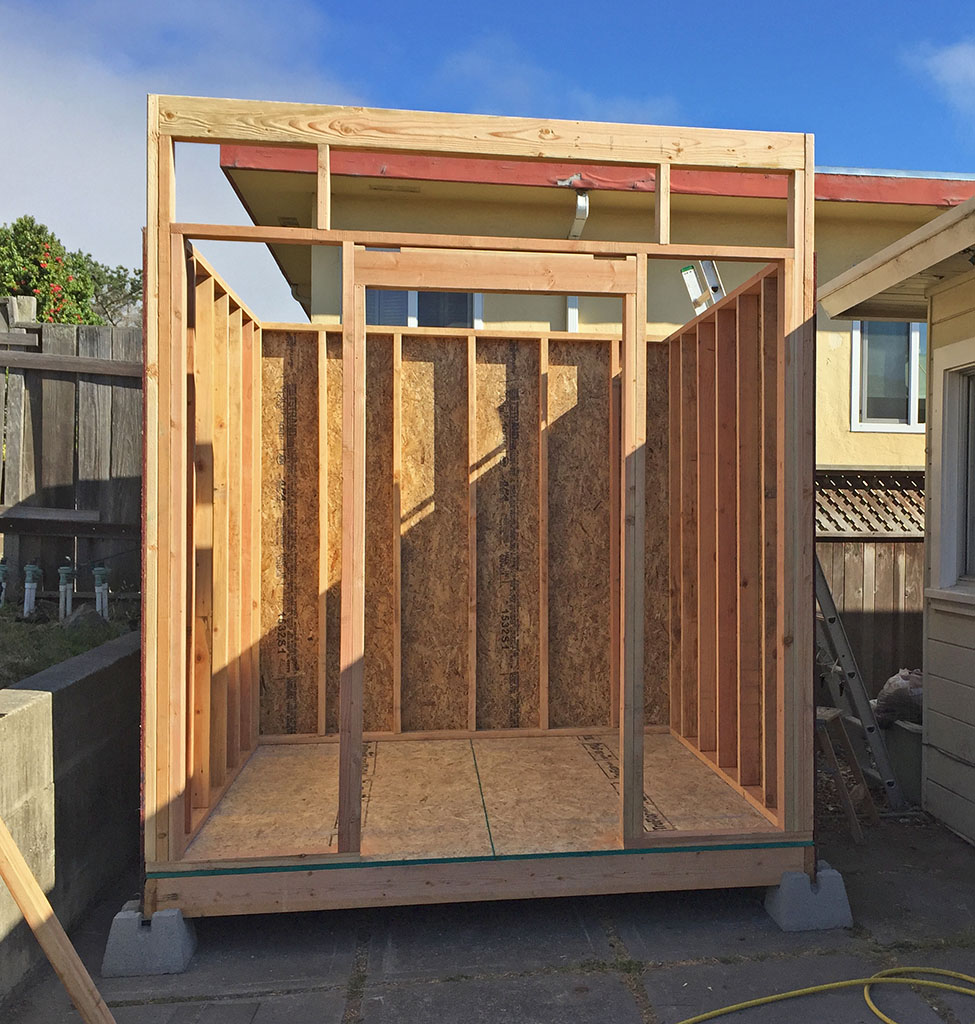
Here you can see the walls framed and some sheathing attached. What is also of note here is that you can see how the area above the doorway was altered from the plans in order to accommodate the single window that I found at the store.
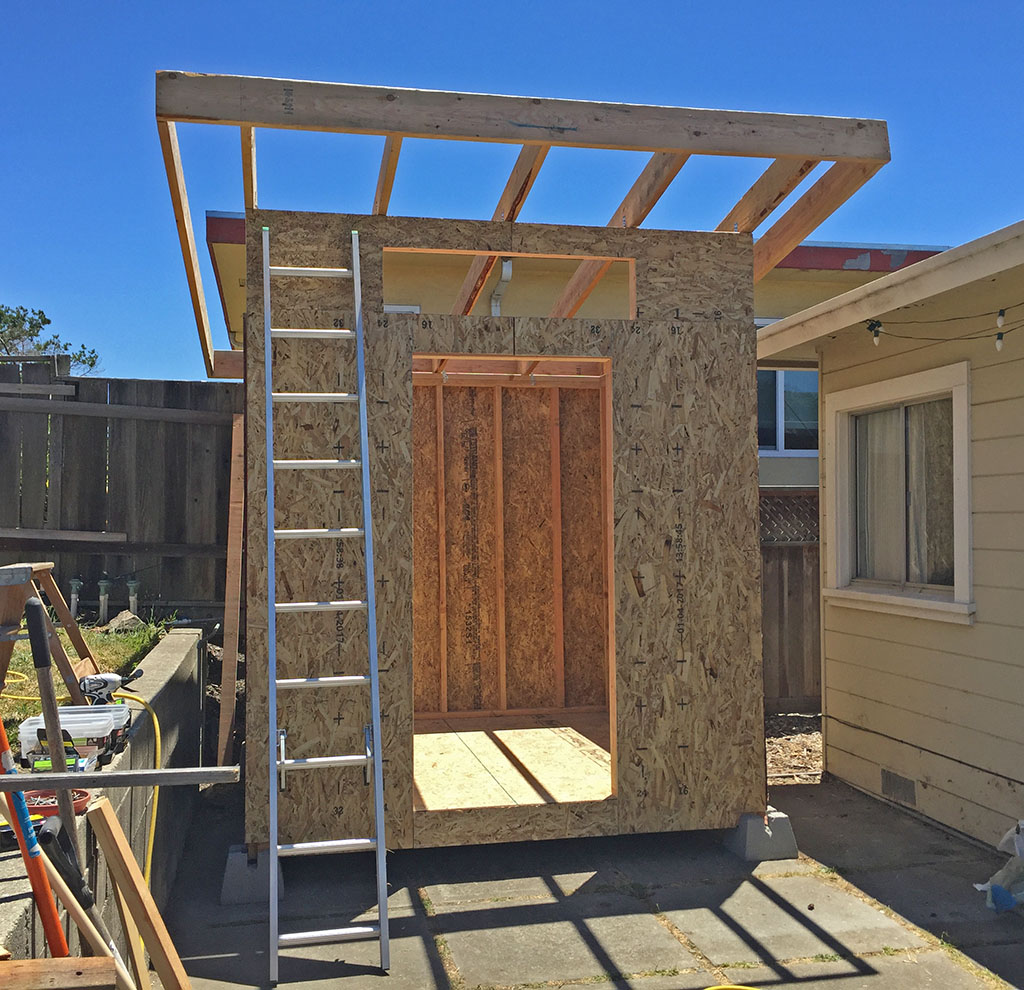
Getting the rafters in place for the roof was probably the hardest part of this whole project. It turns out that a 12’ long green 2x8 is HEAVY. Most of the boards could be propped up and then dragged up and into place, but the front, back and outside ones were tricky. I ended up screwing a few temporary brackets onto the end of the rafters so that I had a support for the front and back boards. With my wife’s help, I could get them propped up in place well enough to be able to put in a few nails and get things secured. I was definitely sore after this day was done.
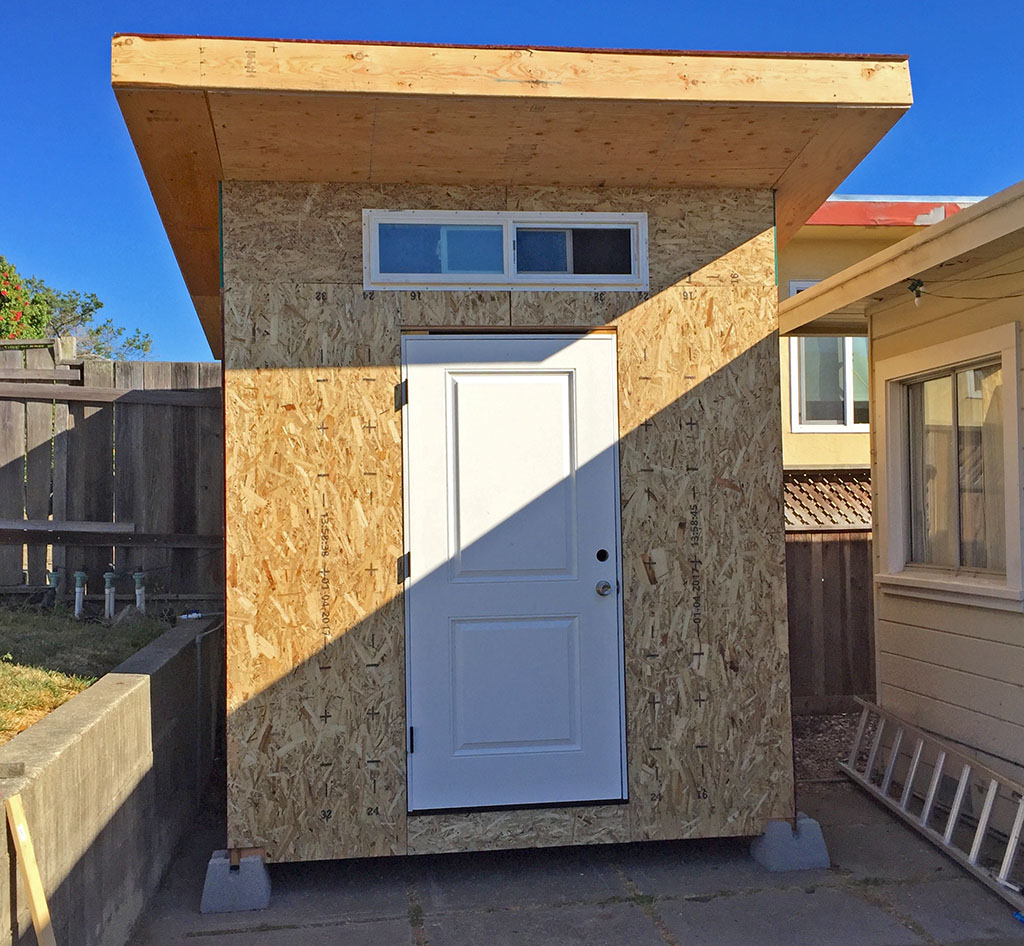
Here you can see the door and window installed and the soffits installed under the edges of the roof. This was also about the stage that I realized I goofed in a few ways on the roof. The sheer act of getting the boards in place was so hard that I forgot to measure the diagonals and make sure it was square, so it ended up just a bit off, which resulted in some gaps in the roof surface. I also accidentally made the roof stick out about 6” too far on each side, but I don’t mind the way it looks, so no worries there
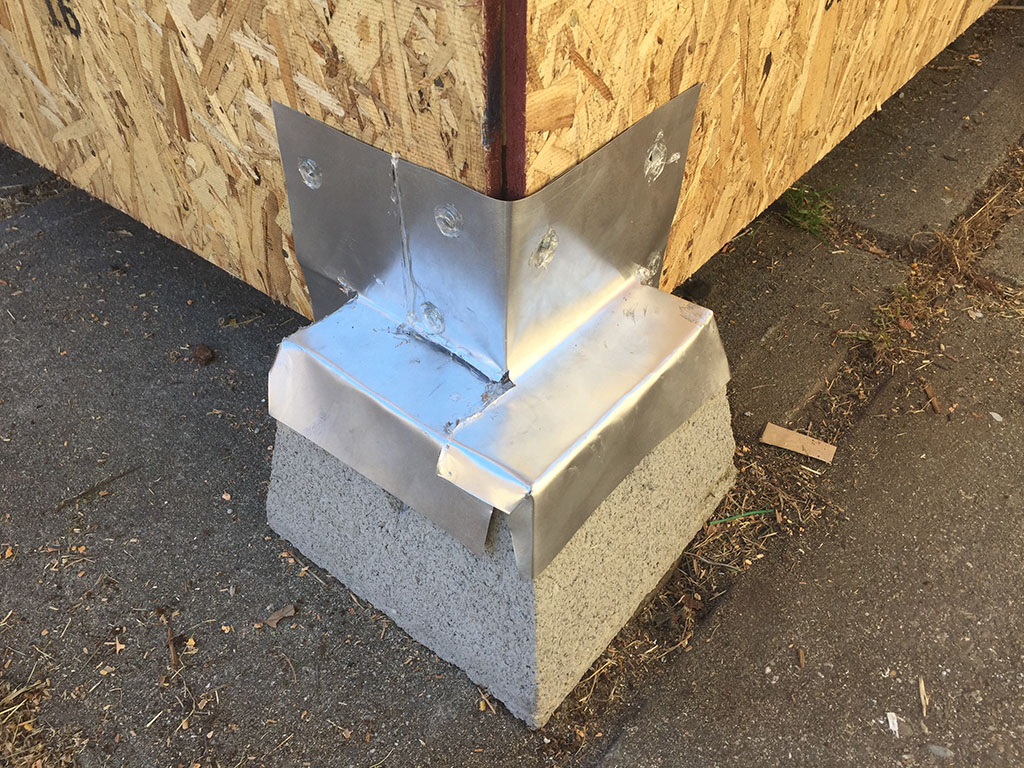
Here you can see my makeshift flashing to keep water from pooling in the footers and soaking into the floor frame. In hindsight, it probably would have been better to use pressure-treated lumber for the floor framing. This was just some aluminum roof flashing and a whole lot of flashing sealer to hold it all together.
For the roof, I put down a water/ice barrier layer and then standard shingles. There was also a drip edge involved and a bunch of nails. Once again, probably far more than needed for this shed, but hopefully I’ll move away before it ever needs replacing.

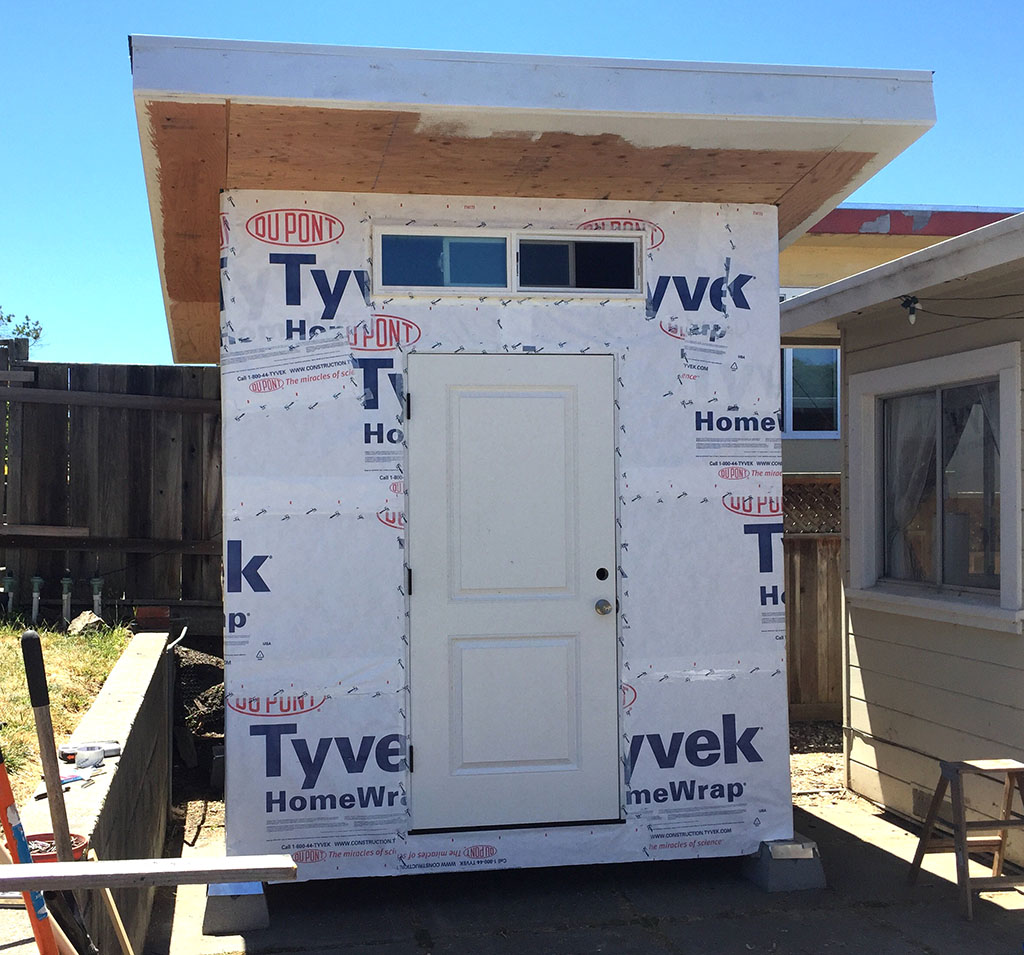
A quick wrap to make it generally weather-proof. There are also some intake vents on the lower right side and you’ll see the roof vents in the finished photo as well.
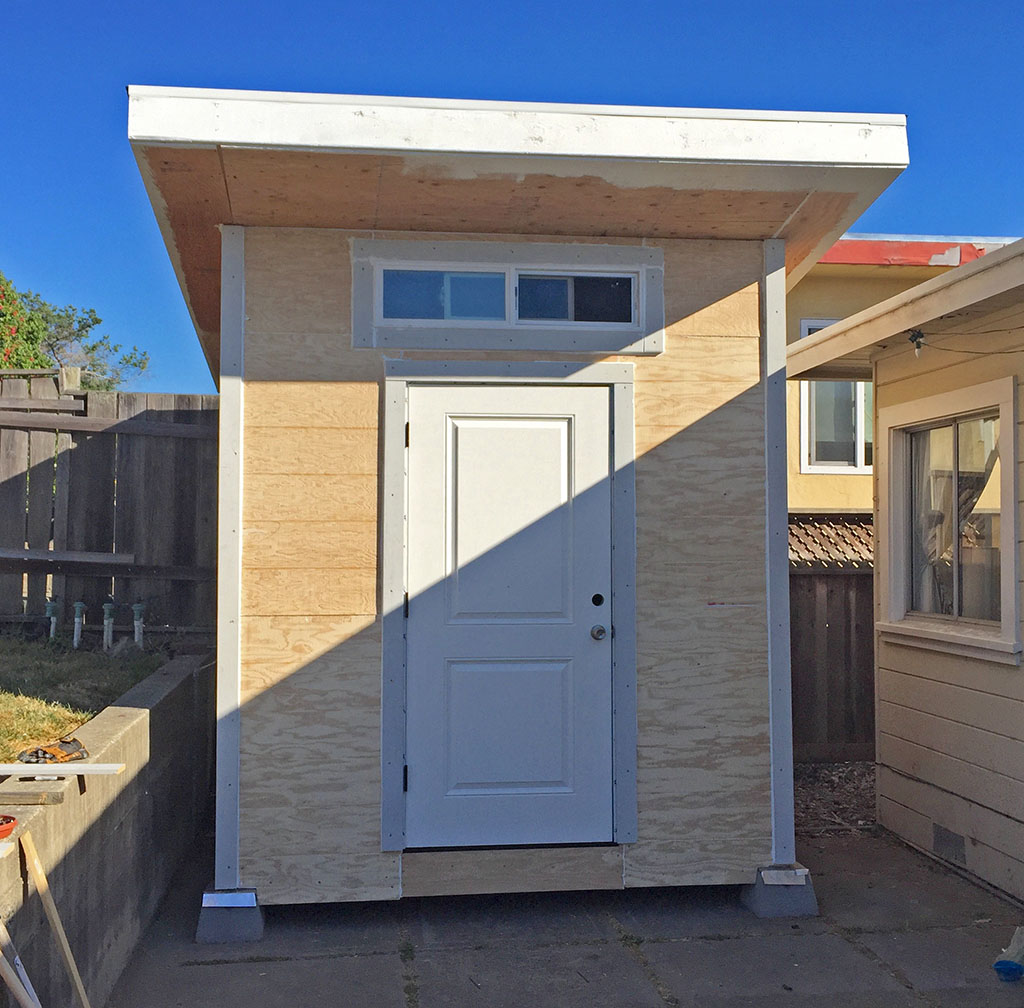
Finally, some basic siding and trim installed. The siding was just a cheap plywood kinda stuff that had a horizontal line pattern that was similar to the house.
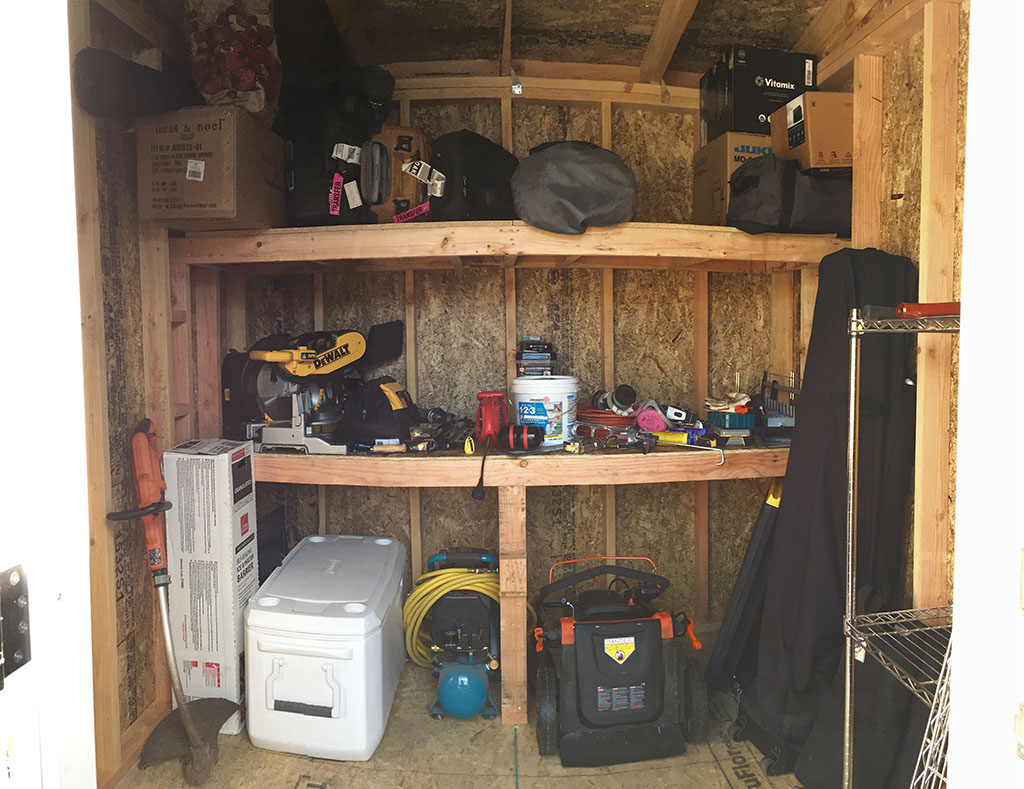
Here’s the interior of the shed and you can see the couple of shelves that I made out of a few extra 2x4’s that I had around. This was just to give me a place to store things like suitcases up out of the way and for a basic work surface, in case I needed it. Although, in practice, that lower shelf has just been more storage rather than any sort of work space.
Here’s the whole thing, primed, locks installed and some simple steps in place.
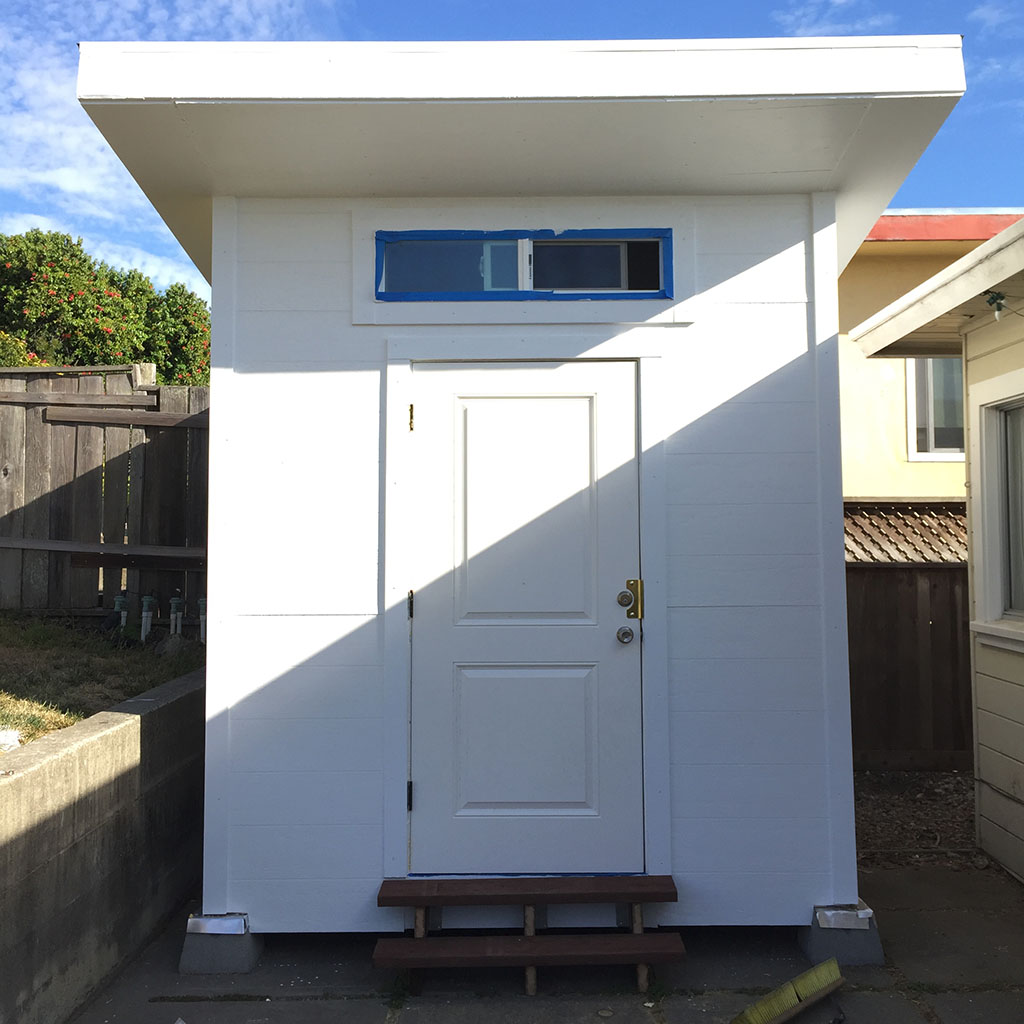
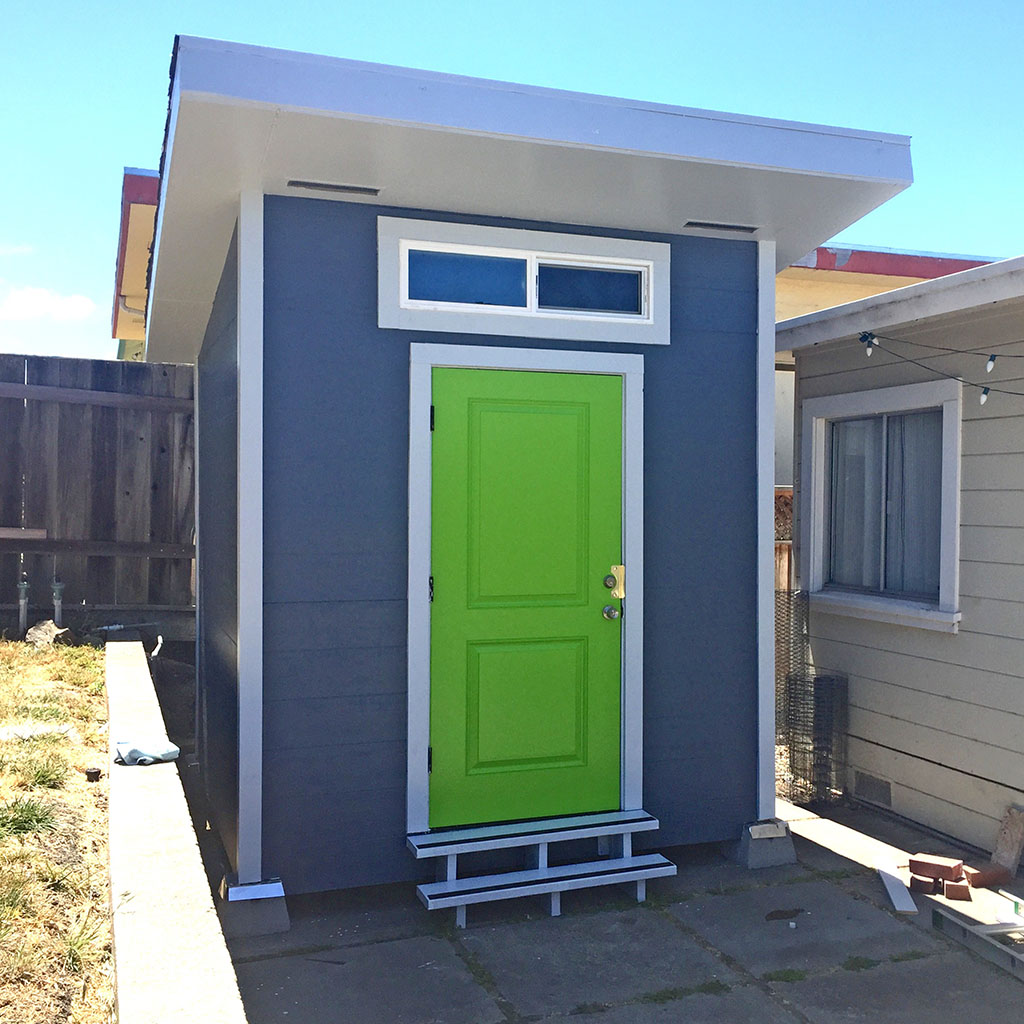
The finished product! Here you can see the soffit vents in place and the colors we went with. This also allowed us to test out a color scheme that we were thinking about for the house, which was fantastic, as we ended up using a darker shade for the trim and also going down a sheen level for both the primary and trim paints.
So far, this shed has lasted two years without collapsing, so I’m going to call it a win!
Thanks for reading!
While there are lots of great shed solutions out there, such as TuffShed, that allow you to purchase a kit and put it together yourself, I was pretty specific about what I wanted in a shed and it wasn’t a kit. I really wanted something that had a bit of a mid-century look to it, in order to match our 1951 house and I had a pretty specific space in which to fit this shed.
Although I build lots of buildings for movies, that in no way translates into me knowing how to actually build a building in my back yard. Accordingly, I spent some time hunting for plans online and ended up purchasing a set of plans from https://www.icreatables.com/ for their ‘8x8 Modern Shed’ Once I had those in hand, I had to do a bit of reconciling against my actual needs shed-wise and what I was willing to spend on said shed. I didn’t need nearly as many windows as the plans called for, both because I didn’t want people to be able to see what I was storing in the shed and because I didn’t want to have to buy a bunch of new windows. I did, however have a store nearby that sells used and surplus doors, windows and misc construction things.
With my measurements in hand, I went to the store, and found a door that was the proper size and a single sliding window that I could adapt to fit above the door, mostly for light and ventilation purposes. I placed an order at a nearby lumber store and a few days later they dropped off about a million pounds of wood in front of our house, which my amazing wife dragged into the garage while I was at work.
In all, it took me something like 9 days of solid work to tear down the old shed and build up the new one, which was about 5 days longer than I was expecting. Learning!
On a bright and sunny Saturday morning, I started with this pile of lumber, a mixture of 2x4s, 2x6s, 2x8s, some chip board sheet goods and some trim boards:
Here’s the old shed that I was replacing. I forgot to get a picture before I started tearing it down, so here it is after I already removed the door (it was an interior door that had warped and was coming apart from getting wet over the years).
After demolishing the old shed, I cleared and leveled out the area underneath. The helpful assistant dog also gave it a very thorough sniffing.
I used deck footers as my ‘foundation’ since I didn’t want to pour concrete and wanted to get it up above the ground just a bit. These were readily available at the local big box store and seemed well suited to the job. I used compacting gravel under the back two blocks, in order to get everything level and square.
Here you can see the framing well under way. It’s pretty much put together like a house, which is probably way more than I needed for a shed, but I’m a fan of over-engineering. I figure that if I build it strong the first time, I won’t have to fix it later.
It was around this time that I discovered how heavy all the green lumber was, when it was all nailed together into a wall. Most of my previous building experience had been using kiln-dried lumber from Home Depot, which is significantly lighter, since all the water has been cooked out. I didn't realize that the standard from a lumber yard was going to be 'green' lumber, meaning that it hasn't been dried, so still has all that water in it. This makes it heavier and also means that it'll shrink a bit as it dries.
You might also notice the bright yellow pneumatic hose in this photos. I already had an air compressor, so I bought a fairly inexpensive framing nailer and I cannot recommend it enough! There is no way my arm would have held up to pounding in that many nails by hand (did I mention that I sit in front of a computer all day?).
This is the one that I purchased and it served me well: https:www.amazon.com/gp/product/B0032JTDPO
It’s also worth noting that for the most part, I was building this by myself. There were a few occasions that I found myself unable to lift, stabilize and square-up walls all by myself, so I dragged my wife out to help a bit, but generally it was just me putting this thing together.
Here you can see the walls framed and some sheathing attached. What is also of note here is that you can see how the area above the doorway was altered from the plans in order to accommodate the single window that I found at the store.
Getting the rafters in place for the roof was probably the hardest part of this whole project. It turns out that a 12’ long green 2x8 is HEAVY. Most of the boards could be propped up and then dragged up and into place, but the front, back and outside ones were tricky. I ended up screwing a few temporary brackets onto the end of the rafters so that I had a support for the front and back boards. With my wife’s help, I could get them propped up in place well enough to be able to put in a few nails and get things secured. I was definitely sore after this day was done.
Here you can see the door and window installed and the soffits installed under the edges of the roof. This was also about the stage that I realized I goofed in a few ways on the roof. The sheer act of getting the boards in place was so hard that I forgot to measure the diagonals and make sure it was square, so it ended up just a bit off, which resulted in some gaps in the roof surface. I also accidentally made the roof stick out about 6” too far on each side, but I don’t mind the way it looks, so no worries there
Here you can see my makeshift flashing to keep water from pooling in the footers and soaking into the floor frame. In hindsight, it probably would have been better to use pressure-treated lumber for the floor framing. This was just some aluminum roof flashing and a whole lot of flashing sealer to hold it all together.
For the roof, I put down a water/ice barrier layer and then standard shingles. There was also a drip edge involved and a bunch of nails. Once again, probably far more than needed for this shed, but hopefully I’ll move away before it ever needs replacing.
A quick wrap to make it generally weather-proof. There are also some intake vents on the lower right side and you’ll see the roof vents in the finished photo as well.
Finally, some basic siding and trim installed. The siding was just a cheap plywood kinda stuff that had a horizontal line pattern that was similar to the house.
Here’s the interior of the shed and you can see the couple of shelves that I made out of a few extra 2x4’s that I had around. This was just to give me a place to store things like suitcases up out of the way and for a basic work surface, in case I needed it. Although, in practice, that lower shelf has just been more storage rather than any sort of work space.
Here’s the whole thing, primed, locks installed and some simple steps in place.
The finished product! Here you can see the soffit vents in place and the colors we went with. This also allowed us to test out a color scheme that we were thinking about for the house, which was fantastic, as we ended up using a darker shade for the trim and also going down a sheen level for both the primary and trim paints.
So far, this shed has lasted two years without collapsing, so I’m going to call it a win!
Thanks for reading!