
April 2016
Inc Project
04 - April - 2016 - 10:18
A little while back, I put the Ferrari Enzo project aside so that I could try something new.
A good friend of mine, Neil Blevins, along with Bill Zahn, Stephan Bugaj, and a collection of concept art all-stars, have been working on an ‘art of’ book of sorts. For those unfamiliar, an ‘art of’ book is usually a book that contains the concept art for a film, television series, or something similar, i.e. ‘The Art of Inside Out’ or ‘The Art of Game of Thrones.’ The big difference here is that this book is full of art for a production that has not yet been made. They’ve been painting images and writing a story for a few years and this presented an opportunity for me to add my own bit of flavor to the mix.
I’d been interested in trying my hand at producing a garage resin model kit for a while, so that I could learn a bit more about the process. I talked to Neil about such a project and we decided that I would take his digital 3d model of the main character, who is a can-shaped robot, and see if I could turn it into a model kit. This blog post is about some of that process.
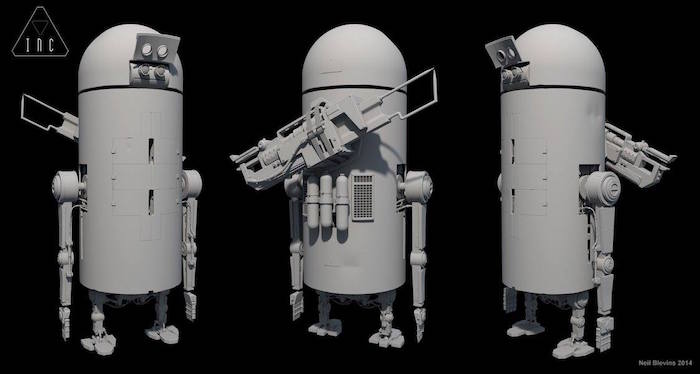
First off, I received a 3d file from Neil, which was the version of the main character that he was using to digitally render images from. It was set up to look good in pictures, but had lots of fine detail and various features that would be tricky to turn into physical object. Neil and I had agreed that we’d like to aim for a completed model that was 8-10 inches tall, which meant roughly 1/18 scale for this character (it was meant to be a pretty large robot). So, it fell to me to take his digital 3d model and figure out how to shrink it down, alter it and cut it up so that it could both be 3d printed and then replicated in resin, and then actually print it, clean up the prints, make molds of the parts, make castings from those molds and finally put at least one kit together so that Neil could put images of it into the book that they were working on.
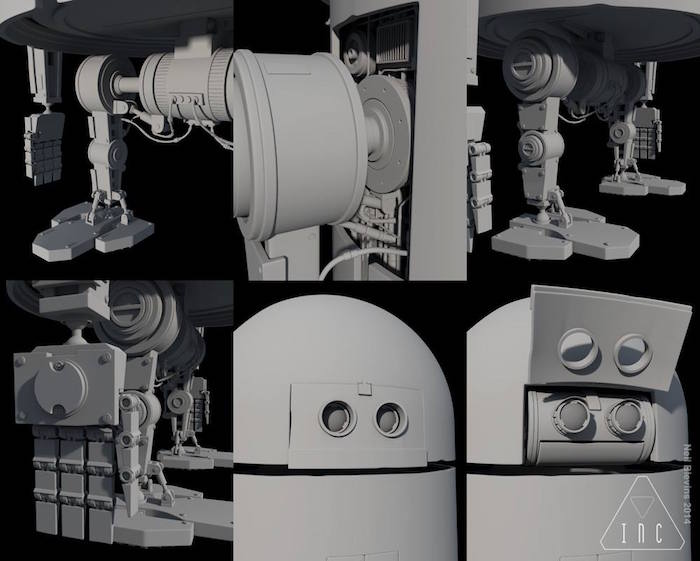
Here are a few views of the digital model that I was working from.
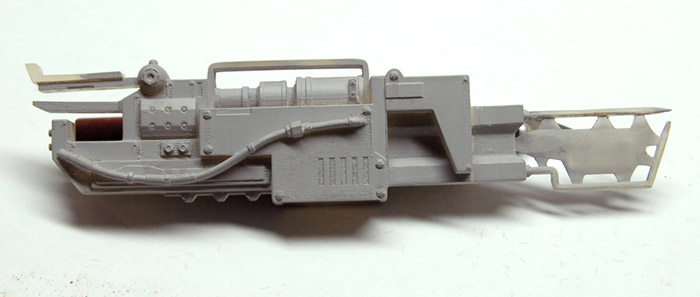
Before jumping into the bulk of the work, I did a bit of a test. The robot had a weapon of sorts that was part gun and part spot welder. It was a fairly complex shape, with both thick and thin areas and would make a decent trial for the printing, clean up and mold making. After a few additions in the 3d file, to bridge some gaps, add some support and make it a little more mold friendly (less undercuts), I had the gun printed at Shapeways. Below you can see the print I got back, sprayed with an initial coat of primer.
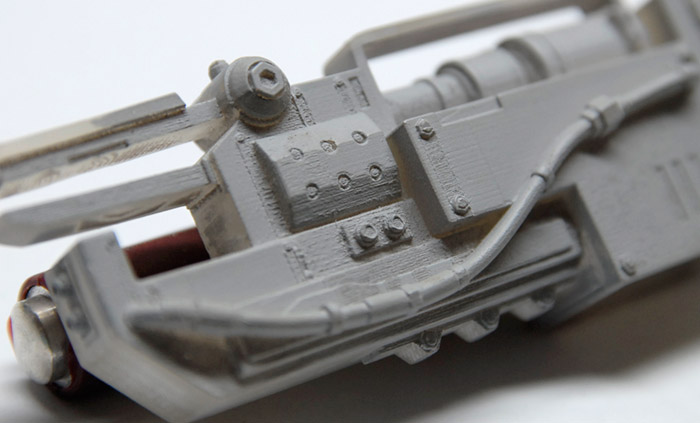
The print itself was a little rough in a few areas, so it required a few cycles of priming and sanding, in order to fill in and smooth out the striations that the printing left behind. Below you can see a close up of one such area and the ridges on the flat surfaces that should be smooth.
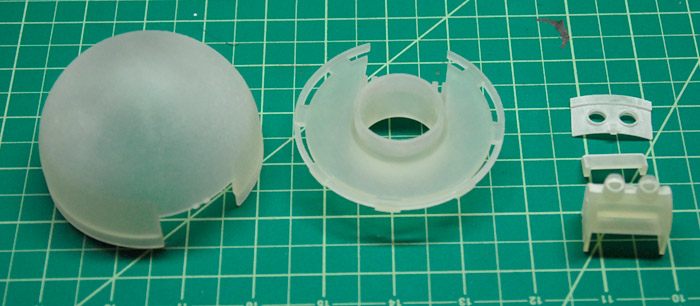
With that test done, and a few lessons learned (how to keep print costs down, basic mold pouring techniques learned, etc), I moved on to a few more pieces. Below you can see the head, split into three parts, as they arrived from the printer. They come in a clear plastic that makes it difficult to see the texture from the printing process. This is why I primed the parts before sanding, as otherwise it was nearly impossible to see if the surface was smooth or not.
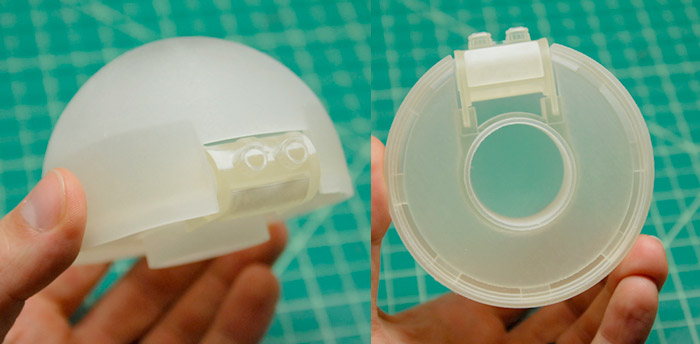
Here is how they go together, just press-fit in this photo:
Once the long and dull process of prepping all of the parts for mold making was complete, I split the mold making process into two main groups: single-piece molds and two-piece molds. The single-piece molds are for relatively flat parts, that only have detail on one side. The parts can be attached to a board, have a little box built around them and the silicon poured over them. The two-piece molds are for parts that have detail all around them. Those are more complicated to make molds for and require a form be built up around them with something like clay, defining where the mold seam will be. A pour spout and registration indentations need to be added so that the mold halves align and there is a place to pour in the resin in the finished mold.
First though, a bit about this process: Since the intent here is to make resin castings, using silicon rubber as the mold material, the requirements are a little different than if I were making molds for something like injection molded plastic kits. The silicon has a great deal of flexibility, so there can be some undercuts on the piece to be cast, and you don’t have to worry about the piece getting stuck in the mold. Also, basic molding and casting with these materials don’t strictly require any special equipment, although the addition of a few small machines can help the quality level a great deal.
In my case, I opted to supplement my process with the addition of a vacuum pump, a vacuum chamber, a pressure vessel and air compressor. I’ll go into more detail on those a bit later.
For the mold making, I started by ordering a box of corrugated plastic sheet. This stuff is commonly used for signs, but it is easy to cut, reasonably strong and inexpensive. For the one-part molds, I simply put a sheet down, hot-glued my parts to the sheet, and then built little walls around each part that would hold in the silicon. Those walls were hot-glued to the base and any gaps sealed up with more hot glue.
From what I had read, the mold should be at least 3/4” thick from the highest bit of the part being cast. I measured and marked on the walls of each box so I knew where to pour to. Now, when pouring a silicon mold, you’ll get the best mold quality if you eliminate bubbles from the silicon. Additionally, if you would like to pressure cast later on, you MUST get rid of the air bubbles in the silicon or they will give you a bumpy surface on your casting. There are a few ways to eliminate or minimize bubbles: pouring slowly into one corner of the mold (easy way, but not good for pressure casting), and vacuum degassing (harder, requires equipment, but good for pressure casting).
There is lots of information out there about mold making with silicon and casting with resin, so I’ll gloss over most of this. See the end of this post for links to various information sources to learn more.
The executive summary is that pouring your silicon from a little bit of a height (maybe 6 inches) and fairly slowly prevents bubbles from forming around your object, so you get good fidelity, but it does not prevent bubbles from forming in the silicon itself. So, if you are going to just pour resin into your mold and let it cure, this works just fine. If you are intending to pressure cast, you’ll need to get all the bubbles out of the silicon as well, so that requires another step: vacuum degassing. This is the technique of putting your mixed silicon under vacuum so that all the air bubbles expand and rise to the top, leaving your silicon bubble-free. If you skip this step, and pressure cast later, you’ll get what are commonly called ‘measles’ on the casting. These are when the bubbles in the silicon shrink under the pressure, and make little bumps on the casting, which you have to clean up later.
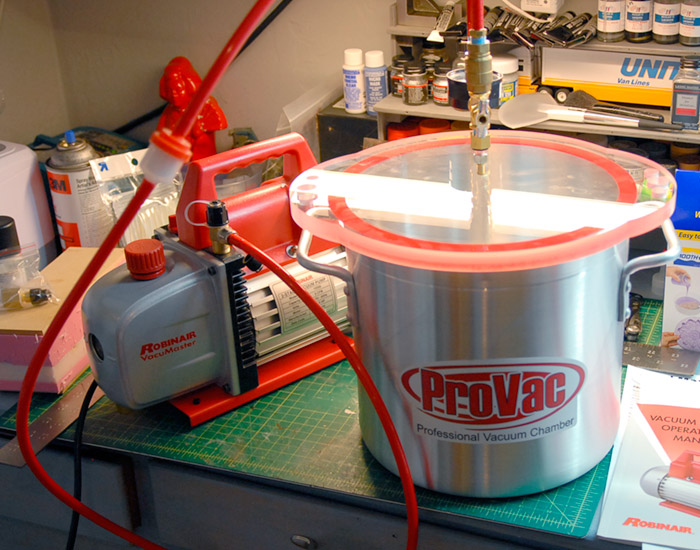
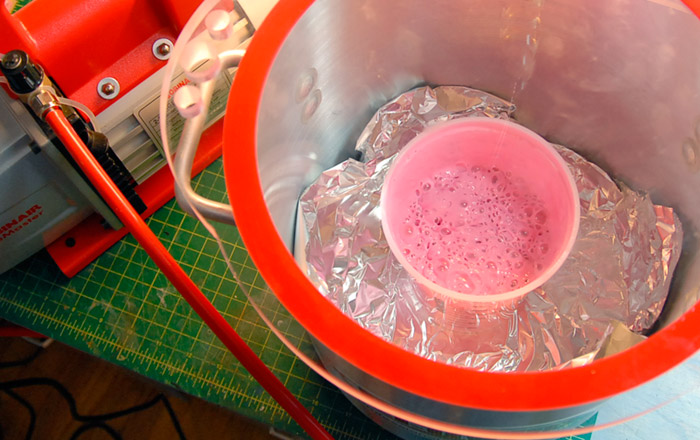
Since my goal was to be able to make the highest quality parts possible, I decided to invest in a bit of new equipment. This consisted of a vacuum chamber and a vacuum pump. This allows me to mix up a batch of silicon, put it into the vacuum chamber, place it under vacuum for a few minutes, watch all the air bubble out, and THEN pour it into my mold forms. Below you can see my setup and a batch of silicon bubbling away under vacuum.
After the single-piece molds were poured and cured, and a test casting or two had been done, it was time to move on to the larger and more complex multi-piece molds. For these, I got a box of water-based clay to use to build up half of each mold. Below you can see the arms and legs in their molds, ready for the first part to be poured. You can see how there are a few divots and grooves to be used for registration as well as little lumps that will be the pour spouts at the top of each part. You can also see the final state of the 3d printed parts, after they had been sanded and primed a few times and then finally had a gloss clear coat sprayed onto them, in order to get a smoother finish on the cast parts.
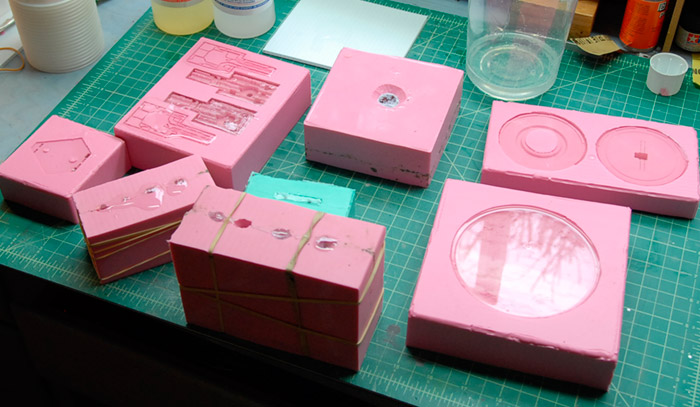
After pouring the first half, the molds are pulled off of their bases (but the sides left in place), the water-based clay washed away, some mold release agent sprayed on, and the other half of the mold poured. Below you can see a bunch of the other pieces ready for their second mold halves to be poured. On the lower left you can see the feet and their pour spouts that are plastic instead of clay, and the face plate and mouth in the center lower row, where I’m connecting two parts in one mold for faster casting later.
For the largest parts, including the two halves of the body and the head dome, the molds were still just two parts, but they required a bit more engineering in order to be sure that they could support their own weight later on. My fear was that if they were not thick enough, they would sag and close off the narrow space between the two halves of the mold, thinning the final part. For a few of the halves, I ended up enclosing a few scrap metal rods inside the mold in order to add support, which seemed to work decently.
Below you can see the head dome, getting prepped for pouring the first half of the mold.
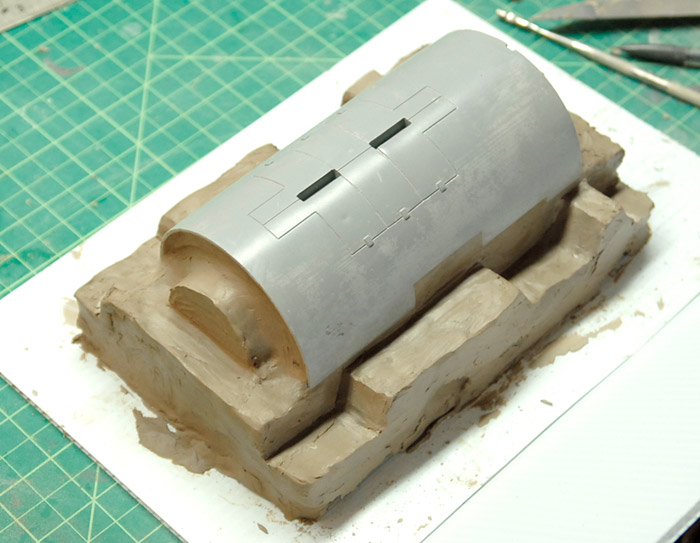
Similarly, one of the body halves, on its little bed of clay, ready for mold walls and some silicon.
Once the molds were made, I did a bit of testing with casting. First off, I tried to pour some resin into my new molds to see how it turned out without using any fancy tricks. Below you can see some freshly-poured resin, which pours clear and turns opaque white as it cures.
What I discovered is that while this lazy casting works pretty well for the larger, thicker parts, it doesn’t work as well for the smaller thinner things. Air bubbles tended to get trapped in the thinner parts, resulting in unusable castings. So, the next step was to move on to pressure casting. This entails pouring resin into the molds and then putting those molds into a pressure chamber and cranking up the pressure. This both pushes the resin down into the molds and also compresses any bubbles down to tiny sizes, making them much less of an issue. If this is combined with vacuum degassing of the resin, you get the best of both worlds, with nearly bubble-free resin squished down into the molds.
While I don’t have any good pictures of my pressure casting setup, it was decidedly DIY. I purchased an inexpensive pressure chamber (from Harbor Freight) that is intended for painting and then did all the things that the warning labels tell you not to do. I took most all of the fittings off of it, plugged up most of the holes, and removed the paint intake tube. The end result being a pressure pot that has a fitting to attach an air hose, a pressure gauge, and a valve that can vent the chamber. Combine this with an average-power air compressor and I’ve got a pressure casting setup!
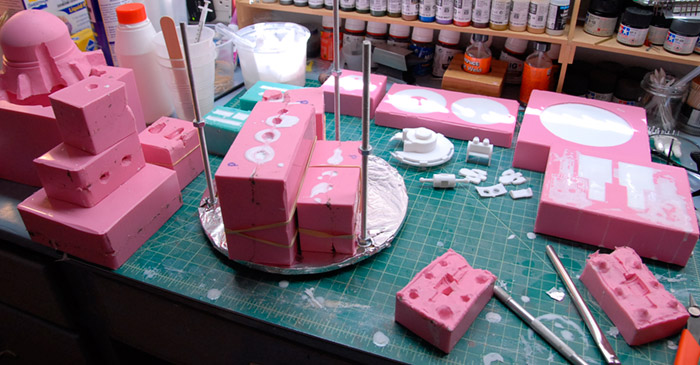
The tricky part here was that the resin I was using has a pot life (time between mixing and curing) of about 7 minutes, during which I needed to vacuum degas the resin, pour it into the molds (which was complicated in a few cases), and then get it into the pressure chamber and under pressure, all before it starts to thicken. To help pack the most into the pressure chamber (which wasn’t very large), I built a little shelf that I could load up and drop into the pot. It was just a couple round pieces of wood held apart by long threaded rods with some nuts on them. Below you can see the shelf (with the top shelf removed), and various molds, after removal from the pressure pot.
This allowed me, if everything went perfectly, to make one kit worth of parts in three cycles of the pressure chamber. Unfortunately, there are a few parts that are tricky to get good castings of (like the hands), so often I’ve got to try those a couple of times in order to get a set of good parts.
That’s the basics of my adventure in building up a model kit on my own. Keep an eye out for a near-future blog post with a bit about the finished parts, some casting tricks and photos of the first finished model in grey primer.
Thanks for reading!
A good friend of mine, Neil Blevins, along with Bill Zahn, Stephan Bugaj, and a collection of concept art all-stars, have been working on an ‘art of’ book of sorts. For those unfamiliar, an ‘art of’ book is usually a book that contains the concept art for a film, television series, or something similar, i.e. ‘The Art of Inside Out’ or ‘The Art of Game of Thrones.’ The big difference here is that this book is full of art for a production that has not yet been made. They’ve been painting images and writing a story for a few years and this presented an opportunity for me to add my own bit of flavor to the mix.
I’d been interested in trying my hand at producing a garage resin model kit for a while, so that I could learn a bit more about the process. I talked to Neil about such a project and we decided that I would take his digital 3d model of the main character, who is a can-shaped robot, and see if I could turn it into a model kit. This blog post is about some of that process.
First off, I received a 3d file from Neil, which was the version of the main character that he was using to digitally render images from. It was set up to look good in pictures, but had lots of fine detail and various features that would be tricky to turn into physical object. Neil and I had agreed that we’d like to aim for a completed model that was 8-10 inches tall, which meant roughly 1/18 scale for this character (it was meant to be a pretty large robot). So, it fell to me to take his digital 3d model and figure out how to shrink it down, alter it and cut it up so that it could both be 3d printed and then replicated in resin, and then actually print it, clean up the prints, make molds of the parts, make castings from those molds and finally put at least one kit together so that Neil could put images of it into the book that they were working on.
Here are a few views of the digital model that I was working from.
Before jumping into the bulk of the work, I did a bit of a test. The robot had a weapon of sorts that was part gun and part spot welder. It was a fairly complex shape, with both thick and thin areas and would make a decent trial for the printing, clean up and mold making. After a few additions in the 3d file, to bridge some gaps, add some support and make it a little more mold friendly (less undercuts), I had the gun printed at Shapeways. Below you can see the print I got back, sprayed with an initial coat of primer.
The print itself was a little rough in a few areas, so it required a few cycles of priming and sanding, in order to fill in and smooth out the striations that the printing left behind. Below you can see a close up of one such area and the ridges on the flat surfaces that should be smooth.
With that test done, and a few lessons learned (how to keep print costs down, basic mold pouring techniques learned, etc), I moved on to a few more pieces. Below you can see the head, split into three parts, as they arrived from the printer. They come in a clear plastic that makes it difficult to see the texture from the printing process. This is why I primed the parts before sanding, as otherwise it was nearly impossible to see if the surface was smooth or not.
Here is how they go together, just press-fit in this photo:
Once the long and dull process of prepping all of the parts for mold making was complete, I split the mold making process into two main groups: single-piece molds and two-piece molds. The single-piece molds are for relatively flat parts, that only have detail on one side. The parts can be attached to a board, have a little box built around them and the silicon poured over them. The two-piece molds are for parts that have detail all around them. Those are more complicated to make molds for and require a form be built up around them with something like clay, defining where the mold seam will be. A pour spout and registration indentations need to be added so that the mold halves align and there is a place to pour in the resin in the finished mold.
First though, a bit about this process: Since the intent here is to make resin castings, using silicon rubber as the mold material, the requirements are a little different than if I were making molds for something like injection molded plastic kits. The silicon has a great deal of flexibility, so there can be some undercuts on the piece to be cast, and you don’t have to worry about the piece getting stuck in the mold. Also, basic molding and casting with these materials don’t strictly require any special equipment, although the addition of a few small machines can help the quality level a great deal.
In my case, I opted to supplement my process with the addition of a vacuum pump, a vacuum chamber, a pressure vessel and air compressor. I’ll go into more detail on those a bit later.
For the mold making, I started by ordering a box of corrugated plastic sheet. This stuff is commonly used for signs, but it is easy to cut, reasonably strong and inexpensive. For the one-part molds, I simply put a sheet down, hot-glued my parts to the sheet, and then built little walls around each part that would hold in the silicon. Those walls were hot-glued to the base and any gaps sealed up with more hot glue.
From what I had read, the mold should be at least 3/4” thick from the highest bit of the part being cast. I measured and marked on the walls of each box so I knew where to pour to. Now, when pouring a silicon mold, you’ll get the best mold quality if you eliminate bubbles from the silicon. Additionally, if you would like to pressure cast later on, you MUST get rid of the air bubbles in the silicon or they will give you a bumpy surface on your casting. There are a few ways to eliminate or minimize bubbles: pouring slowly into one corner of the mold (easy way, but not good for pressure casting), and vacuum degassing (harder, requires equipment, but good for pressure casting).
There is lots of information out there about mold making with silicon and casting with resin, so I’ll gloss over most of this. See the end of this post for links to various information sources to learn more.
The executive summary is that pouring your silicon from a little bit of a height (maybe 6 inches) and fairly slowly prevents bubbles from forming around your object, so you get good fidelity, but it does not prevent bubbles from forming in the silicon itself. So, if you are going to just pour resin into your mold and let it cure, this works just fine. If you are intending to pressure cast, you’ll need to get all the bubbles out of the silicon as well, so that requires another step: vacuum degassing. This is the technique of putting your mixed silicon under vacuum so that all the air bubbles expand and rise to the top, leaving your silicon bubble-free. If you skip this step, and pressure cast later, you’ll get what are commonly called ‘measles’ on the casting. These are when the bubbles in the silicon shrink under the pressure, and make little bumps on the casting, which you have to clean up later.
Since my goal was to be able to make the highest quality parts possible, I decided to invest in a bit of new equipment. This consisted of a vacuum chamber and a vacuum pump. This allows me to mix up a batch of silicon, put it into the vacuum chamber, place it under vacuum for a few minutes, watch all the air bubble out, and THEN pour it into my mold forms. Below you can see my setup and a batch of silicon bubbling away under vacuum.
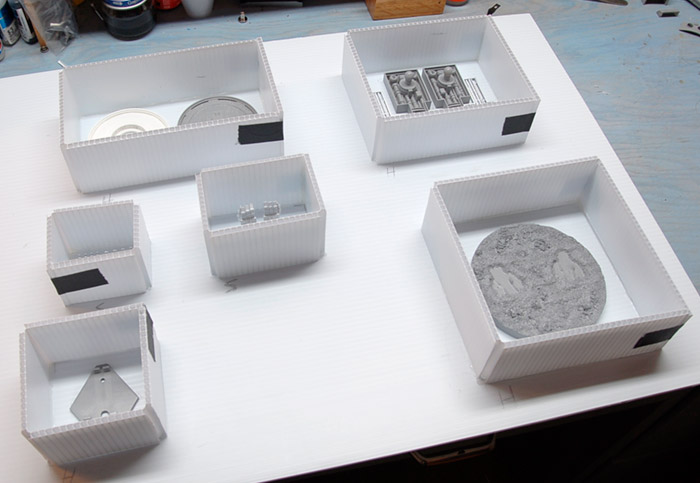
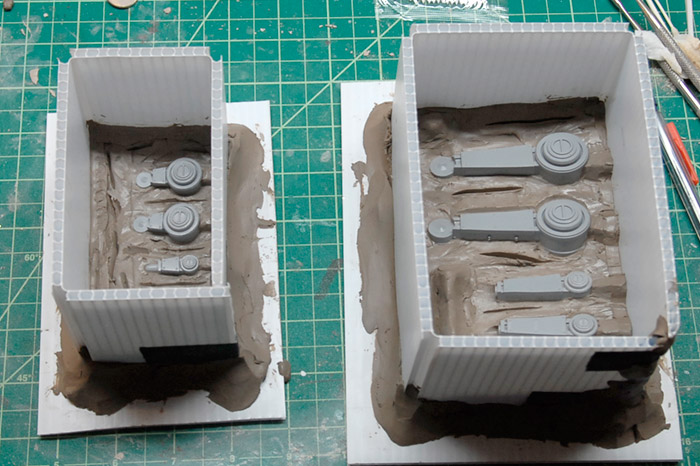
After the single-piece molds were poured and cured, and a test casting or two had been done, it was time to move on to the larger and more complex multi-piece molds. For these, I got a box of water-based clay to use to build up half of each mold. Below you can see the arms and legs in their molds, ready for the first part to be poured. You can see how there are a few divots and grooves to be used for registration as well as little lumps that will be the pour spouts at the top of each part. You can also see the final state of the 3d printed parts, after they had been sanded and primed a few times and then finally had a gloss clear coat sprayed onto them, in order to get a smoother finish on the cast parts.
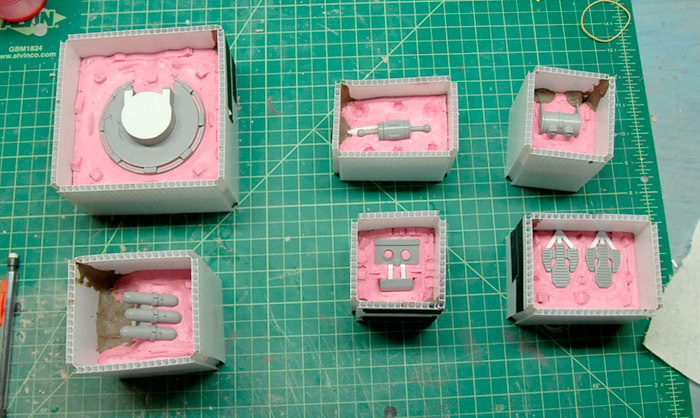
After pouring the first half, the molds are pulled off of their bases (but the sides left in place), the water-based clay washed away, some mold release agent sprayed on, and the other half of the mold poured. Below you can see a bunch of the other pieces ready for their second mold halves to be poured. On the lower left you can see the feet and their pour spouts that are plastic instead of clay, and the face plate and mouth in the center lower row, where I’m connecting two parts in one mold for faster casting later.
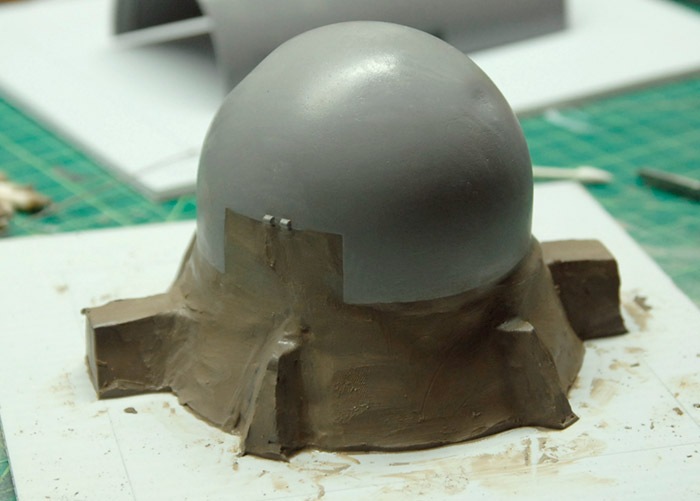
For the largest parts, including the two halves of the body and the head dome, the molds were still just two parts, but they required a bit more engineering in order to be sure that they could support their own weight later on. My fear was that if they were not thick enough, they would sag and close off the narrow space between the two halves of the mold, thinning the final part. For a few of the halves, I ended up enclosing a few scrap metal rods inside the mold in order to add support, which seemed to work decently.
Below you can see the head dome, getting prepped for pouring the first half of the mold.
Similarly, one of the body halves, on its little bed of clay, ready for mold walls and some silicon.
Once the molds were made, I did a bit of testing with casting. First off, I tried to pour some resin into my new molds to see how it turned out without using any fancy tricks. Below you can see some freshly-poured resin, which pours clear and turns opaque white as it cures.
What I discovered is that while this lazy casting works pretty well for the larger, thicker parts, it doesn’t work as well for the smaller thinner things. Air bubbles tended to get trapped in the thinner parts, resulting in unusable castings. So, the next step was to move on to pressure casting. This entails pouring resin into the molds and then putting those molds into a pressure chamber and cranking up the pressure. This both pushes the resin down into the molds and also compresses any bubbles down to tiny sizes, making them much less of an issue. If this is combined with vacuum degassing of the resin, you get the best of both worlds, with nearly bubble-free resin squished down into the molds.
While I don’t have any good pictures of my pressure casting setup, it was decidedly DIY. I purchased an inexpensive pressure chamber (from Harbor Freight) that is intended for painting and then did all the things that the warning labels tell you not to do. I took most all of the fittings off of it, plugged up most of the holes, and removed the paint intake tube. The end result being a pressure pot that has a fitting to attach an air hose, a pressure gauge, and a valve that can vent the chamber. Combine this with an average-power air compressor and I’ve got a pressure casting setup!
The tricky part here was that the resin I was using has a pot life (time between mixing and curing) of about 7 minutes, during which I needed to vacuum degas the resin, pour it into the molds (which was complicated in a few cases), and then get it into the pressure chamber and under pressure, all before it starts to thicken. To help pack the most into the pressure chamber (which wasn’t very large), I built a little shelf that I could load up and drop into the pot. It was just a couple round pieces of wood held apart by long threaded rods with some nuts on them. Below you can see the shelf (with the top shelf removed), and various molds, after removal from the pressure pot.
This allowed me, if everything went perfectly, to make one kit worth of parts in three cycles of the pressure chamber. Unfortunately, there are a few parts that are tricky to get good castings of (like the hands), so often I’ve got to try those a couple of times in order to get a set of good parts.
That’s the basics of my adventure in building up a model kit on my own. Keep an eye out for a near-future blog post with a bit about the finished parts, some casting tricks and photos of the first finished model in grey primer.
Thanks for reading!