
Hobbyboss
F-84e Thunderjet Completion
10 - June - 2013 - 20:42
Picking up where the last post left off, the decal work continued. It was pretty straight-forward, with liberal use of MicroSet and MicroSol to try to get the decals to sink into the panel lines and rivets. This was generally successful, but if you look closely in the finished model galley, you can see a few areas where the decals were a bit stubborn. This was mostly on the large wing insignias and the stars and bars on the sides of the fuselage. I'm just guessing that the white layer was a little tougher than the others, making those decals a bit harder to soften.
With all the decals on, I sprayed the whole jet with a few coats of Testors Flat Clear to kill the gloss and give everything the same sheen. Below you can see the canopy with the masking removed and everything with a nice dull finish.
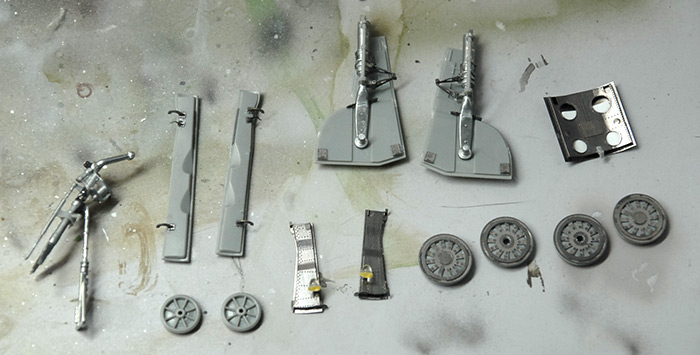
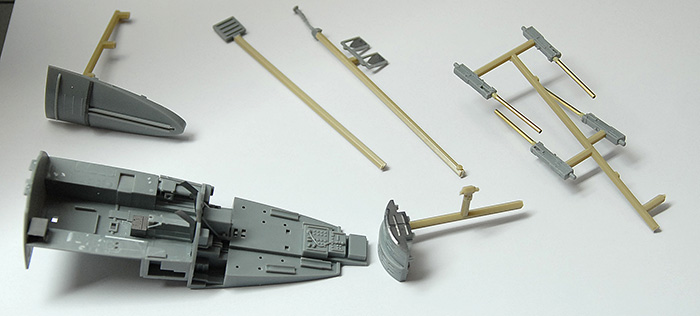
The last step in construction was to assemble all the fiddly bits that are prone to breakage, and thus left to the end. This was also an area that had the most replacement with either kit metal parts or Eduard photo etch detail parts. The landing gear all had metal parts that came with the kit as well as a few small details that were from the Eduard kit. The air brake and small gear doors (upper left and lower center, respectively) were full replacements with Eduard parts, although with the air brake, I completely misplaced some vent louvres, so I had to make a few replacements with very thin plastic card (the white you can see through the holes in the image below). Below you can see them all built and ready for priming and painting.
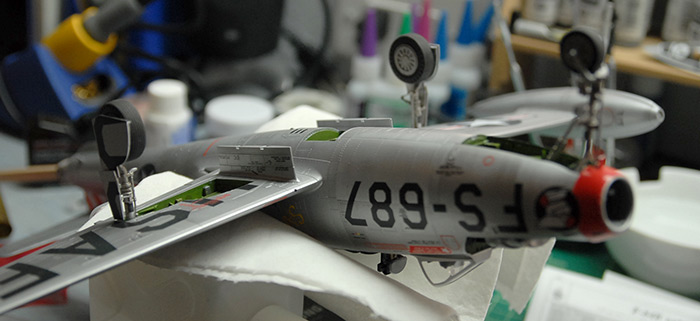
Those parts all got the same paint treatment as the body, and were then decalled, sprayed with flat, and then assembled. Below, you can see the jet propped at a funny angle as the epoxy on the landing gear sets.
This is where I got a bit lazy with the documentation photography. But after this point, all that was left was some weathering, and the assembly and painting of the two bombs that attach to the pylons. Weathering was done using a neutral wash from MIG. I tested out using black watercolors first, but it just didn't like the flat clear coat, and just wanted to bead up and make black water spots. I settled on a fairly easy technique where I'd paint on the neutral wash with a small paint brush, covering all the panel lines and rivet lines. Then, I'd let it dry for at least a few hours (so that it was completely dry), and then go back over it with a lint-free wipe, dampened with thinner (the sort that is meant to work with MIG pigments). That wiped most of the wash away, but left just enough behind in the lines and rivets to be pleasing. It also left just a bit on the surface to make things look not quite so clean.
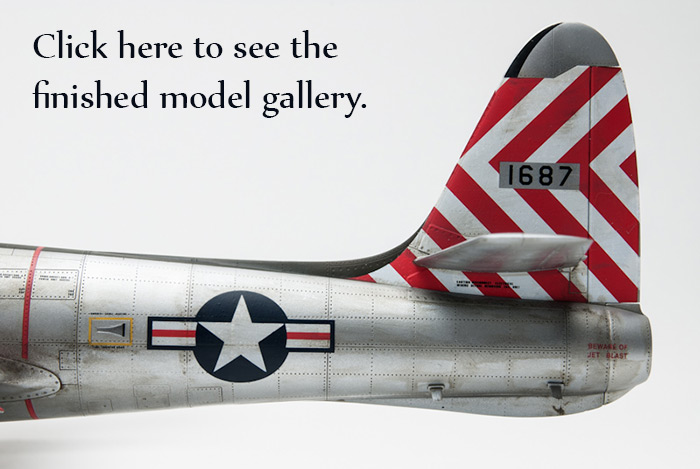
Well, that one is all wrapped up, so check out the images of the finished model by clicking on the image below. Thanks for reading!
With all the decals on, I sprayed the whole jet with a few coats of Testors Flat Clear to kill the gloss and give everything the same sheen. Below you can see the canopy with the masking removed and everything with a nice dull finish.
The last step in construction was to assemble all the fiddly bits that are prone to breakage, and thus left to the end. This was also an area that had the most replacement with either kit metal parts or Eduard photo etch detail parts. The landing gear all had metal parts that came with the kit as well as a few small details that were from the Eduard kit. The air brake and small gear doors (upper left and lower center, respectively) were full replacements with Eduard parts, although with the air brake, I completely misplaced some vent louvres, so I had to make a few replacements with very thin plastic card (the white you can see through the holes in the image below). Below you can see them all built and ready for priming and painting.
Those parts all got the same paint treatment as the body, and were then decalled, sprayed with flat, and then assembled. Below, you can see the jet propped at a funny angle as the epoxy on the landing gear sets.
This is where I got a bit lazy with the documentation photography. But after this point, all that was left was some weathering, and the assembly and painting of the two bombs that attach to the pylons. Weathering was done using a neutral wash from MIG. I tested out using black watercolors first, but it just didn't like the flat clear coat, and just wanted to bead up and make black water spots. I settled on a fairly easy technique where I'd paint on the neutral wash with a small paint brush, covering all the panel lines and rivet lines. Then, I'd let it dry for at least a few hours (so that it was completely dry), and then go back over it with a lint-free wipe, dampened with thinner (the sort that is meant to work with MIG pigments). That wiped most of the wash away, but left just enough behind in the lines and rivets to be pleasing. It also left just a bit on the surface to make things look not quite so clean.
Well, that one is all wrapped up, so check out the images of the finished model by clicking on the image below. Thanks for reading!
F-84e Progress
27 - April - 2013 - 20:25
Hey there! It's been ages, I know, but I'm back with an update on my progress on the F-84e. Since the last update, lots of other exciting non-model-related things have happened, such as me finishing work on Monsters University (in theaters June 21st!), some vacation, and misc other tasks. But recently, I decided to quit slacking around and try to make some real progress on this model. Here's what I have been up to…
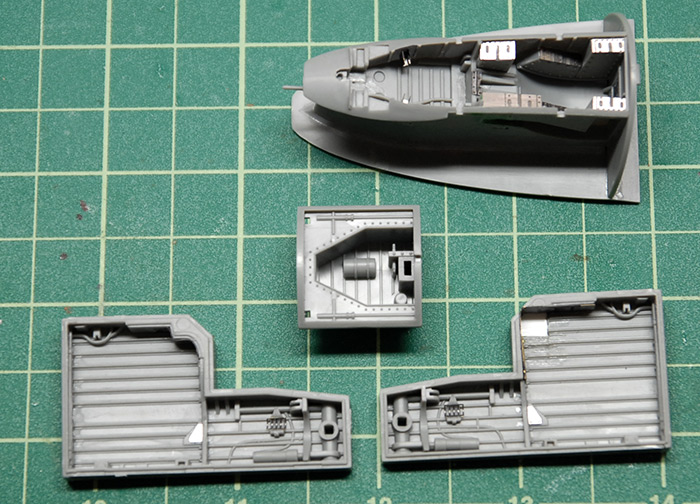
After the cockpit, the next step was the landing gear and air brake bays. The detail kit from Eduard included various panels and brackets for these, so you can see a few of those in the images below. The Eduard instructions also called for me to cut one of the corners out of one rear gear bay and replace it with an etch panel (lower right, in the below photo). This was questionably successful, as the part that I was supposed to replace the floor corner with didn't fit very well and the thickness between the plastic floor parts and the etch version just weren't close enough to blend together. I decided to just let it slide and replaced the etch floor with some polystyrene card and leave it at that.
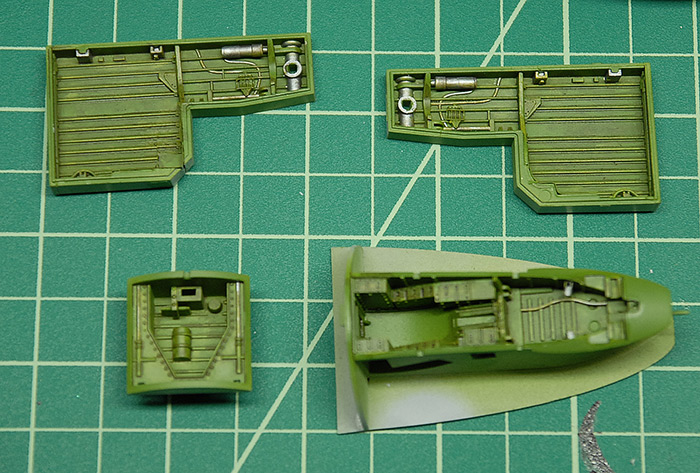
Below you can see the same bays after priming and painting in a base green. They had various details picked out by hand in steel paint, the raised bits picked out with a lighter shade via dry brushing and the whole things hit with a grungy brown wash to give it all a bit of dirt.
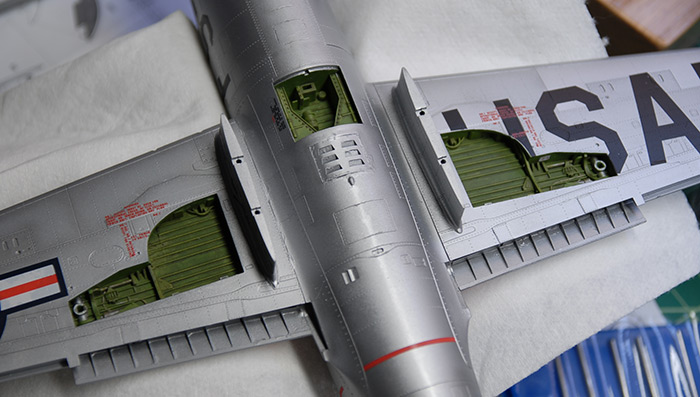
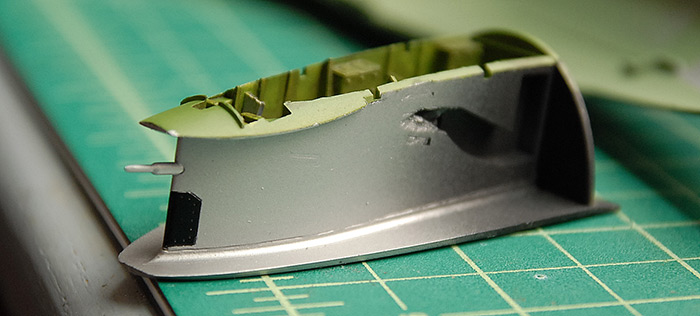
Next up was prepping the fuselage halves for assembly. Since the front gear bay, air brake bay and cockpit are all locked between the halved when they go together, the inside of the fuselage halves need to be painted to match where appropriate. As you can see in the image below, most of it was painted the same green as the cockpit. The metallic bit at the front is the area that is seen through the nose intake, which, according to reference photos, matches the exterior aluminum color.
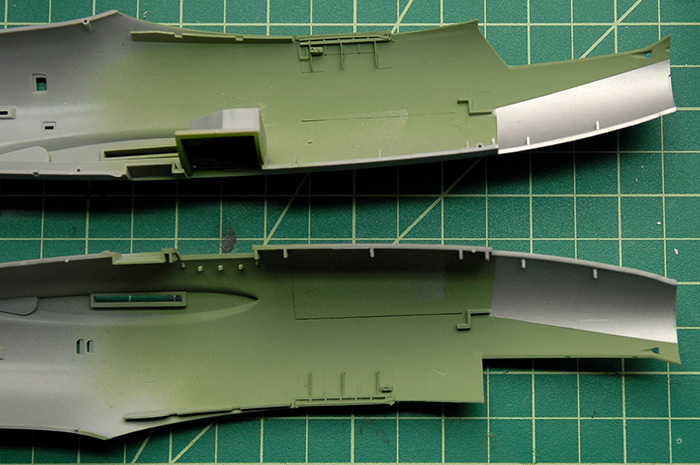
Similarly, the front landing gear bay had to have the upper section of it painted that same aluminum, since it goes in that same intake, and splits the flow of air. I'm not sure what the little black panel is, but all the reference I could find showed it being black and shiny, so there you have it.
Below you can see the fuselage halves in place, while the glue is drying, with the cockpit sandwiched in between.
Skipping ahead a bit, the next step was to assemble the wings, which sandwich the rear gear bays in them. This was another area where the Eduard detail kit had a few extras for me to add. The place where the flaps go had an extra photo-etch piece, which showed a bit of the structure of the wing itself. These were a little tricky, as it required that a little bit of the wing be cut away to make room for the flap connections (which were also replaced by etch parts). You can see in the photo below that the two sides are different colors, as I first tried filling in the gaps with super glue, on the right side, and then, not being happy with that (but also not willing to take it back apart) I took a different approach on the left side and filled the area in with green putty. The putty was then sanded back into a flat surface which fit the etch part a little better. While neither side is perfect, I'm hoping that the imperfections are mostly covered by the flaps, once they are in place.
Also visible below is a bit of the filling that was added between the fuselage halves to help cover up the seam.
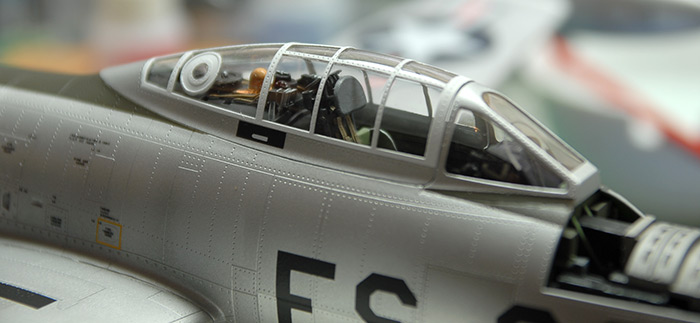
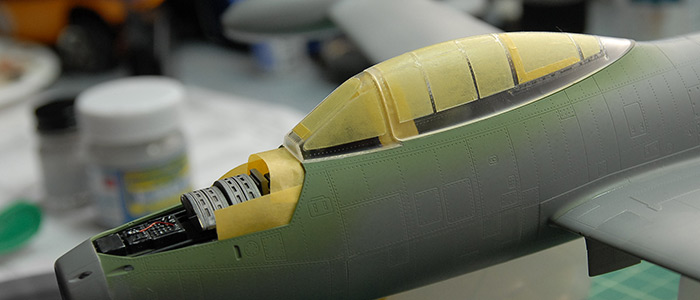
Next up was to mask the canopy parts, using the precut masks that came with the Eduard kit. Generally, they fit well, but were tricky to place in a few cases. You can see below where I ended up just adding a little bit of extra tape, because it was giving me too much trouble getting the mask into just the right place. Also, this is where I ran into a bit of a snag. I discovered that, with all the cockpit stuff in place, the front canopy section wouldn't actually fit over it.
Whoops!
The HUD glass was sticking up a bit too far to allow the canopy to fit into its spot. What I ended up doing was detaching a few of the parts that held the HUD and then shortened a few of them, so that, once back in place, they were low enough to allow the canopy to fit. A side note here: I found that the clear HUD piece that came with the kit seemed strangely large. If I were to go back and do it again, I'd probably make a new piece that was quite a bit smaller and substitute that instead. But, by the time I got far enough along and realized that its scale didn't really match the reference photos I had, I really wasn't up for tearing it apart again and building something new. Oh well :)
The rear canopy section is taped in place on the front and held in the back with a tiny dab of clear-parts glue, with the thought that it'll be easy to pop back off after painting.
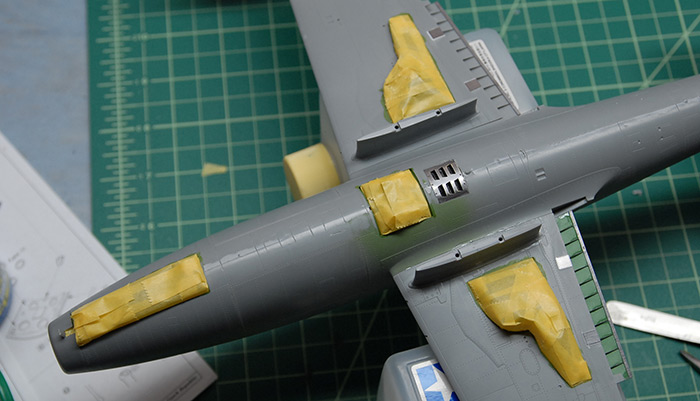
Below you can see the various gear bays masked off and ready for priming and painting.
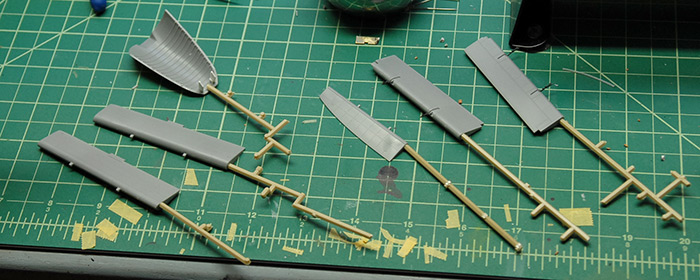
The various flaps and such with the standard scrap-sprue handles, also ready for priming and painting.
The model after priming with Mr Surfacer 1200:

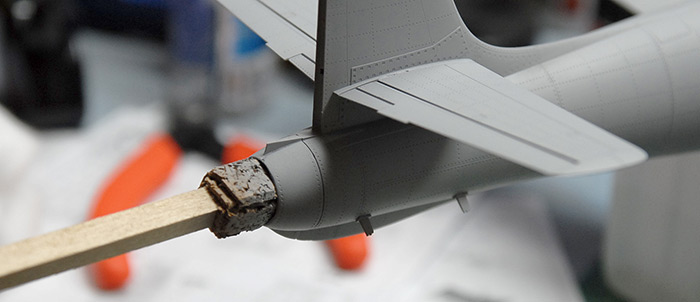
I made myself a little handle out of some scrap bass wood I had around and some self-adhesive cork sheeting I had left over from when I lined my desk drawers. I'm pretty sure I may have snapped off a few of the etch parts inside the exhaust, but I'll fix those later ;)
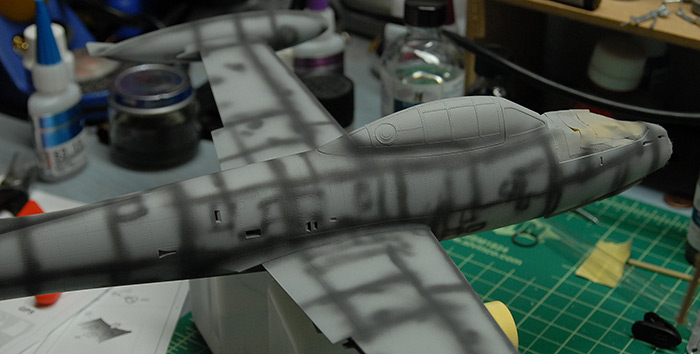
Next up was some pre-shading on the panel lines with some Tamiya German Grey. The idea here is to just give some contrasting tones that can subtly show through the metallic paint later on. This helps break up the otherwise flat surface and hints at wear and tear.
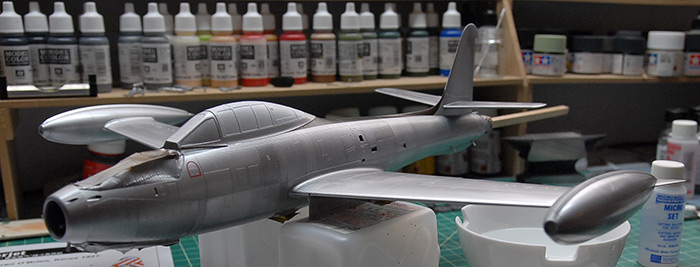
Next up was a base coat of Alcald Aluminum paint. Then various panels were masked off and painted with a darker aluminum shade. Then more panels were masked and painted with a lighter aluminum shade. Next, the top of the canopy was masked and painted flat white. Finally, the top of the fuselage was masked and painted olive drab.
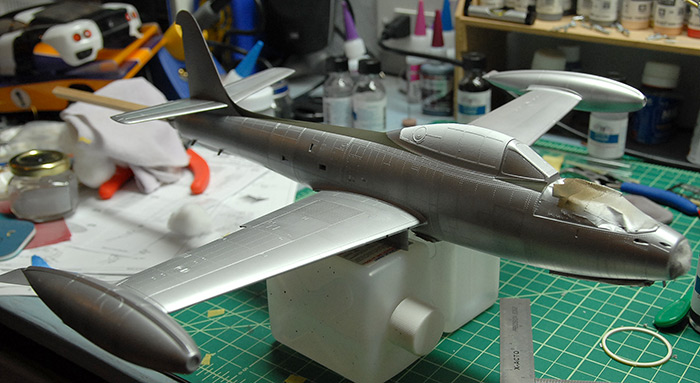
In the below photo, it is a little easier to see some of the variation in the panel shades. These will be picked out a bit more later on with weathering and pin washing.
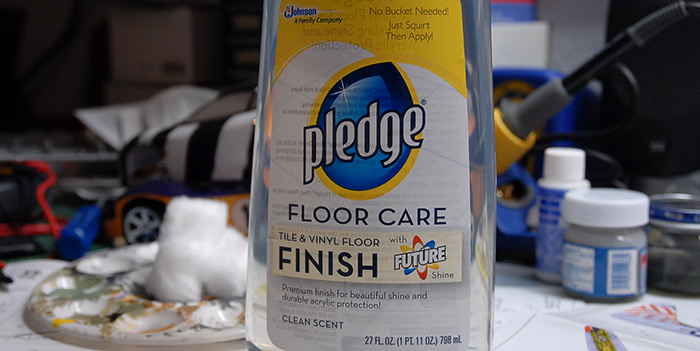
Next up were two coats of Pledge Future, to prep for decals. For those not familiar with this stuff, it is a floor care product that is widely used by modelers since it has a number of features that make it great to work with. First off, it can be airbrushed directly, without any diluting (very handy). It provides a nice glossy surface, to help prevent silvering (this is the reason to want a gloss coat at this point) with the decals and also lays nice and flat after drying, so you don't have to worry about it adding a ton of thickness or filling in fine panel seams. Also, it is an acrylic product, so I can put it right over the fragile Alclad paint and not have to worry about the solvents eating away the paint. It also smells nice :)
Since it's no longer called 'Future', I figured I'd add an image of what my bottle looks like, so that others wanting to use the same had an easier time tracking it down (it can be ordered from amazon.com).
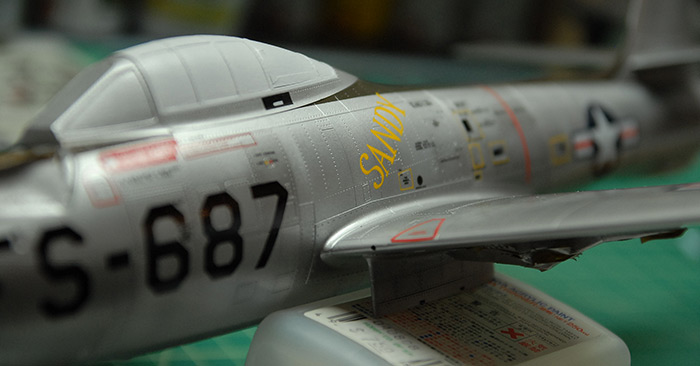
And finally, here's a little teaser of the in-progress decal work. At this time, I've got one side pretty much complete decal-wise and am moving on to the other side.
Once the decals are all on, then it's back to the landing gear, in order to give this bird some legs to stand on. Then comes an overcoating of flat clear to kill the gloss from the Future, removal of the canopy masks and then final assembly. I'm still debating how I want to display this one, so I'll leave thoughts on that to a later post.
Thanks for reading!
After the cockpit, the next step was the landing gear and air brake bays. The detail kit from Eduard included various panels and brackets for these, so you can see a few of those in the images below. The Eduard instructions also called for me to cut one of the corners out of one rear gear bay and replace it with an etch panel (lower right, in the below photo). This was questionably successful, as the part that I was supposed to replace the floor corner with didn't fit very well and the thickness between the plastic floor parts and the etch version just weren't close enough to blend together. I decided to just let it slide and replaced the etch floor with some polystyrene card and leave it at that.
Below you can see the same bays after priming and painting in a base green. They had various details picked out by hand in steel paint, the raised bits picked out with a lighter shade via dry brushing and the whole things hit with a grungy brown wash to give it all a bit of dirt.
Next up was prepping the fuselage halves for assembly. Since the front gear bay, air brake bay and cockpit are all locked between the halved when they go together, the inside of the fuselage halves need to be painted to match where appropriate. As you can see in the image below, most of it was painted the same green as the cockpit. The metallic bit at the front is the area that is seen through the nose intake, which, according to reference photos, matches the exterior aluminum color.
Similarly, the front landing gear bay had to have the upper section of it painted that same aluminum, since it goes in that same intake, and splits the flow of air. I'm not sure what the little black panel is, but all the reference I could find showed it being black and shiny, so there you have it.
Below you can see the fuselage halves in place, while the glue is drying, with the cockpit sandwiched in between.
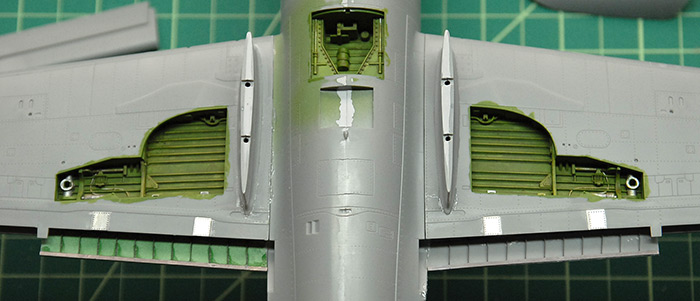
Skipping ahead a bit, the next step was to assemble the wings, which sandwich the rear gear bays in them. This was another area where the Eduard detail kit had a few extras for me to add. The place where the flaps go had an extra photo-etch piece, which showed a bit of the structure of the wing itself. These were a little tricky, as it required that a little bit of the wing be cut away to make room for the flap connections (which were also replaced by etch parts). You can see in the photo below that the two sides are different colors, as I first tried filling in the gaps with super glue, on the right side, and then, not being happy with that (but also not willing to take it back apart) I took a different approach on the left side and filled the area in with green putty. The putty was then sanded back into a flat surface which fit the etch part a little better. While neither side is perfect, I'm hoping that the imperfections are mostly covered by the flaps, once they are in place.
Also visible below is a bit of the filling that was added between the fuselage halves to help cover up the seam.
Next up was to mask the canopy parts, using the precut masks that came with the Eduard kit. Generally, they fit well, but were tricky to place in a few cases. You can see below where I ended up just adding a little bit of extra tape, because it was giving me too much trouble getting the mask into just the right place. Also, this is where I ran into a bit of a snag. I discovered that, with all the cockpit stuff in place, the front canopy section wouldn't actually fit over it.
Whoops!
The HUD glass was sticking up a bit too far to allow the canopy to fit into its spot. What I ended up doing was detaching a few of the parts that held the HUD and then shortened a few of them, so that, once back in place, they were low enough to allow the canopy to fit. A side note here: I found that the clear HUD piece that came with the kit seemed strangely large. If I were to go back and do it again, I'd probably make a new piece that was quite a bit smaller and substitute that instead. But, by the time I got far enough along and realized that its scale didn't really match the reference photos I had, I really wasn't up for tearing it apart again and building something new. Oh well :)
The rear canopy section is taped in place on the front and held in the back with a tiny dab of clear-parts glue, with the thought that it'll be easy to pop back off after painting.
Below you can see the various gear bays masked off and ready for priming and painting.
The various flaps and such with the standard scrap-sprue handles, also ready for priming and painting.
The model after priming with Mr Surfacer 1200:
I made myself a little handle out of some scrap bass wood I had around and some self-adhesive cork sheeting I had left over from when I lined my desk drawers. I'm pretty sure I may have snapped off a few of the etch parts inside the exhaust, but I'll fix those later ;)
Next up was some pre-shading on the panel lines with some Tamiya German Grey. The idea here is to just give some contrasting tones that can subtly show through the metallic paint later on. This helps break up the otherwise flat surface and hints at wear and tear.
Next up was a base coat of Alcald Aluminum paint. Then various panels were masked off and painted with a darker aluminum shade. Then more panels were masked and painted with a lighter aluminum shade. Next, the top of the canopy was masked and painted flat white. Finally, the top of the fuselage was masked and painted olive drab.
In the below photo, it is a little easier to see some of the variation in the panel shades. These will be picked out a bit more later on with weathering and pin washing.
Next up were two coats of Pledge Future, to prep for decals. For those not familiar with this stuff, it is a floor care product that is widely used by modelers since it has a number of features that make it great to work with. First off, it can be airbrushed directly, without any diluting (very handy). It provides a nice glossy surface, to help prevent silvering (this is the reason to want a gloss coat at this point) with the decals and also lays nice and flat after drying, so you don't have to worry about it adding a ton of thickness or filling in fine panel seams. Also, it is an acrylic product, so I can put it right over the fragile Alclad paint and not have to worry about the solvents eating away the paint. It also smells nice :)
Since it's no longer called 'Future', I figured I'd add an image of what my bottle looks like, so that others wanting to use the same had an easier time tracking it down (it can be ordered from amazon.com).
And finally, here's a little teaser of the in-progress decal work. At this time, I've got one side pretty much complete decal-wise and am moving on to the other side.
Once the decals are all on, then it's back to the landing gear, in order to give this bird some legs to stand on. Then comes an overcoating of flat clear to kill the gloss from the Future, removal of the canopy masks and then final assembly. I'm still debating how I want to display this one, so I'll leave thoughts on that to a later post.
Thanks for reading!
New project: F-84e Thunderjet
13 - January - 2013 - 18:28
With the Hornethopter wrapped up, it was time to move along to the next project. I bought this kit a year or so ago for a few different reasons. First, the kit looked well made and came with a number of things that you usually have to pay extra for and order separately, such as metal landing gear. It also was 1:32 scale, which is on the larger side for aircraft, allowing for more detail and a little room to work. I had bought this with the intention of learning more about natural metal finishing, since that wasn't something I had done much of previously. Finally, I haven't made a plastic aircraft model since I was maybe 13 years old, so it seemed like it would be a fun change of pace.
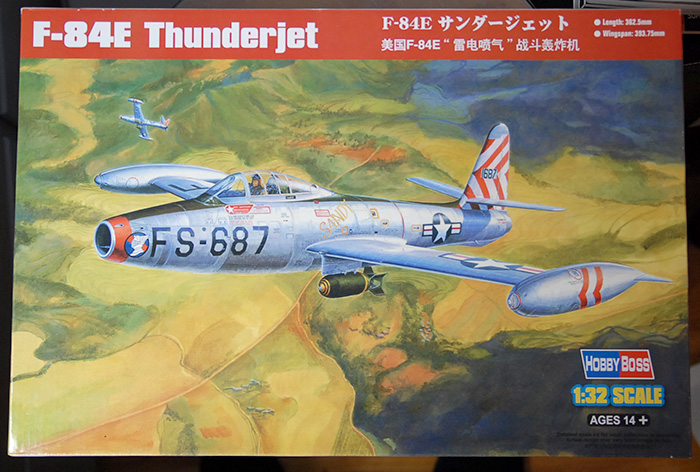
This one is made by HobbyBoss and is of the Korean-war-era F-84E Thunderjet.
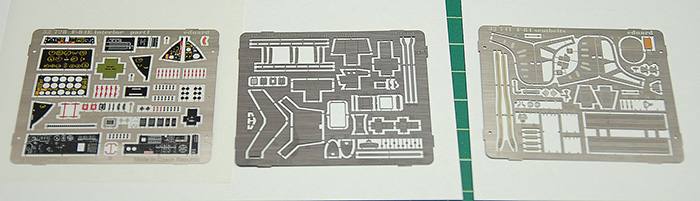
Since I don't seem to be able to leave well enough alone, I also ordered the 'Big Ed' kit of detailing parts from Eduard. It consists of four sets of photo-etched metal (seat belts, cockpit details, exterior details, and remove-before-flight tags) and one set of pre-cut canopy masks. Below you can see, from left to right, the canopy masks, exterior detail kit and remove-before-flight tags.

Below you can see the two frets of photo-etch for the cockpit details (left two) and one (partially used at this point) fret for the seat belt and ejector seat upgrades.
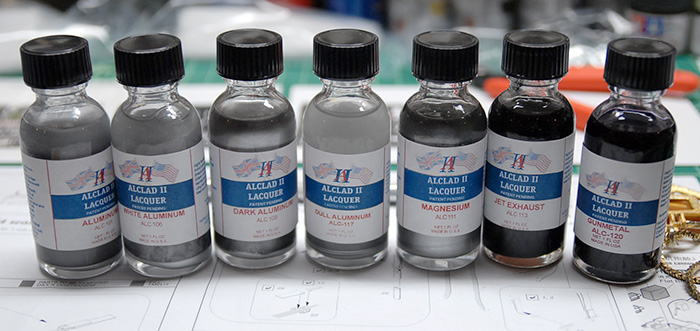
While I was ordering things, I expanded my collection of Alclad metallic paints by ordering a few more. These were chosen to provide a few similar shades of aluminum for the main aircraft skin as well as a few other colors that I thought would be handy (gunmetal, jet exhaust)
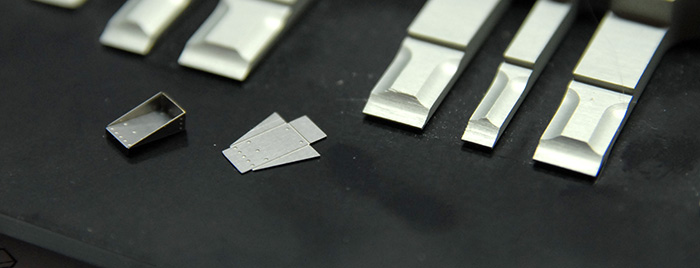
With the addition of all of the upgrade parts, I found that I needed to be much more careful of the order in which things are assembled. In addition, there was quite a bit of work that had to be done to the plastic parts, in order to shave off raised details that were to be replaced by photo-etched parts. To start, though, I put together the seat belts, since they were not replacing any kit part, making them safe to build without worry. The parts are pre-printed photo-etched metal, which is pretty cool, but also a little shinier than I would prefer and a bit tricky to bend without the paint flaking off. Here are the belts after being assembled but before bending them into final shape on the seat.
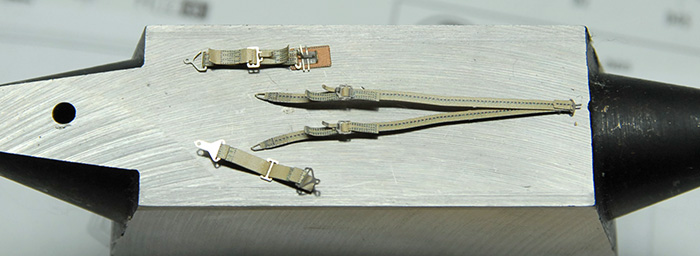
Here is a close-up of the little foot-rest-looking things for the seat in bent and unbent form. They are on a Hold-and-Fold bender (very handy!).
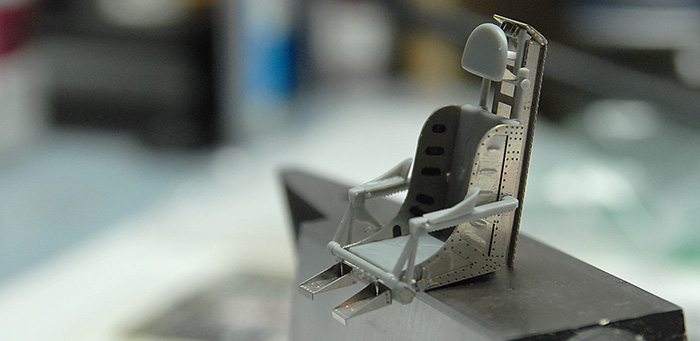
Here is the seat, pretty much all assembled with kit and upgrade parts mixing. Although, as I discovered later on, the upgrade parts seem to actually be for the F-84G seat rather than the F-84E (at least so I have read, as I wouldn't know for sure myself, and have had a hard time finding good reference). What this meant, though, was that the seat, with the new frame behind it, sat quite a bit further forward in the cockpit that the kit seat. This required a little bit of trimming and planning in order to get everything to fit again. Mostly just taking a bit out of the center pillar and moving the control stick forward. Also, I made a few modifications to the kit part that helps align the seat in the cockpit, so that it would fit in there securely.
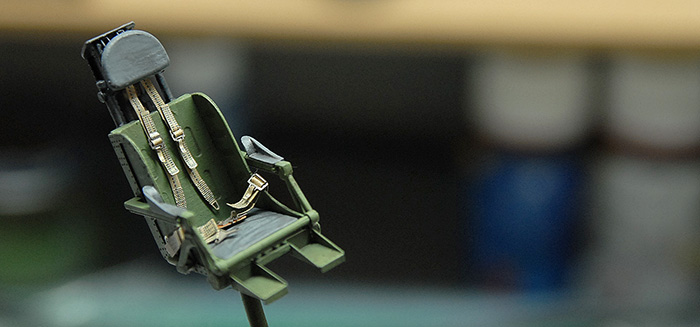
Here is the seat with paint. I also had a hard time finding good reference of this cockpit as far as color goes. Most of the reference is of the F-84G, and most of THAT is of planes that have long since been decommissioned, been repainted, and have been sitting in museums for a while. Even checking other models that have been built, the colored ranged from all black, to all green to a mixture of both. Since my seat was already a bit mismatched version-wise, I decided to just go with a mixture of black and interior green. If I was a stickler for historical detail, I'd probably rebuild the seat to remove the back structure. But I'm not a stickler like that, and I like the way it looks, so I suppose this one will never win any IPMS awards ;)
Next up was to start putting together the cockpit tub. This is where is started to get a bit trickier, as there were many kit parts that were being replaced by the upgrade parts and many kit parts that just needed altering. The kit parts had many of the controls molded into the plastic, but since those were being replaced by more pre-printed etched parts, I had to shave off much of the raised details. There were also a few boxes and cylinders that either needed to be cut off and replaced with folded etch or needed to be cut off and saved to be put back on top of the printed etch parts later.
Directly connected to the front of the cockpit tub is the gun bay, with four machine cannons. Looking at the kit parts, the gun barrels were not looking so good. They were a little soft around the edges, didn't have a hole in the end, and had a mold seam that I would have to clean up. I had seen various articles in Fine Scale Modeler magazine where people used fancy turned brass gun barrels that looked just fabulous. Not having anything like that, I instead dug into a bag of scrap metal bits that I got at the local Ace Hardware, and found some lengths of 1/16" brass tubing that I could cut down and use instead. With a bit of careful cutting (I put the tube on the desk, put a sharp x-acto on top and slowly rolled back and forth, letting the knife cut through the soft metal with only light pressure), I ended up with four 1" long gun barrels that looked much better than the kit versions.
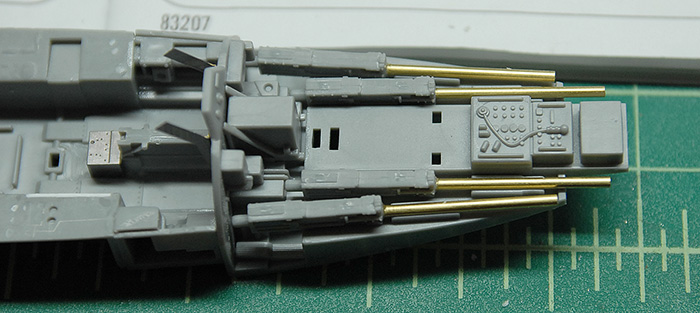
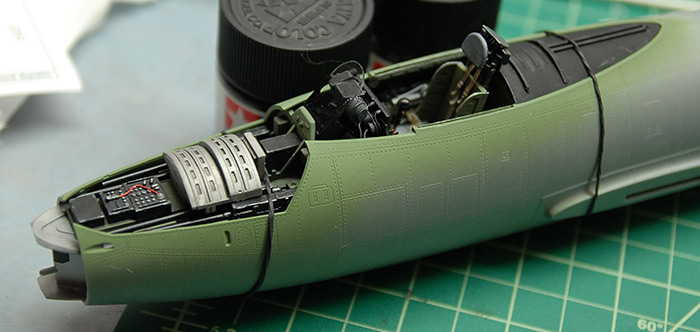
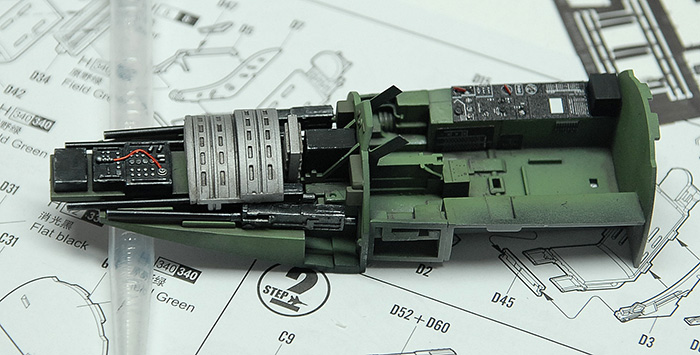
Below you can see the various cockpit and gun bay parts attached to scrap plastic and ready for painting.
Below is the current state of the cockpit and gun bay. The gun bay parts are not glued yet, but just put in there to demonstrate how they go together. Also, only a few bits of the pre-printed etch have gone into the cockpit so far, and they will get touched up a bit later and possibly sprayed with a matte medium overcoat in order to dull them down a bit (pending a paint interaction test, to avoid any possible mishaps).
The painting was made up of a base coat of Mr Surfacer 1200, then a layer of Tamiya Dark Green (XF-61) followed by an overcoat of Tamiya Cockpit Green (XF-71), all sprayed with my Paasche Talon airbrush. On the lighter green, I avoided the corners a bit, to let them stay a bit darker. The gun bay parts are Alclad Gunmetal and Dull Aluminum. Everything got a light wash of Abteilung Dark Mud in order to pick out some details and make it all a bit less clean. It still needs some selective dry-brushing of highlights, and much more of the photo-etched details, but that's for next time!
Thanks for reading!
This one is made by HobbyBoss and is of the Korean-war-era F-84E Thunderjet.
Since I don't seem to be able to leave well enough alone, I also ordered the 'Big Ed' kit of detailing parts from Eduard. It consists of four sets of photo-etched metal (seat belts, cockpit details, exterior details, and remove-before-flight tags) and one set of pre-cut canopy masks. Below you can see, from left to right, the canopy masks, exterior detail kit and remove-before-flight tags.
Below you can see the two frets of photo-etch for the cockpit details (left two) and one (partially used at this point) fret for the seat belt and ejector seat upgrades.
While I was ordering things, I expanded my collection of Alclad metallic paints by ordering a few more. These were chosen to provide a few similar shades of aluminum for the main aircraft skin as well as a few other colors that I thought would be handy (gunmetal, jet exhaust)
With the addition of all of the upgrade parts, I found that I needed to be much more careful of the order in which things are assembled. In addition, there was quite a bit of work that had to be done to the plastic parts, in order to shave off raised details that were to be replaced by photo-etched parts. To start, though, I put together the seat belts, since they were not replacing any kit part, making them safe to build without worry. The parts are pre-printed photo-etched metal, which is pretty cool, but also a little shinier than I would prefer and a bit tricky to bend without the paint flaking off. Here are the belts after being assembled but before bending them into final shape on the seat.
Here is a close-up of the little foot-rest-looking things for the seat in bent and unbent form. They are on a Hold-and-Fold bender (very handy!).
Here is the seat, pretty much all assembled with kit and upgrade parts mixing. Although, as I discovered later on, the upgrade parts seem to actually be for the F-84G seat rather than the F-84E (at least so I have read, as I wouldn't know for sure myself, and have had a hard time finding good reference). What this meant, though, was that the seat, with the new frame behind it, sat quite a bit further forward in the cockpit that the kit seat. This required a little bit of trimming and planning in order to get everything to fit again. Mostly just taking a bit out of the center pillar and moving the control stick forward. Also, I made a few modifications to the kit part that helps align the seat in the cockpit, so that it would fit in there securely.
Here is the seat with paint. I also had a hard time finding good reference of this cockpit as far as color goes. Most of the reference is of the F-84G, and most of THAT is of planes that have long since been decommissioned, been repainted, and have been sitting in museums for a while. Even checking other models that have been built, the colored ranged from all black, to all green to a mixture of both. Since my seat was already a bit mismatched version-wise, I decided to just go with a mixture of black and interior green. If I was a stickler for historical detail, I'd probably rebuild the seat to remove the back structure. But I'm not a stickler like that, and I like the way it looks, so I suppose this one will never win any IPMS awards ;)
Next up was to start putting together the cockpit tub. This is where is started to get a bit trickier, as there were many kit parts that were being replaced by the upgrade parts and many kit parts that just needed altering. The kit parts had many of the controls molded into the plastic, but since those were being replaced by more pre-printed etched parts, I had to shave off much of the raised details. There were also a few boxes and cylinders that either needed to be cut off and replaced with folded etch or needed to be cut off and saved to be put back on top of the printed etch parts later.
Directly connected to the front of the cockpit tub is the gun bay, with four machine cannons. Looking at the kit parts, the gun barrels were not looking so good. They were a little soft around the edges, didn't have a hole in the end, and had a mold seam that I would have to clean up. I had seen various articles in Fine Scale Modeler magazine where people used fancy turned brass gun barrels that looked just fabulous. Not having anything like that, I instead dug into a bag of scrap metal bits that I got at the local Ace Hardware, and found some lengths of 1/16" brass tubing that I could cut down and use instead. With a bit of careful cutting (I put the tube on the desk, put a sharp x-acto on top and slowly rolled back and forth, letting the knife cut through the soft metal with only light pressure), I ended up with four 1" long gun barrels that looked much better than the kit versions.
Below you can see the various cockpit and gun bay parts attached to scrap plastic and ready for painting.
Below is the current state of the cockpit and gun bay. The gun bay parts are not glued yet, but just put in there to demonstrate how they go together. Also, only a few bits of the pre-printed etch have gone into the cockpit so far, and they will get touched up a bit later and possibly sprayed with a matte medium overcoat in order to dull them down a bit (pending a paint interaction test, to avoid any possible mishaps).
The painting was made up of a base coat of Mr Surfacer 1200, then a layer of Tamiya Dark Green (XF-61) followed by an overcoat of Tamiya Cockpit Green (XF-71), all sprayed with my Paasche Talon airbrush. On the lighter green, I avoided the corners a bit, to let them stay a bit darker. The gun bay parts are Alclad Gunmetal and Dull Aluminum. Everything got a light wash of Abteilung Dark Mud in order to pick out some details and make it all a bit less clean. It still needs some selective dry-brushing of highlights, and much more of the photo-etched details, but that's for next time!
Thanks for reading!