
Woodworking
Letter Block Toy Box
29 - June - 2020 - 20:08
Some dear friends had themselves a baby a little while back so I wanted to build something for them that would hopefully last a lifetime. After searching around for some theme ideas, I stumbled across some toy block themed toy boxes that I thought would be fun. I wasn't crazy about the ones that I saw construction-wise (they looked a bit too flimsy), so I spent a bit of time mocking up a box in the computer and landed on a design that I thought would look nice, be sturdy enough to take lots of abuse and all while being safe for a toddler.
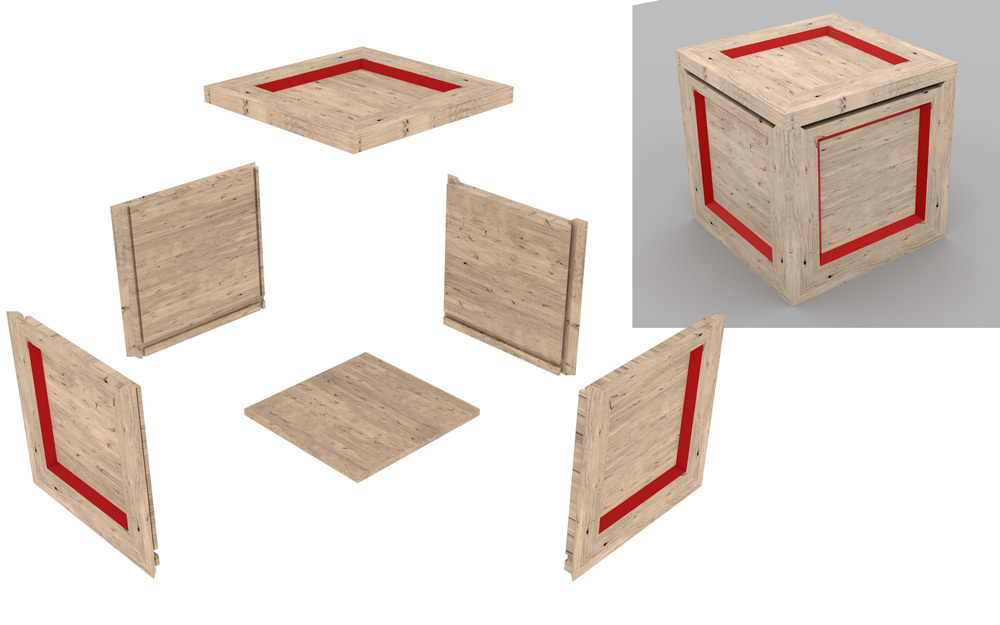
Below you can see the couple of images that I ended up with after my design process. I'll talk a bit about the special features as they come up in pictures later on, but the important thing to note is that it is big, heavy and made from solid ash. Did I mention that it is heavy?
This one is light on details and heavy on pictures, so enjoy the show!

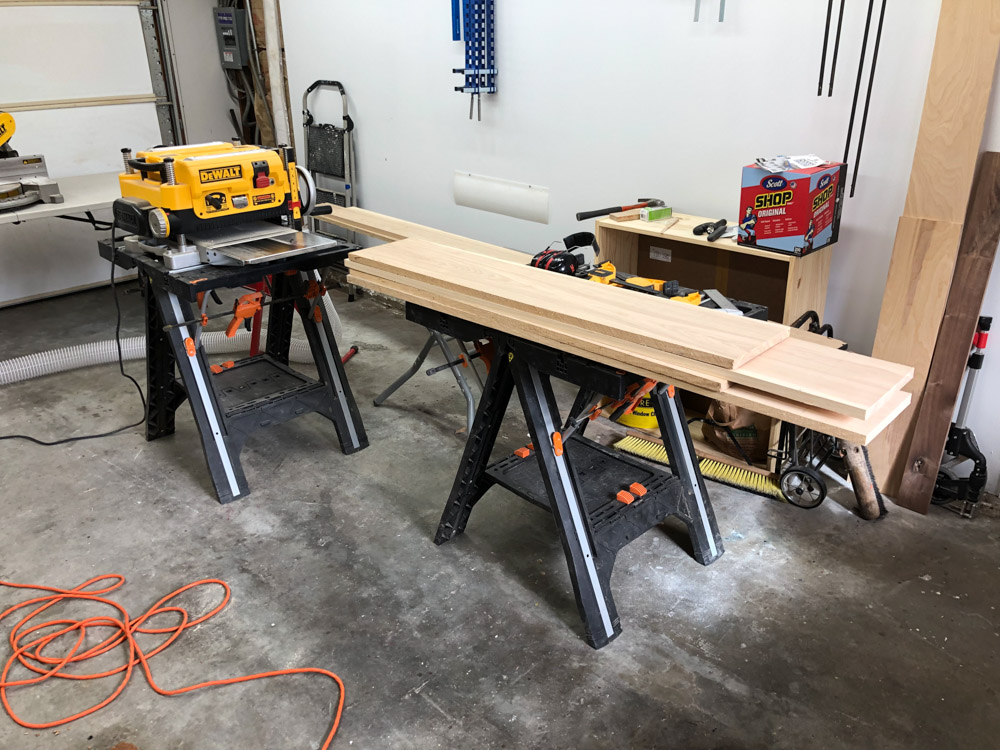
As usual, I started with a pile of wood from my local hardwood dealer, and milled it down to 3/4".
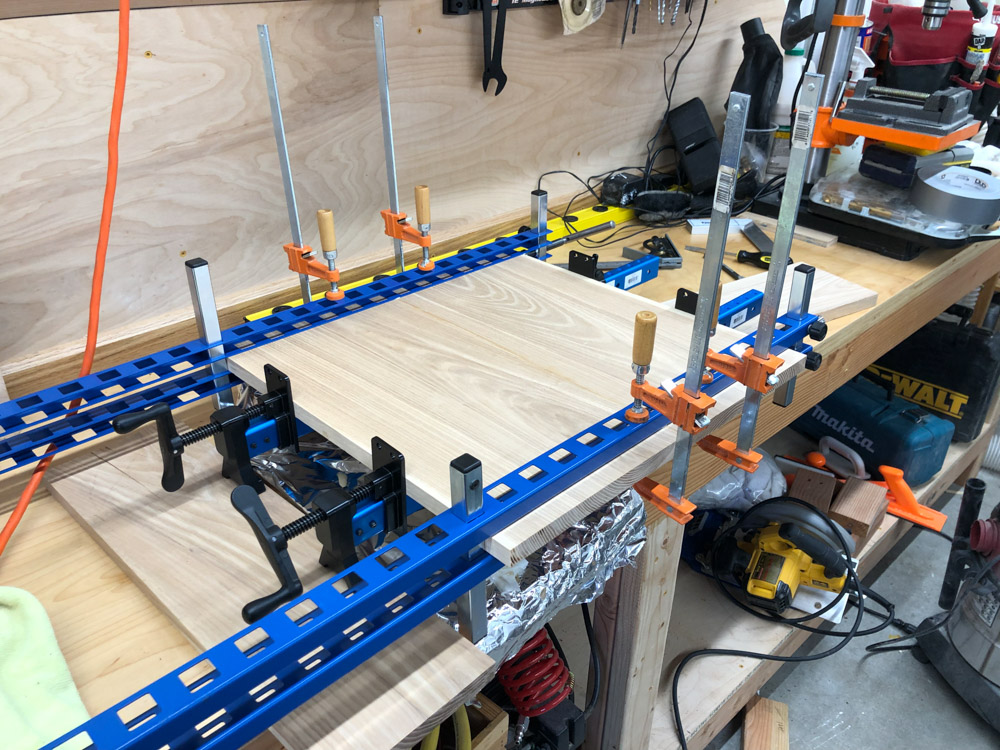
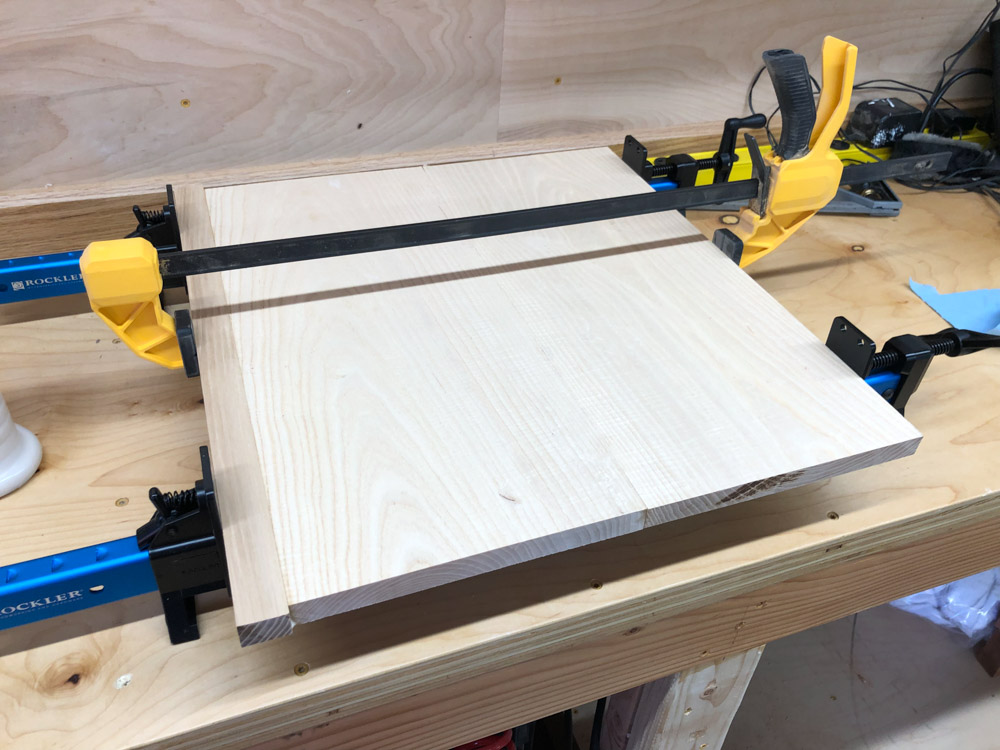
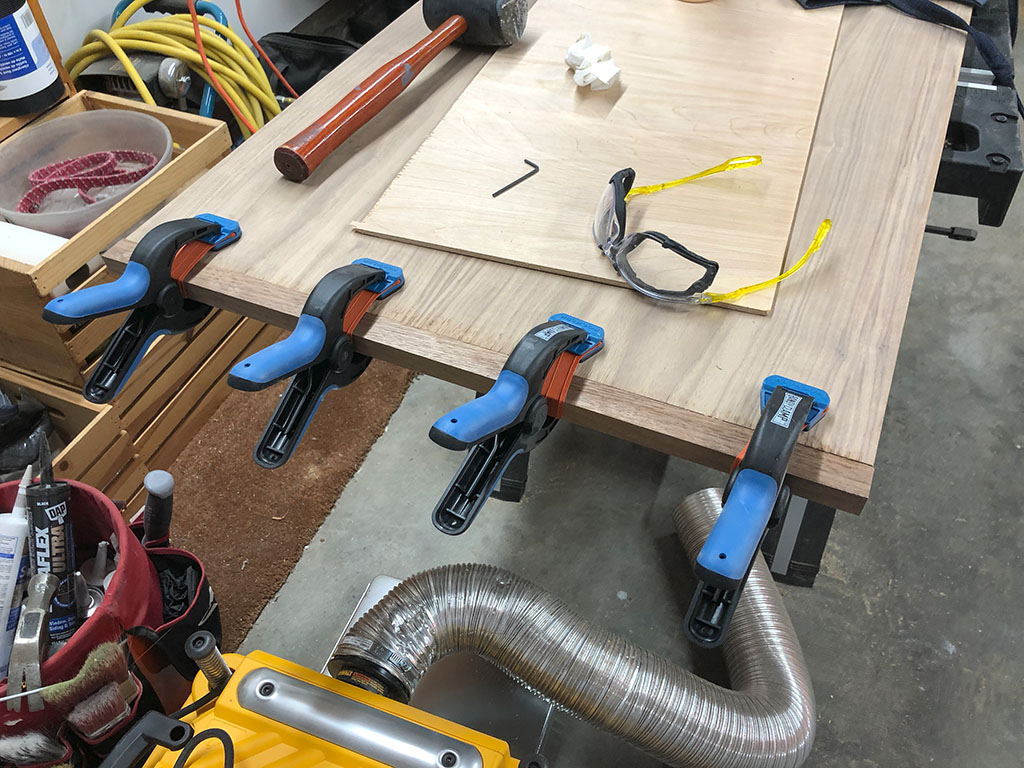
After cutting down to rough length, the main side panels were glued up. Below you can see the panel clamps from Rockler that I got for this project. I try to embrace Mike Pekovich's (creative director at Fine Woodworking magazine) theory that you should try to buy a new tool for each project, thereby slowly increasing your set of tools, but also trying out something new.
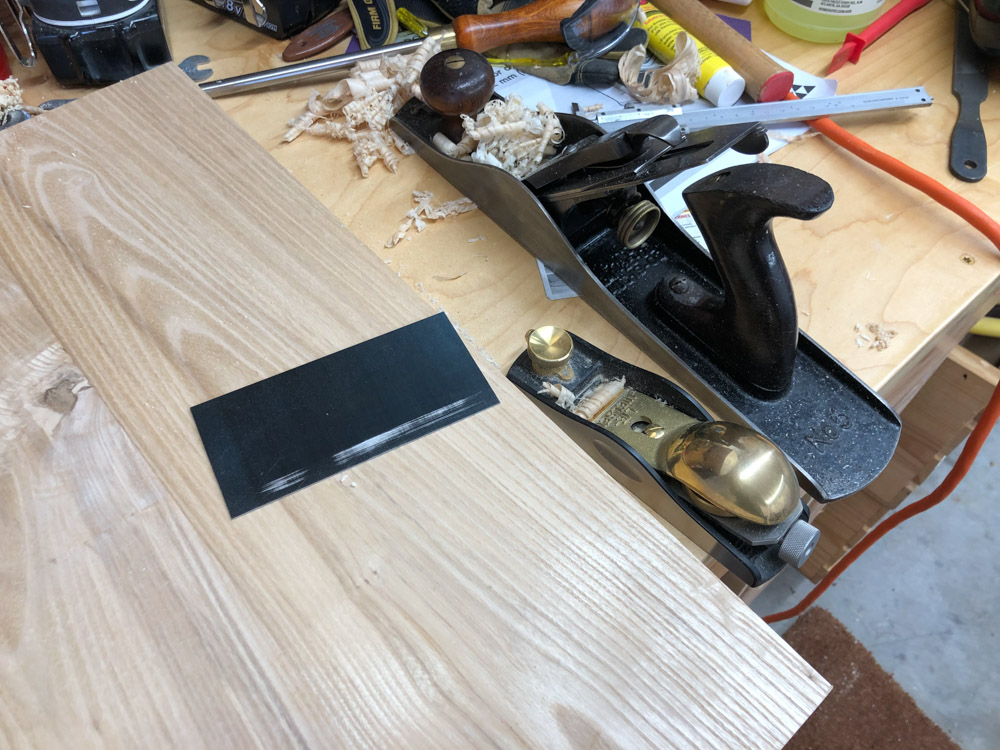
The panels took a bit of fine tuning, planing, scraping and such to get them smooth and clean.
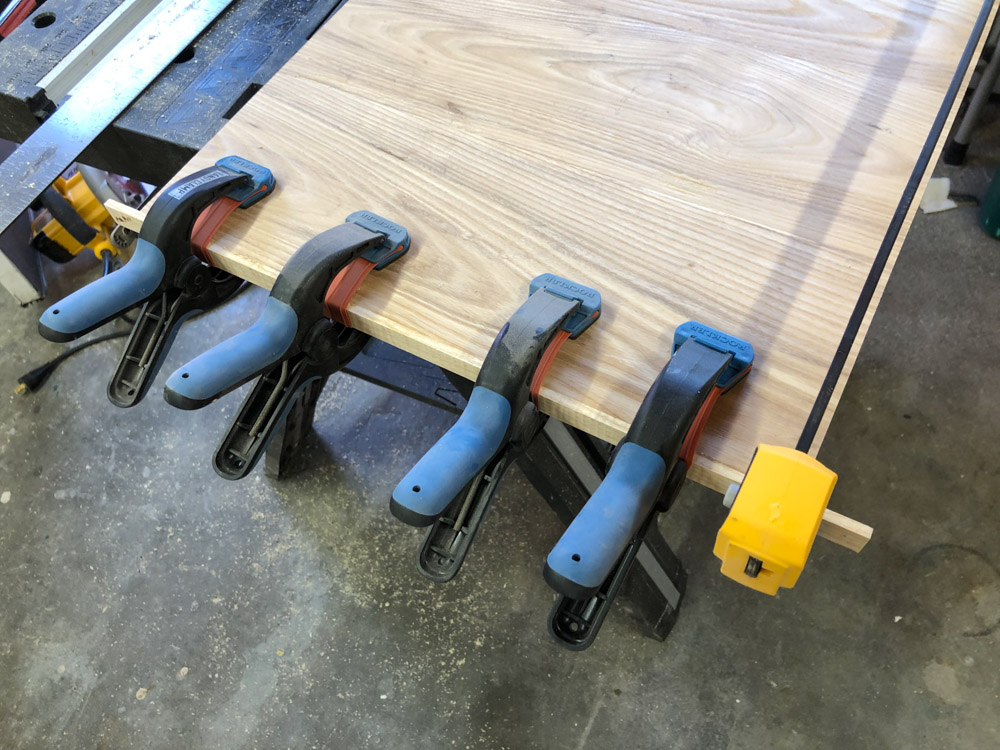
Turns out that the stock that I bought was an awkward width, being not quite wide enough to use two pieces to make one side. Fortunately, this extra bit should be hidden at the bottom of the inside.
And sometimes you accidentally make a panel just a liiiiiitle bit too narrow.
Here's the main box sides glued up. One side is a little taller in order to give the back hinge a little height. More on that shortly.
Below you can see the beveled edges being glued to the top.
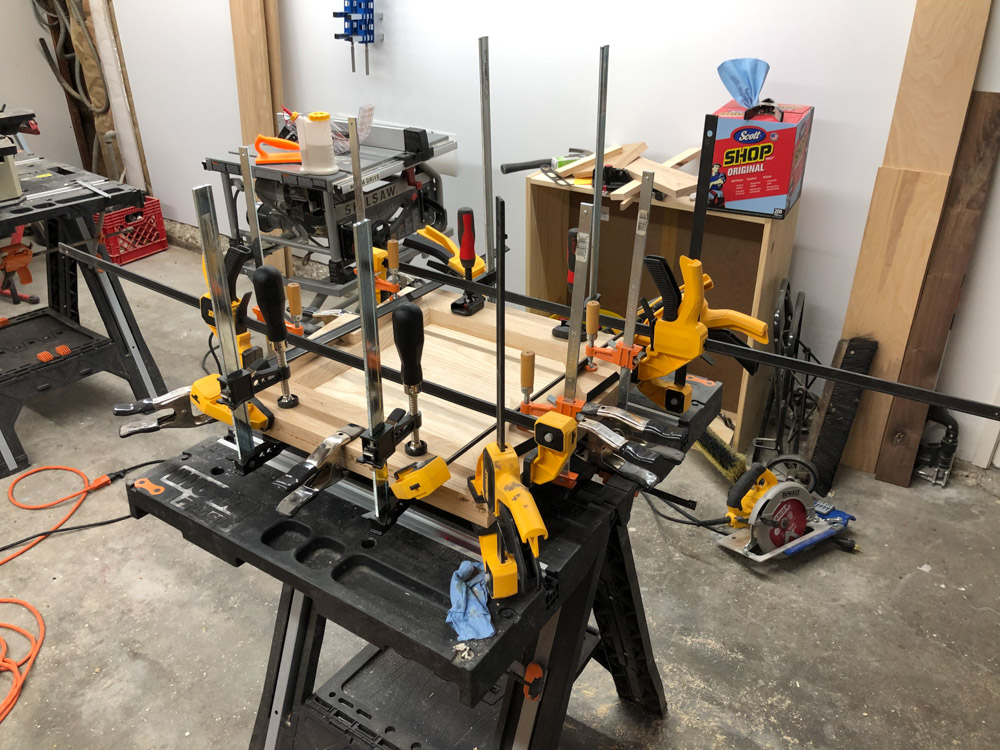
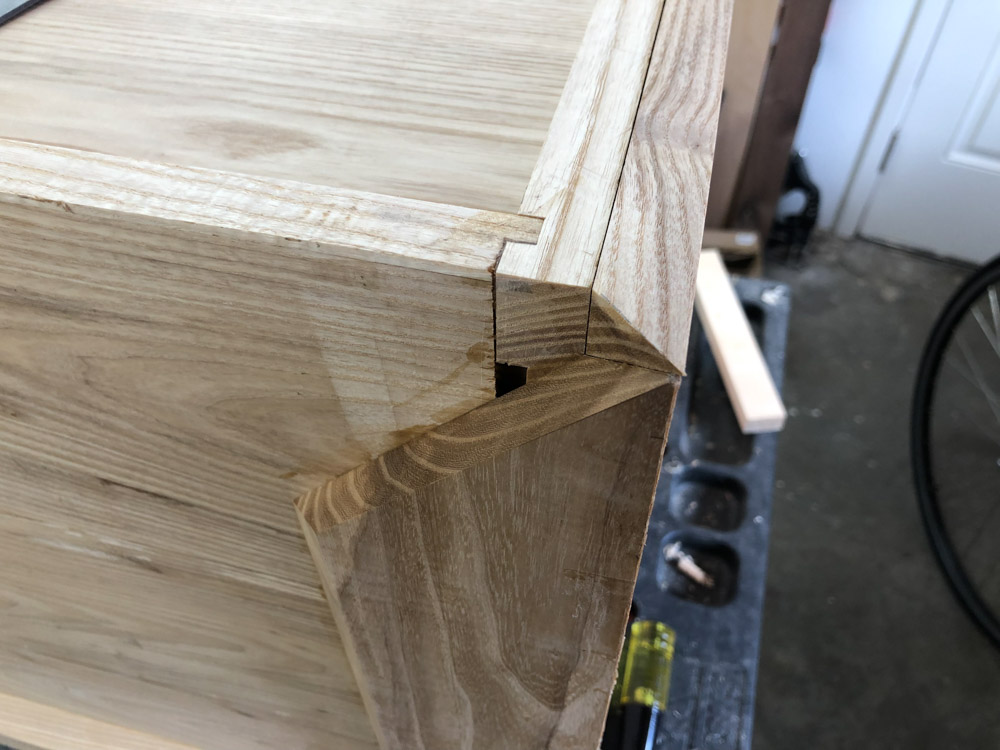
Here's where it starts to get a little tricky. The side have the same chamfered edging, but they are meant to stick up a bit from the side panels, in order to leave a gap below the closed lid (no pinched little fingers), and then also have a miter at the outside edges.
This makes for some unusual meeting of corners at the bottom of each side.
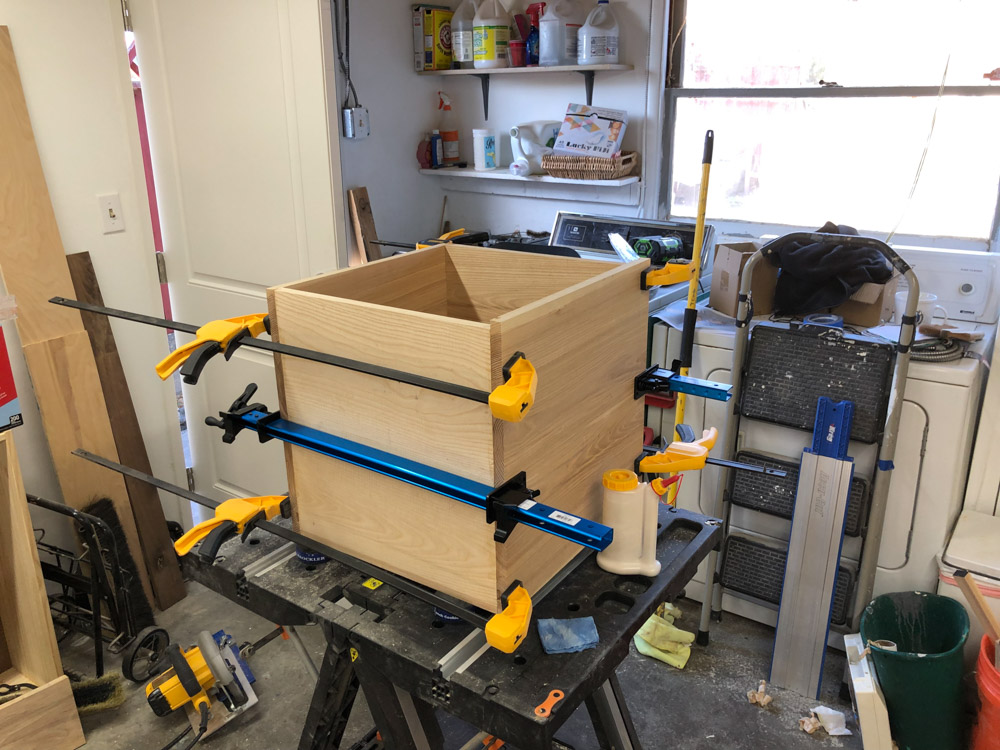
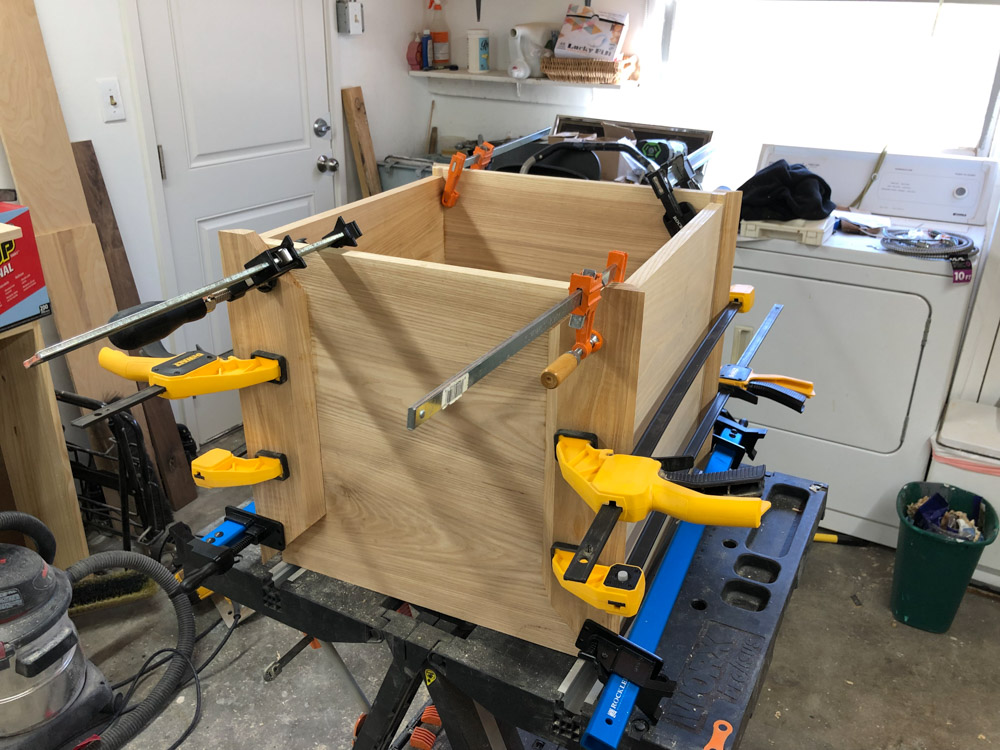
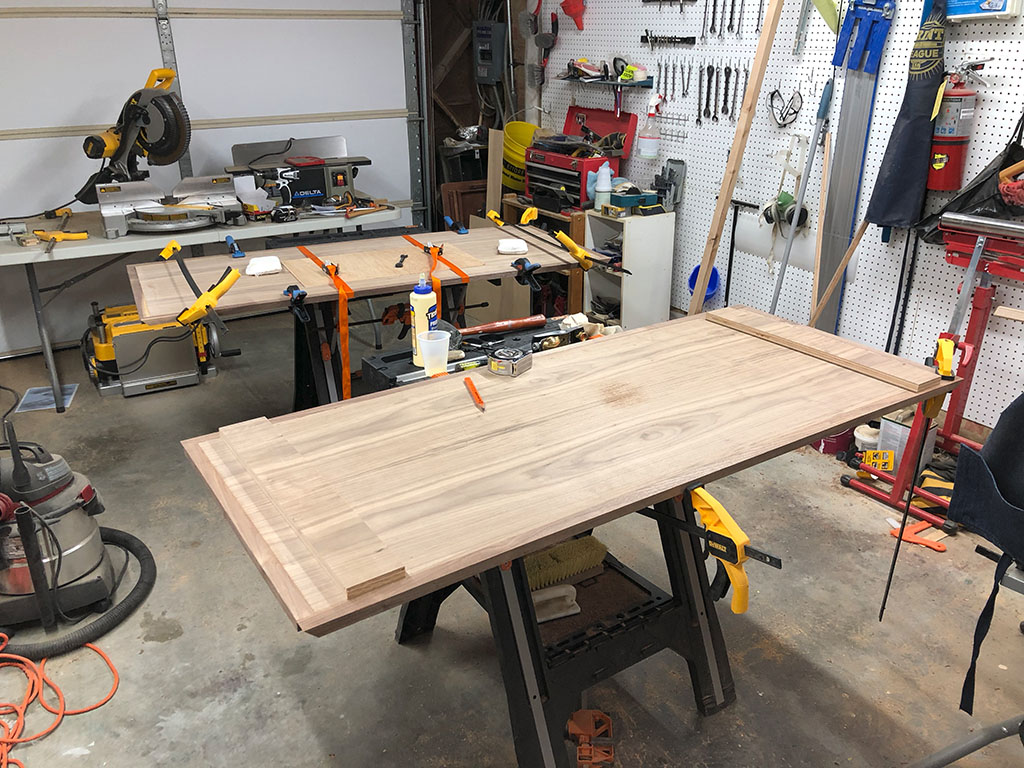
Here's the box all glued up, with the lid set on top.
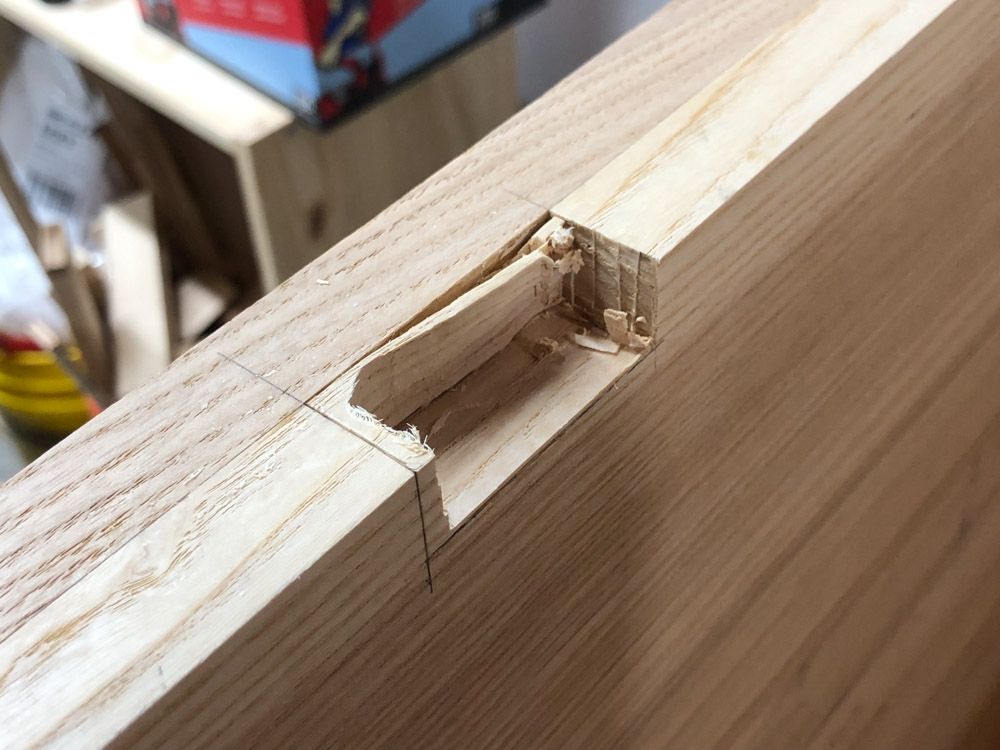
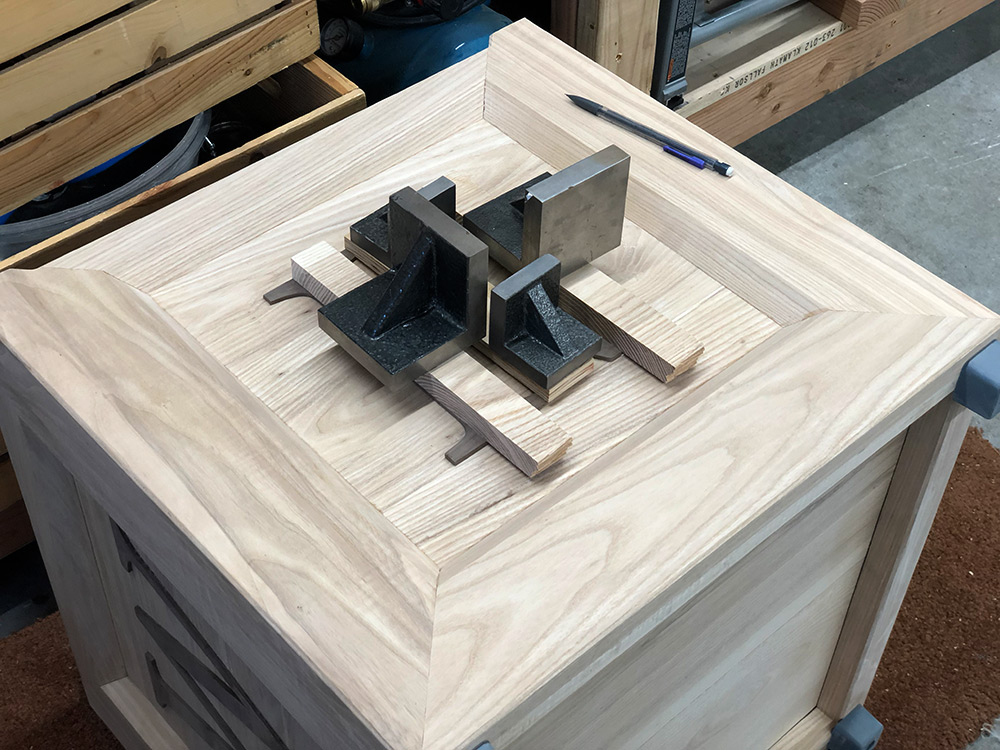
The torsion hinges that I bought (no slammed lids) were only meant to go onto a 3/4" board, not the 1 1/2" thickness I had at the back of the box, so I need to carve out some recesses for them. Probably could have sharpened those chisels a bit more…
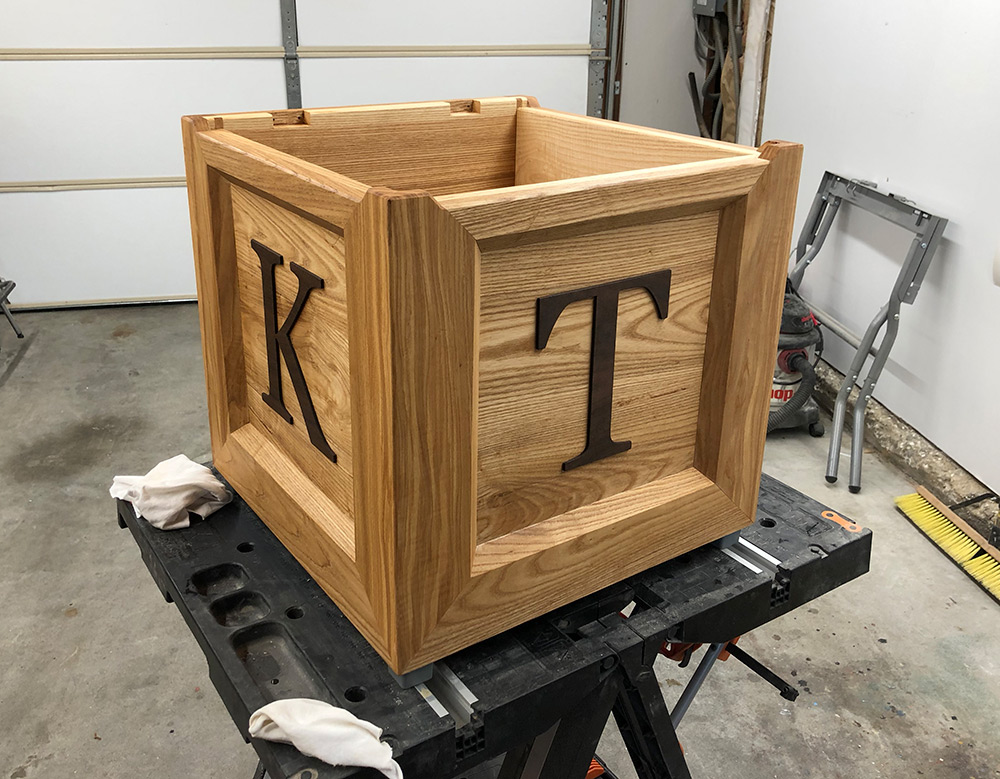
For the letters on the sides of the box, I had some 1/8" walnut laser cut at a local shop. Below you can see it after the burned edges had been sanded clean.
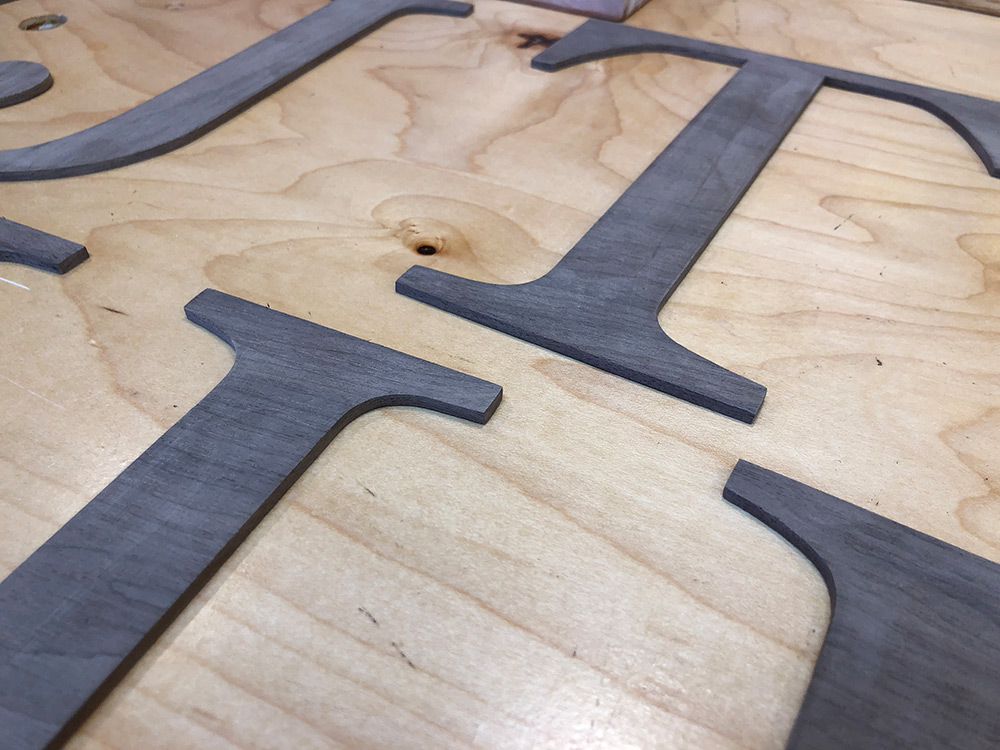
I had some high-tech clamping methods to glue those letters in place.
Finally, before assembly, I finished the box with tung oil (100% kid safe). A bit about tung oil: it smells pleasant and nutty, makes a nice rich finish and takes FOREVER to cure. On top of a few coats of the tung oil went a bit of a beeswax furniture polish (the sort that is used on children's wooden toys).
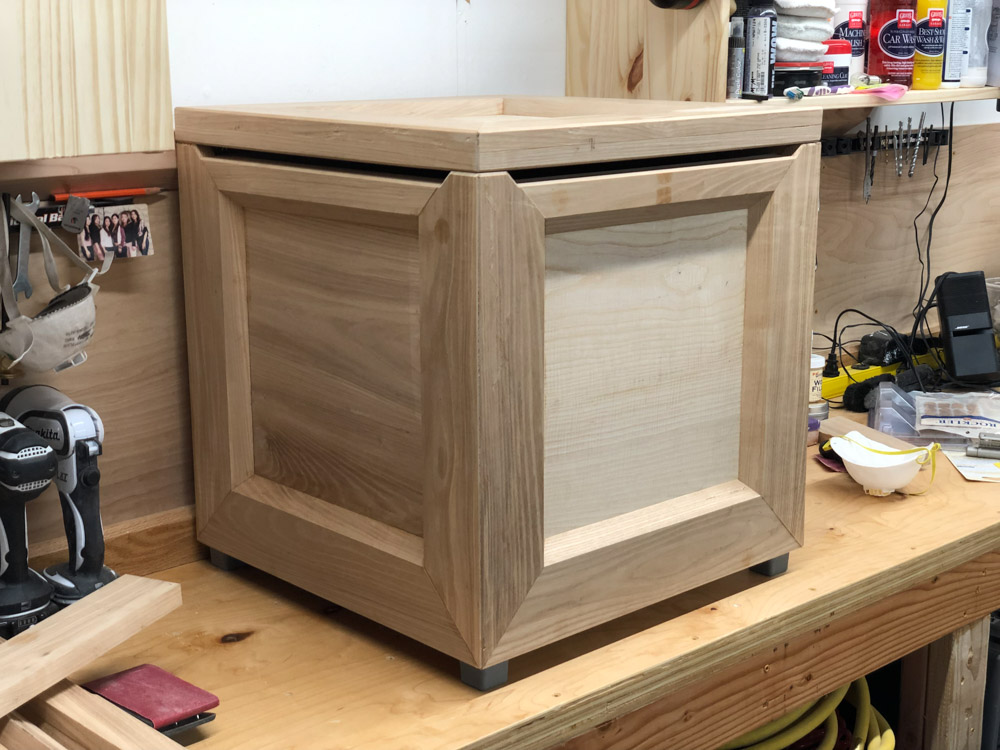
After finishing the hinges were put in place, chains added so that the top doesn't open TOO far, little rubber bumpers added on the front upper corners, for the lid to land on and non-slip rubber feet added to the bottom.
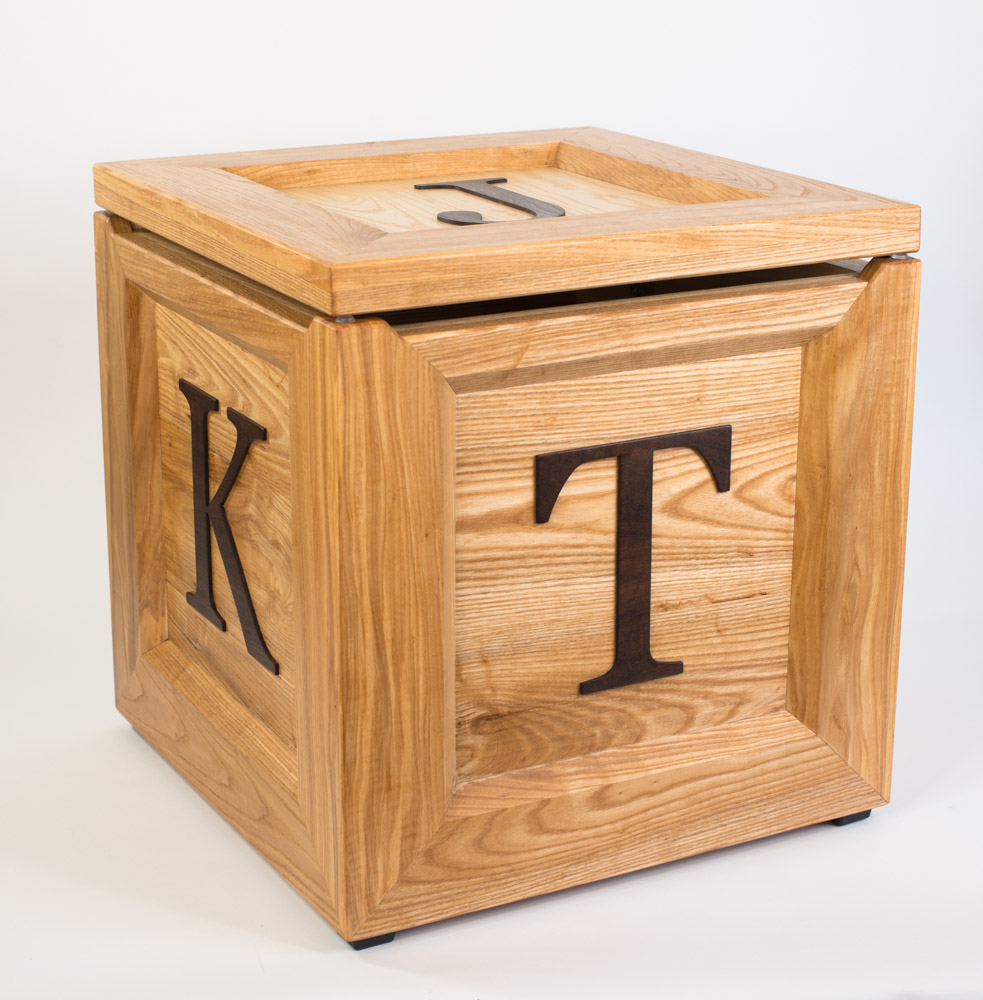
In all, I think the box turned out well and my friends seemed pleased with it :)
Here is a gallery with more photos of the finished product, where you can also see the hinges in action, holding the lid partly open.
Thanks for reading!
Below you can see the couple of images that I ended up with after my design process. I'll talk a bit about the special features as they come up in pictures later on, but the important thing to note is that it is big, heavy and made from solid ash. Did I mention that it is heavy?
This one is light on details and heavy on pictures, so enjoy the show!
As usual, I started with a pile of wood from my local hardwood dealer, and milled it down to 3/4".
After cutting down to rough length, the main side panels were glued up. Below you can see the panel clamps from Rockler that I got for this project. I try to embrace Mike Pekovich's (creative director at Fine Woodworking magazine) theory that you should try to buy a new tool for each project, thereby slowly increasing your set of tools, but also trying out something new.
The panels took a bit of fine tuning, planing, scraping and such to get them smooth and clean.
Turns out that the stock that I bought was an awkward width, being not quite wide enough to use two pieces to make one side. Fortunately, this extra bit should be hidden at the bottom of the inside.
And sometimes you accidentally make a panel just a liiiiiitle bit too narrow.
Here's the main box sides glued up. One side is a little taller in order to give the back hinge a little height. More on that shortly.
Below you can see the beveled edges being glued to the top.
Here's where it starts to get a little tricky. The side have the same chamfered edging, but they are meant to stick up a bit from the side panels, in order to leave a gap below the closed lid (no pinched little fingers), and then also have a miter at the outside edges.
This makes for some unusual meeting of corners at the bottom of each side.
Here's the box all glued up, with the lid set on top.
The torsion hinges that I bought (no slammed lids) were only meant to go onto a 3/4" board, not the 1 1/2" thickness I had at the back of the box, so I need to carve out some recesses for them. Probably could have sharpened those chisels a bit more…
For the letters on the sides of the box, I had some 1/8" walnut laser cut at a local shop. Below you can see it after the burned edges had been sanded clean.
I had some high-tech clamping methods to glue those letters in place.
Finally, before assembly, I finished the box with tung oil (100% kid safe). A bit about tung oil: it smells pleasant and nutty, makes a nice rich finish and takes FOREVER to cure. On top of a few coats of the tung oil went a bit of a beeswax furniture polish (the sort that is used on children's wooden toys).
After finishing the hinges were put in place, chains added so that the top doesn't open TOO far, little rubber bumpers added on the front upper corners, for the lid to land on and non-slip rubber feet added to the bottom.
In all, I think the box turned out well and my friends seemed pleased with it :)
Here is a gallery with more photos of the finished product, where you can also see the hinges in action, holding the lid partly open.
Thanks for reading!
Mid-century Desk Build
17 - September - 2019 - 21:43
The reason for this project was that I had been searching for a new desk for years and never quite found the right mix of size, design and price. There were desks that I really liked the look of, but they were either too big for my small home office, or maybe the materials were not very good, or they were just too expensive. After seeing a few how-to videos for midcentury-styled desks, it occurred to me that perhaps I could simply build my own desk, and in the process build up my home woodworking tool set.
I spent some time measuring and confirming exactly how big I wanted the desk to be, researched designs a bit and settled on deriving my design from the desk that this fellow makes in his video:
https://www.youtube.com/watch?v=sOhE8-W2Ryk
I made a few changes, so that the plywood wouldn’t be on the corners, mostly for durability and opted for a much thicker front edge, so I could add the large bevel. I also decided to go with dowels as the primary fastener, because I like torturing myself, apparently.
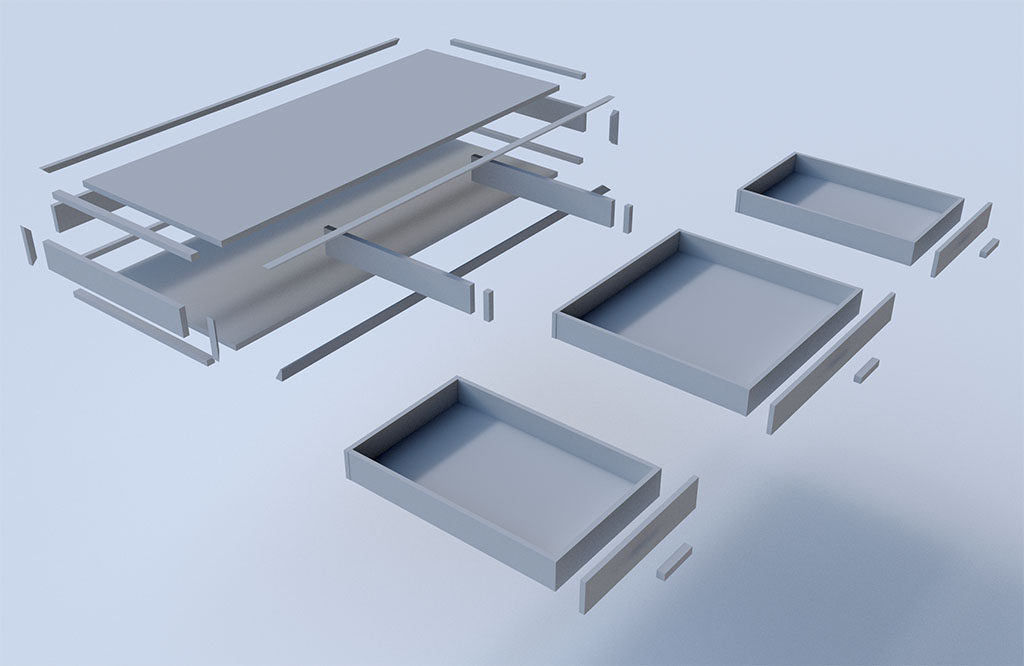
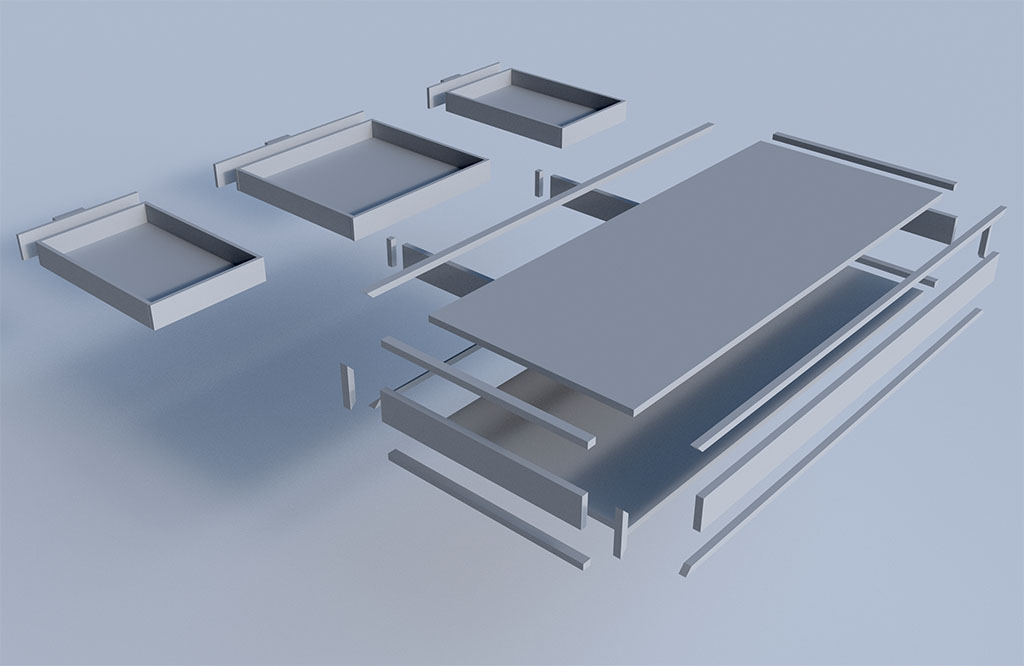
Anyhoo, here’s what I designed in the ol computer:
While I didn’t make myself proper plans, I did give myself a few exploded views to work from and then manually notated those with the important measurements.
After convincing my very-patient wife that I could instead spend the desk-buying money on tools and wood, I placed a few orders and waited for things to arrive.
Here’s what I used tools- and materials-wise for this project:
Tools
- Skilsaw worm-drive portable table saw (new)
- Delta 6” Jointer (new)
- Dewalt DW735x Planer (new)
- DeWalt 12in miter saw (already had)
- Porter Cable 2-1/4hp Router (already had)
- Dewalt 7-1/4” circular saw (already had)
- Makita finishing sander (already had)
- Misc drills, drivers, etc
Materials
- 4x8’ sheet of walnut veneer plywood
- A roughly 10' x 8" piece of 4/4 walnut, rough-sawn.
- A roughly 4' x 8" piece of 3/4" spalted birds eye maple, for the drawer fronts
- Set of walnut legs and angled brackets from tablelegs.com (https://tinyurl.com/y2u48799)
- Pre-finished ½” drawer side plywood (I forgot the exact amount)
- Three 2x4’ sheets of ¼” plywood for the drawer bottoms
- Approx 10’ x 8” piece of 4/4 walnut
- Approx 4’ x 8” piece of birdseye maple
- Drawer slides and pulls
- Strong sense of adventure

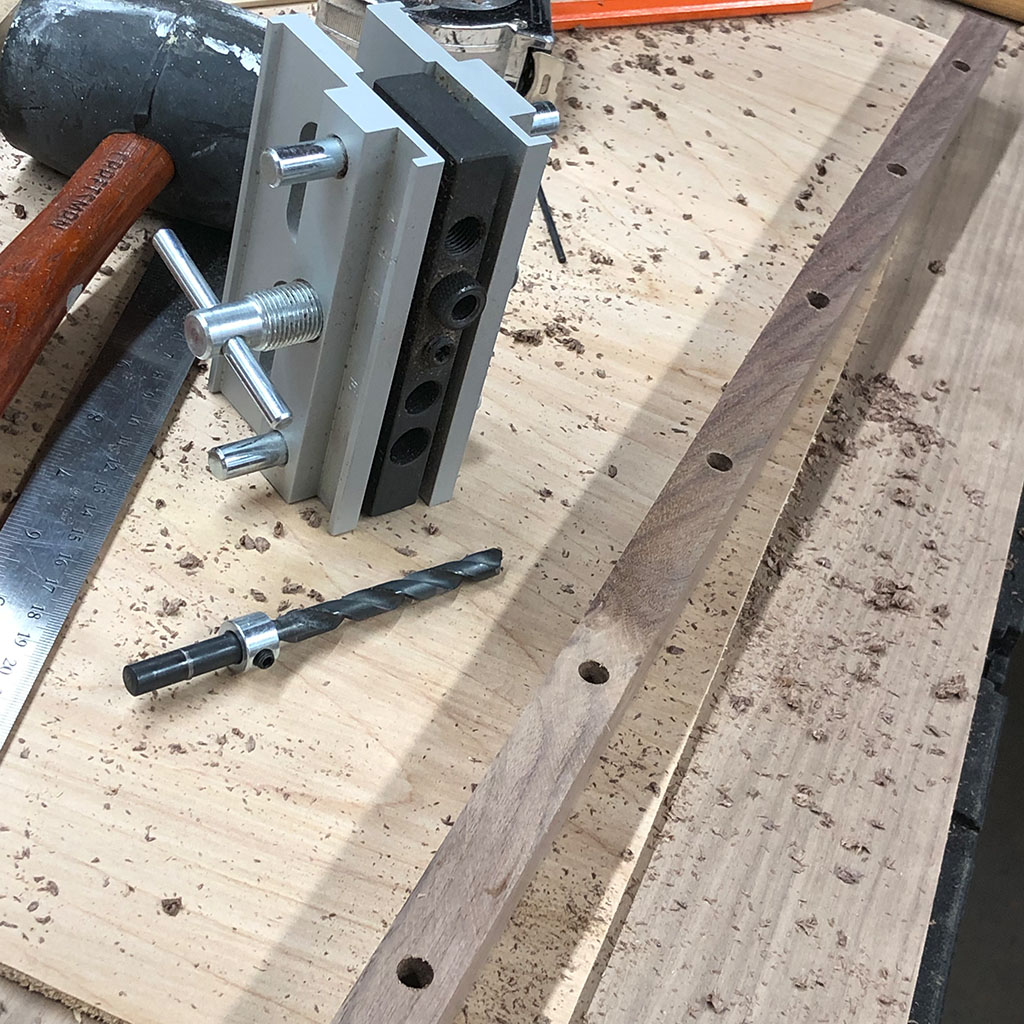
First order of business was ripping the big sheet of plywood down into the top and bottom pieces. This took a bit of help from the afore-mentioned patient wife, since my table saw is far smaller than a sheet of plywood. Once it was cut down a bit, I hopped right into milling down the walnut to final thickness (going to mention why NOT to do this in a bit), and cutting and doweling the edges and corners.
Here you can see the doweling jig that I was using to center the holes.
I used these handy Bandy Clamps from Rockler (https://www.rockler.com/rockler-bandy-clamps
) to attach the corners and in this photo you can see why I say to NOT mill your wood to final thickness right away. What I SHOULD have done it leave it a bit thicker, glue it on and then plane it down, in order to avoid the plywood being a bit higher, as you can see on the right side below. This is also how I found that the doweling jig is a bit of a beast in that it always seems to be just a little off, so you need to build with that in mind and give yourself extra wood to shave down later. Ah well, live and learn.
Below you can see the top and bottom pieces with the edging glued on. This is also when I discovered that I need roughly 800 more clamps than I currently owned. What is also visible here are the end pieces of plywood that will eventually give the desk its thickness.
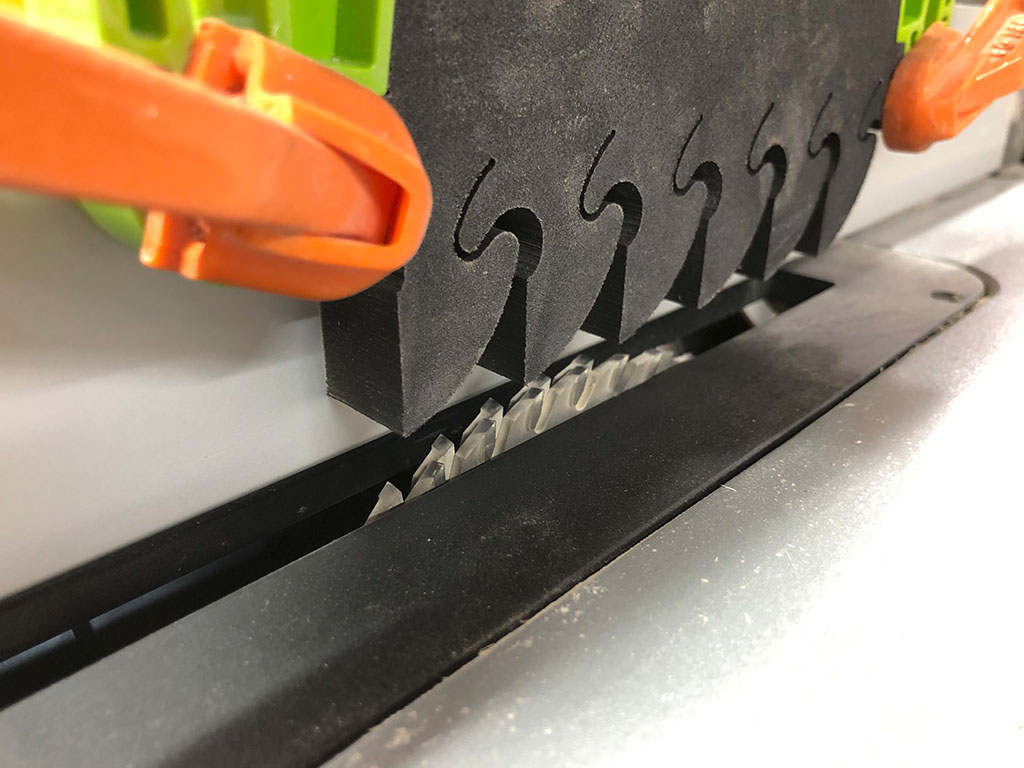
But before the desk gets put together, I opted to make my life a little easier and try to get the drawers all built and fit, since this would be far easier with no top on the desk. I cut all the drawer sides to length and width on the table saw and miter saw and then set up the table saw with a dado blade in order to cut the grooves for the drawer bottoms.
Here you can see the dado setup and feather board for safety. I also just learned a few weeks ago that dado blades are illegal in Europe for safety reasons. Interesting!
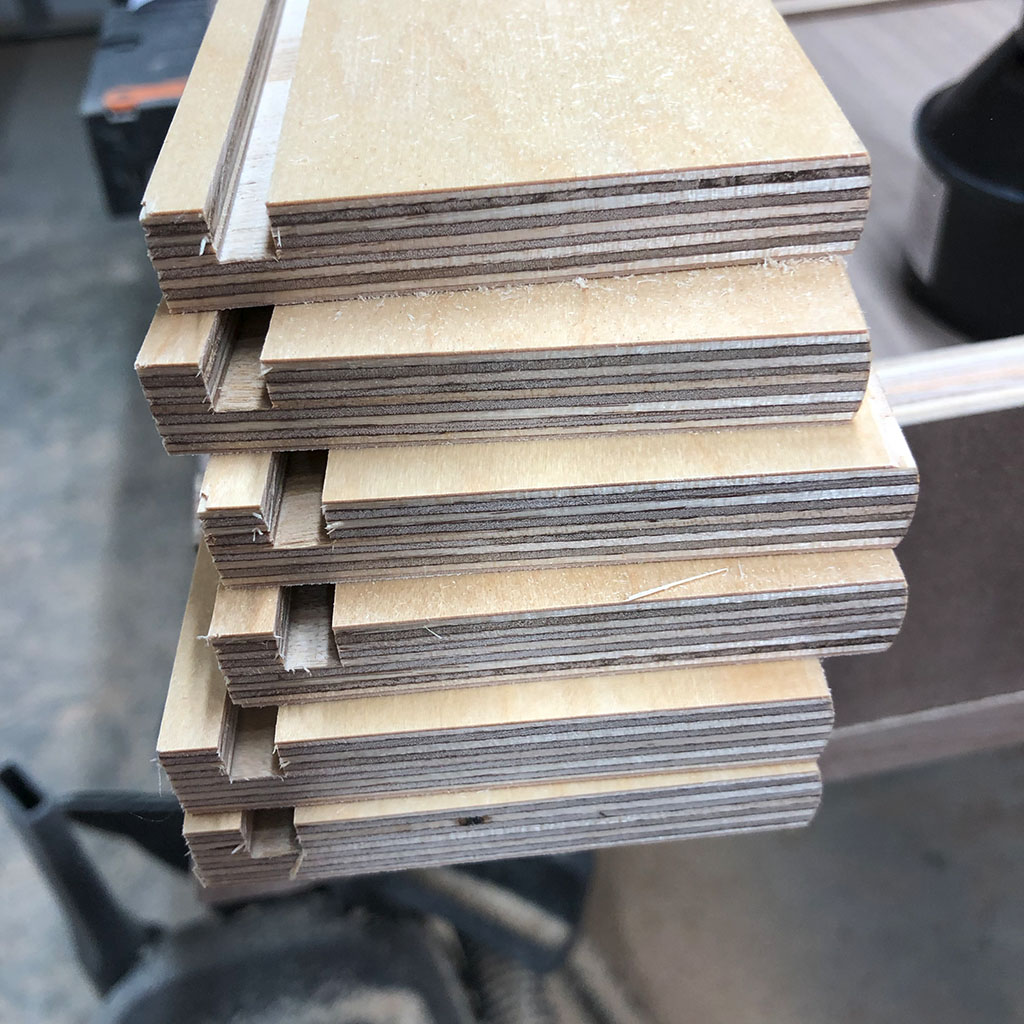
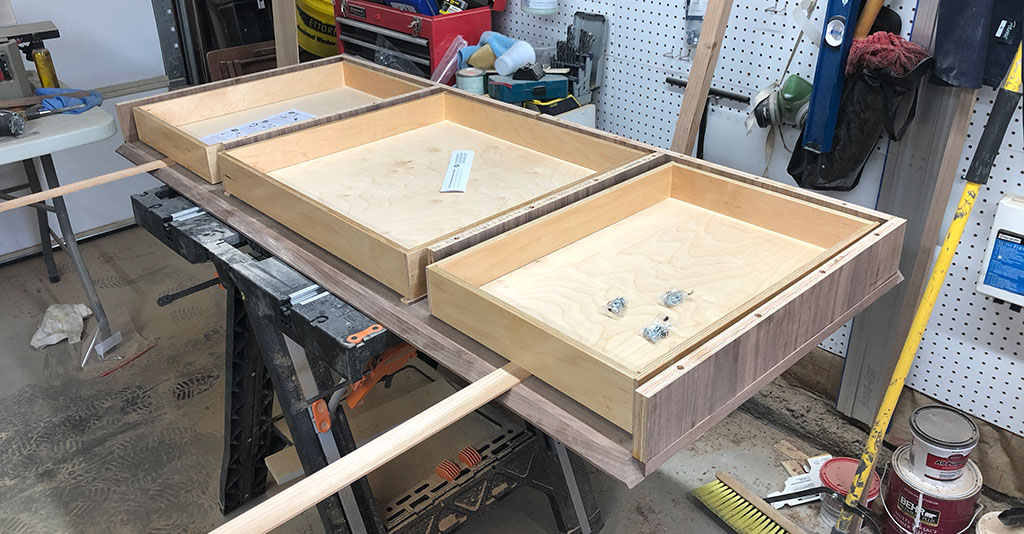
Here’s the freshly cut drawer sides. The plywood that I bought for these was prefinished and had the edges rounded over (right edges in the photo). I cut the drawer sides as to always take advantage of this rounded edge, so that the top edge of each drawer had this nice rounded and finished surface.
I found that using my one-car garage as a wood shop has a few disadvantages. There is no dust collection, and living in a fairly dense neighborhood, I wanted to keep the doors closed in order to keep the sound from being too disruptive. As a result, the air gets pretty thick with dust and it’s also extremely loud in the small enclosed space.
Here I am all dolled up in my dust and noise protection gear.

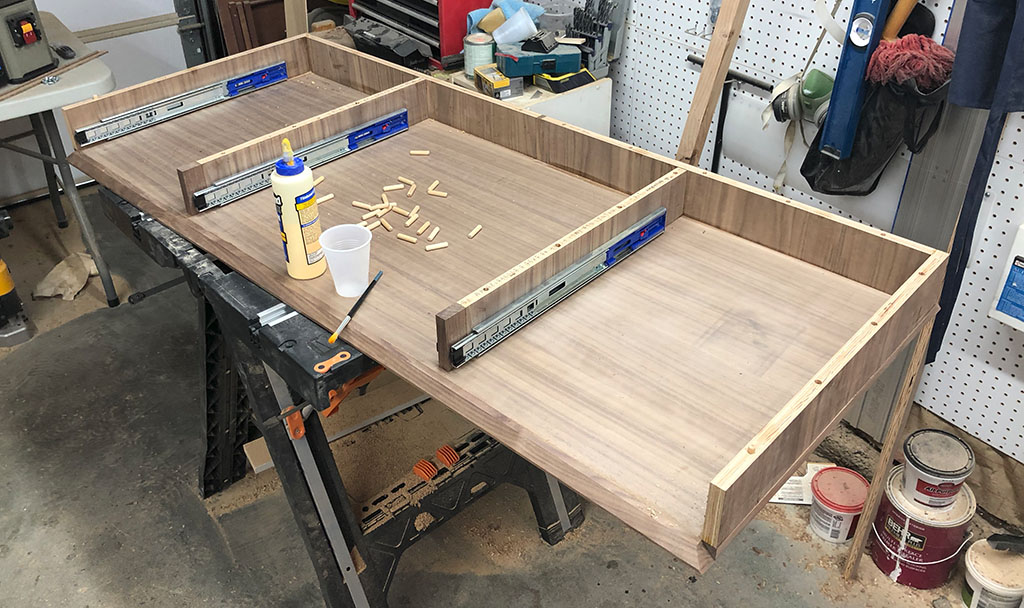
With the drawer boxes assembled, I placed them in the desk in order to figure out placement of the drawer slides. I simply had some 1/8” thick pieces of wood that I used to set the heights so that I could measure where the slides should be on the boxes.
Here you can see the slides in place and me getting prepared to glue all the dowels in place before gluing on the top. Also note how much saw dust is all over everything in the background.
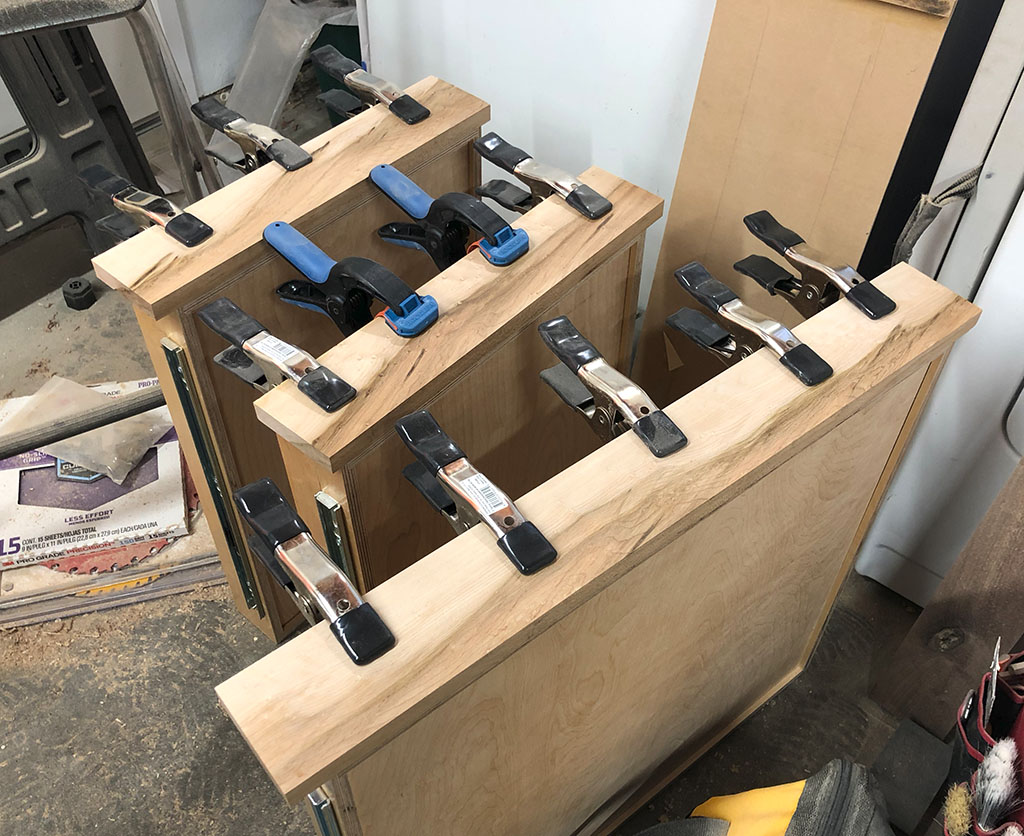
Back to the drawers. Here you can see the milled and sized birdseye maple glued to the front of the drawer boxes.
The big glue-up! Here’s where the top and bottom came together and where I still had FAR too few clamps. This was actually pretty straightforward, since the dowels kept everything pretty well in line.

Here’s the big gap in my pictures. Since I hadn’t really intended to write a blog post about this project, I didn’t do a very good job of documenting the steps involved with attaching the legs and the finishing process.
Somewhere in here was also the routing of the front lip, in order to give it the bevel. I don’t have a router table, so this was done freehand with the edge attached to the desk. It really taught me that I need a router table ;-) There are a few bumps where the router wiggled, but it still turned out well overall.
The legs were actually quite simple to attach. The cleats that they came with just screw right to the bottom of the desk, in a position such that they do not stick out further than the edge of the desk (since they are slightly splayed out). I posted photos of the completed desk on reddit and got a few questions about the strength of the splayed legs, and so far they seem super strong. The cleats are large and solid walnut, so there is very little give.
I decided to go with Danish Oil as the finish , in order for it to not be too glossy and have it still feel like natural wood, more or less. I applied four coats (I think), sanding with 400 grit between the first couple and then ‘wet sanding’ with 800-grit using the Danish Oil as the water and I was pretty happy with that finish. I then read a suggestion to put a few coats of furniture wax over top and that’s where I ended up.
Finally the drawer pulls were attached and the little metal feets attached to the legs.
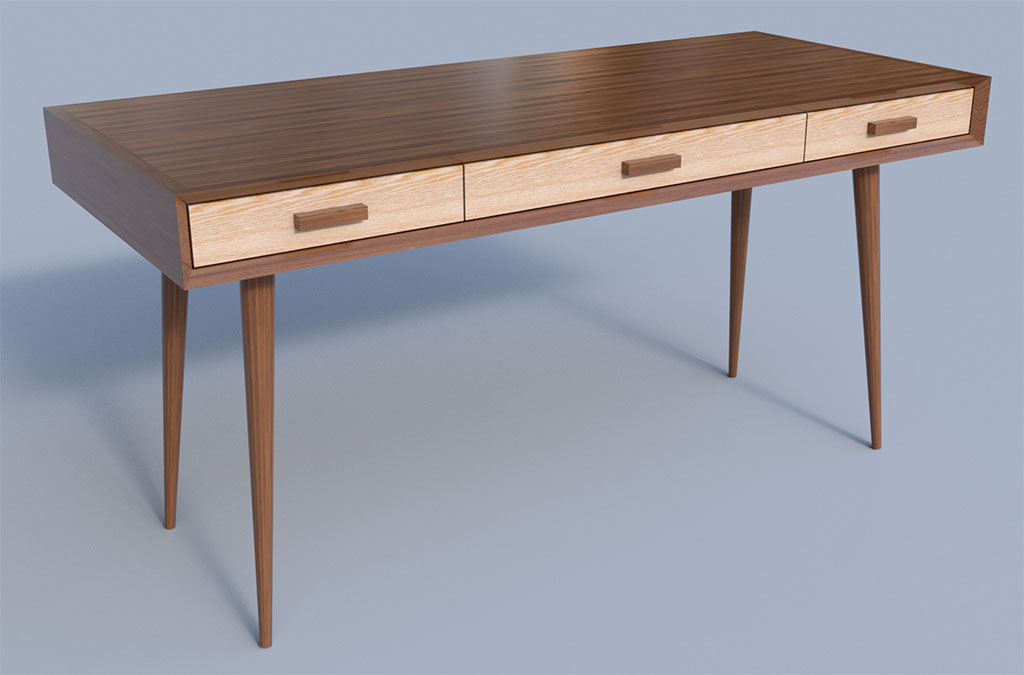
Here’s the final result, with just the Danish Oil applied
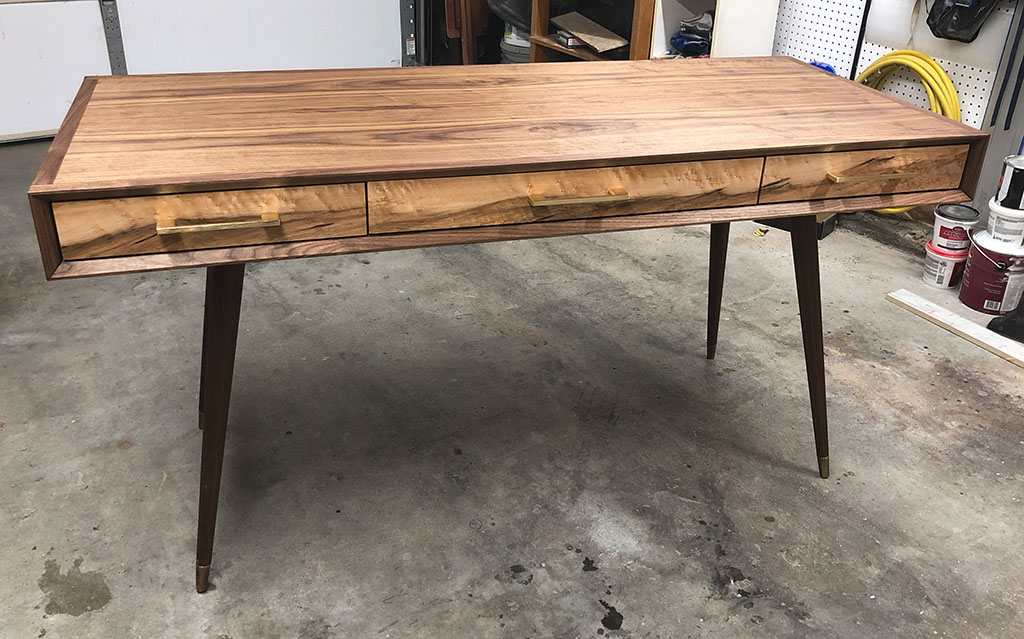

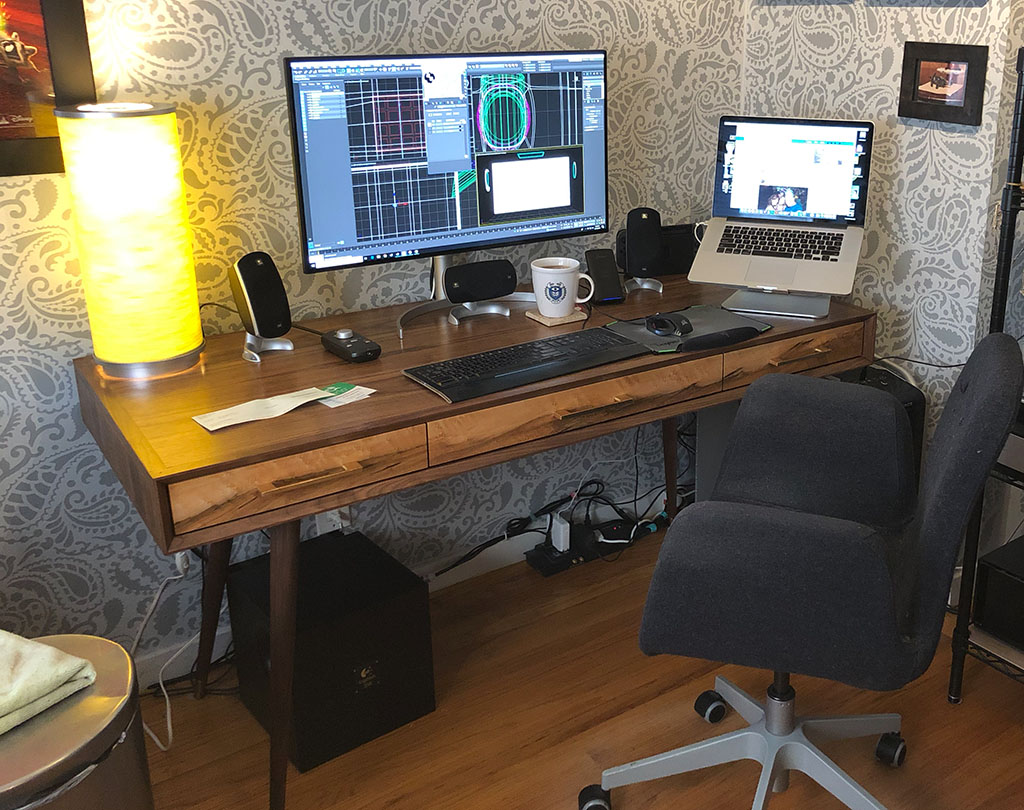
Here’s the final FINAL result, in place, with a few coats of furniture wax
Overall, I learned a ton about woodworking during this project and also learned that there is MUCH more to learn. The biggest takeaway for me was getting into the habit of squaring up all my tools before I use them and after I adjust them. Those front corners would be much tighter if I had noticed that my miter saw had gotten a degree or two out of square.
I’ve only just scratched the surface of working with wood, but also I have found that it is something that I really enjoy, so look for more woodworking projects (with more thorough documentation) here in the future!
Thanks for reading!
I spent some time measuring and confirming exactly how big I wanted the desk to be, researched designs a bit and settled on deriving my design from the desk that this fellow makes in his video:
https://www.youtube.com/watch?v=sOhE8-W2Ryk
I made a few changes, so that the plywood wouldn’t be on the corners, mostly for durability and opted for a much thicker front edge, so I could add the large bevel. I also decided to go with dowels as the primary fastener, because I like torturing myself, apparently.
Anyhoo, here’s what I designed in the ol computer:
While I didn’t make myself proper plans, I did give myself a few exploded views to work from and then manually notated those with the important measurements.
After convincing my very-patient wife that I could instead spend the desk-buying money on tools and wood, I placed a few orders and waited for things to arrive.
Here’s what I used tools- and materials-wise for this project:
Tools
- Skilsaw worm-drive portable table saw (new)
- Delta 6” Jointer (new)
- Dewalt DW735x Planer (new)
- DeWalt 12in miter saw (already had)
- Porter Cable 2-1/4hp Router (already had)
- Dewalt 7-1/4” circular saw (already had)
- Makita finishing sander (already had)
- Misc drills, drivers, etc
Materials
- 4x8’ sheet of walnut veneer plywood
- A roughly 10' x 8" piece of 4/4 walnut, rough-sawn.
- A roughly 4' x 8" piece of 3/4" spalted birds eye maple, for the drawer fronts
- Set of walnut legs and angled brackets from tablelegs.com (https://tinyurl.com/y2u48799)
- Pre-finished ½” drawer side plywood (I forgot the exact amount)
- Three 2x4’ sheets of ¼” plywood for the drawer bottoms
- Approx 10’ x 8” piece of 4/4 walnut
- Approx 4’ x 8” piece of birdseye maple
- Drawer slides and pulls
- Strong sense of adventure
First order of business was ripping the big sheet of plywood down into the top and bottom pieces. This took a bit of help from the afore-mentioned patient wife, since my table saw is far smaller than a sheet of plywood. Once it was cut down a bit, I hopped right into milling down the walnut to final thickness (going to mention why NOT to do this in a bit), and cutting and doweling the edges and corners.
Here you can see the doweling jig that I was using to center the holes.
I used these handy Bandy Clamps from Rockler (https://www.rockler.com/rockler-bandy-clamps
) to attach the corners and in this photo you can see why I say to NOT mill your wood to final thickness right away. What I SHOULD have done it leave it a bit thicker, glue it on and then plane it down, in order to avoid the plywood being a bit higher, as you can see on the right side below. This is also how I found that the doweling jig is a bit of a beast in that it always seems to be just a little off, so you need to build with that in mind and give yourself extra wood to shave down later. Ah well, live and learn.
Below you can see the top and bottom pieces with the edging glued on. This is also when I discovered that I need roughly 800 more clamps than I currently owned. What is also visible here are the end pieces of plywood that will eventually give the desk its thickness.
But before the desk gets put together, I opted to make my life a little easier and try to get the drawers all built and fit, since this would be far easier with no top on the desk. I cut all the drawer sides to length and width on the table saw and miter saw and then set up the table saw with a dado blade in order to cut the grooves for the drawer bottoms.
Here you can see the dado setup and feather board for safety. I also just learned a few weeks ago that dado blades are illegal in Europe for safety reasons. Interesting!
Here’s the freshly cut drawer sides. The plywood that I bought for these was prefinished and had the edges rounded over (right edges in the photo). I cut the drawer sides as to always take advantage of this rounded edge, so that the top edge of each drawer had this nice rounded and finished surface.
I found that using my one-car garage as a wood shop has a few disadvantages. There is no dust collection, and living in a fairly dense neighborhood, I wanted to keep the doors closed in order to keep the sound from being too disruptive. As a result, the air gets pretty thick with dust and it’s also extremely loud in the small enclosed space.
Here I am all dolled up in my dust and noise protection gear.
With the drawer boxes assembled, I placed them in the desk in order to figure out placement of the drawer slides. I simply had some 1/8” thick pieces of wood that I used to set the heights so that I could measure where the slides should be on the boxes.
Here you can see the slides in place and me getting prepared to glue all the dowels in place before gluing on the top. Also note how much saw dust is all over everything in the background.
Back to the drawers. Here you can see the milled and sized birdseye maple glued to the front of the drawer boxes.
The big glue-up! Here’s where the top and bottom came together and where I still had FAR too few clamps. This was actually pretty straightforward, since the dowels kept everything pretty well in line.
Here’s the big gap in my pictures. Since I hadn’t really intended to write a blog post about this project, I didn’t do a very good job of documenting the steps involved with attaching the legs and the finishing process.
Somewhere in here was also the routing of the front lip, in order to give it the bevel. I don’t have a router table, so this was done freehand with the edge attached to the desk. It really taught me that I need a router table ;-) There are a few bumps where the router wiggled, but it still turned out well overall.
The legs were actually quite simple to attach. The cleats that they came with just screw right to the bottom of the desk, in a position such that they do not stick out further than the edge of the desk (since they are slightly splayed out). I posted photos of the completed desk on reddit and got a few questions about the strength of the splayed legs, and so far they seem super strong. The cleats are large and solid walnut, so there is very little give.
I decided to go with Danish Oil as the finish , in order for it to not be too glossy and have it still feel like natural wood, more or less. I applied four coats (I think), sanding with 400 grit between the first couple and then ‘wet sanding’ with 800-grit using the Danish Oil as the water and I was pretty happy with that finish. I then read a suggestion to put a few coats of furniture wax over top and that’s where I ended up.
Finally the drawer pulls were attached and the little metal feets attached to the legs.
Here’s the final result, with just the Danish Oil applied
Here’s the final FINAL result, in place, with a few coats of furniture wax
Overall, I learned a ton about woodworking during this project and also learned that there is MUCH more to learn. The biggest takeaway for me was getting into the habit of squaring up all my tools before I use them and after I adjust them. Those front corners would be much tighter if I had noticed that my miter saw had gotten a degree or two out of square.
I’ve only just scratched the surface of working with wood, but also I have found that it is something that I really enjoy, so look for more woodworking projects (with more thorough documentation) here in the future!
Thanks for reading!