
December 2013
Beginning the Build: Morgan Three Wheeler
01 - December - 2013 - 14:19
On my continuing quest for a better car paint finish, I've chosen a Morgan Three Wheeler model, from Minicraft, as my next build.
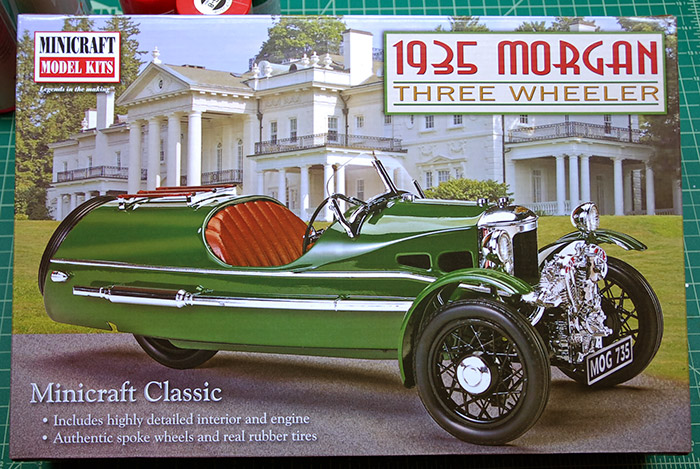
Often, when I pick out kits to build, I do so because of the difficulty and complexity of the kit. I look for well-engineered kits, with lots of extras like photo-etch, metal parts, great decals, etc. This kit, on the other hand, I picked out because I really like the Morgan Three Wheeler. I've seen a few in person and always though that they were just really cool vehicles.
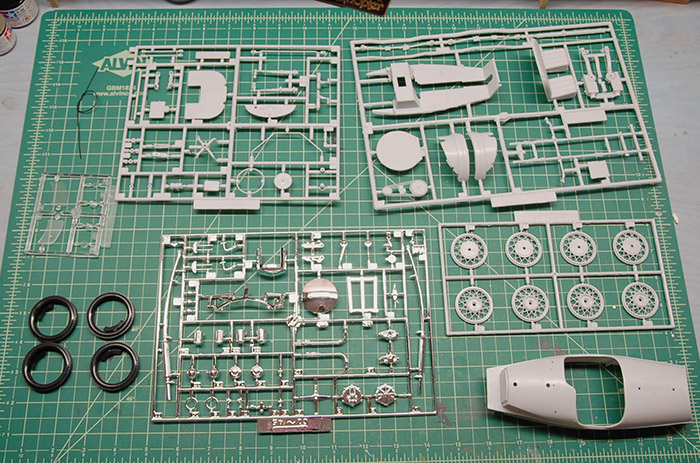
As a result of that method of kit selection, this one ended up taking quite a bit of extra work to make it acceptable. Below you can see the parts as they came out of the box: A few trees of a fairly soft grey plastic, some hard-ish rubber tires, some clear parts, a length of tubing for the engine and one tree of thickly-coated chrome parts.
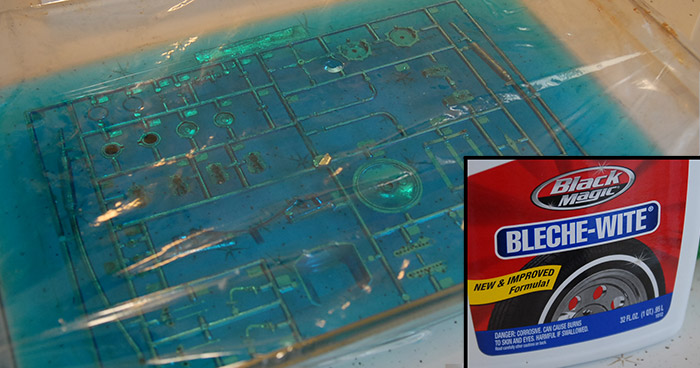
First and foremost, I knew that the chrome parts were just not going to cut it. The varnish/primer that they use under the chrome was on there pretty thick, and in combination with the chrome paint, was filling in many of the details on the parts. That's not evening mentioning the fundamental problem with parts that are painted on the trees: The spots that are left unpainted on the parts once they are cut off the sprue. I decided to give a technique a try that I had read about online and in magazines: de-chroming the parts with Bleche-wite. Bleche-wite is a cleaner that is meant to whiten the whitewalls of tires. It's a pretty aggressive cleaner, so should be handled with care, in a well-ventilated area. I used a baking dish, with the bottle of cleaner emptied into it. I dropped the chrome sprue in there and covered it with plastic wrap. I found that it took a couple multi-hour sessions to get all the chrome off, but because this solvent isn't as aggressive as something like lacquer thinner, I didn't have to worry about the plastic itself dissolving. If you are going to try this yourself, I recommend giving it a few hours in the cleaner and then giving it a light scrubbing with a toothbrush (don't use the brush afterward, despite the tooth-whitening potential), and repeat that process until all the chrome and underlying varnish is all gone.
With that out of the way, I should probably mention something about this kit: It is a mess. Compared to many of the other kits that I have built, from the likes of Tamiya, Hobbyboss and Dragon, this one is of markedly lower quality. There is heaps of flash, the registration between the mold halves is not very good, there are ejector pin marks and sinks all over the place and it just requires a great deal of work to get into shape.
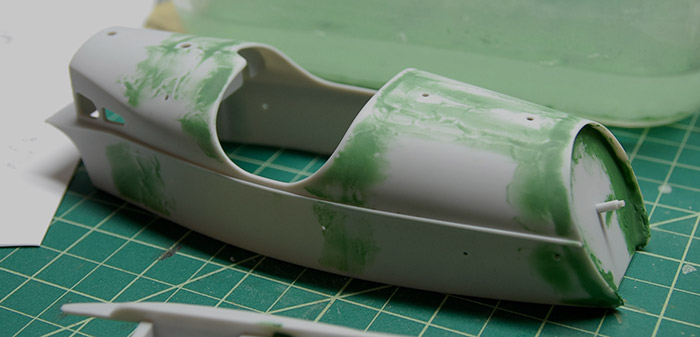
That said, I began by getting the body into a state that is ready for primer and paint. There were sinks on the exterior of the body in every place where there were structural braces on the inside. I ended up thinning some green Squadron putty with some lacquer thinner and spreading that over these areas. After that, I worked my way through various grits of sandpaper, wet sanding until it was smooth enough to be primed. Below you can see the exterior has been sanded, but the rear tire area still needs to be cleaned up.
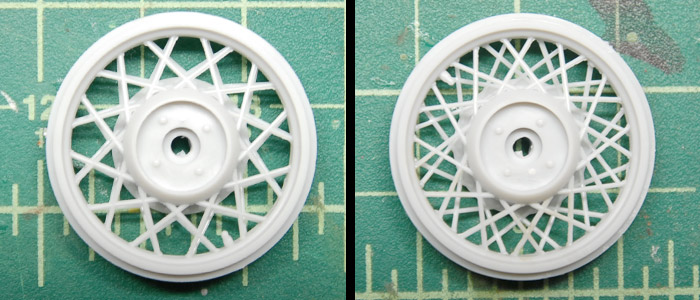
Also, while consulting some reference, I determined that the way the instructions wanted me to put the wheel halves together would have resulted in wheels that didn't really look like the real things. The 1:1 car's wire wheels look to have an offset pattern, making for a much more visually-dense criss-cross pattern. The way the parts aligned resulted in all the spokes lining up, making for a much simpler look. I wanted the more complex look, so I shaved off the locator pins and offset the halves a few degrees. Below you can see the stock and offset locations of the wheel halves.
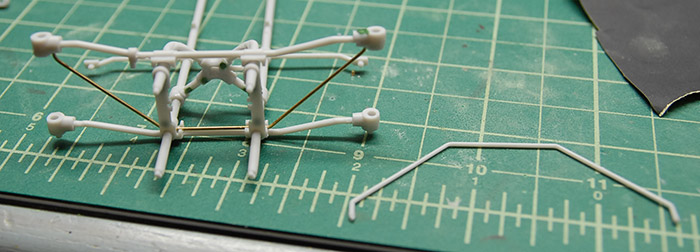
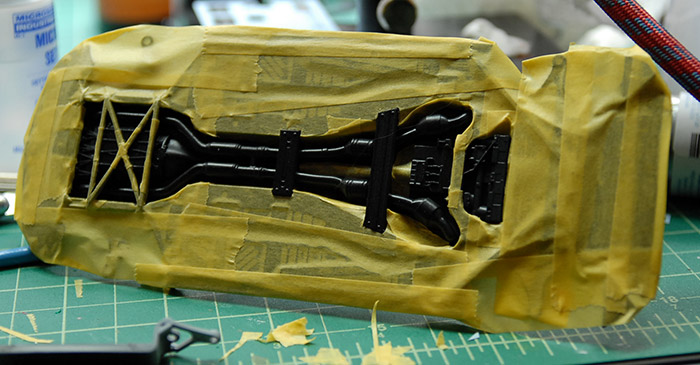
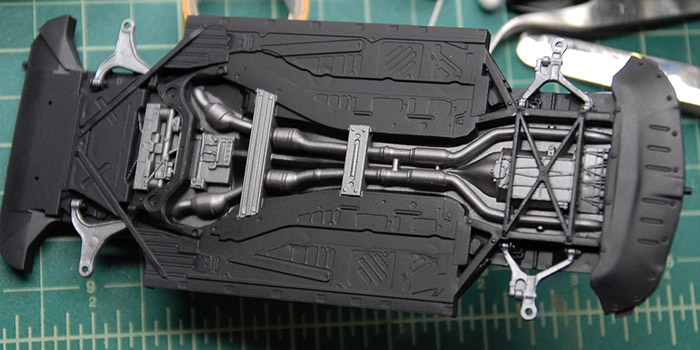
Some thing unusual about this kit is that it is constructed very much like the real car, with an underlying frame that the body sits on top of. While I'm not sure if this was the best idea, since the plastic that this kit is made of is pretty soft and not the best structural material, that is how it is made, so that is what I had to work with. While assembling the front end, I did notice that one of the bracing bars was cast out of scale, so I just replaced it with some extra brass rod that I had laying around, bent to match.
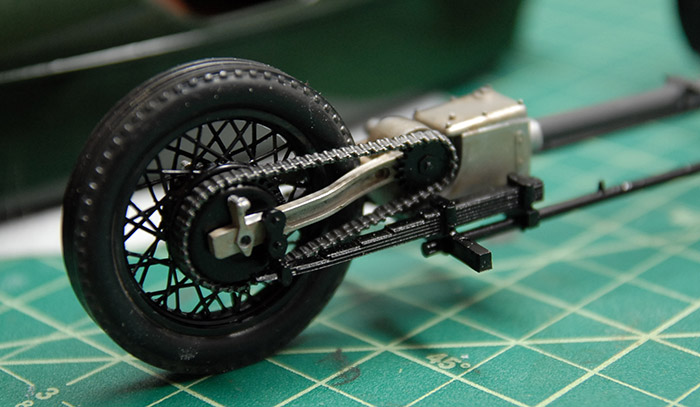
Below you can see a painted wheel, tire mounted, attached to the rear drive assembly. This whole assembly ends up being covered by the body, though, so there were some things here that I would usually fix, but decided not to bother with in this case. As a side note, to anyone else who may attempt this kit: The instructions mention dipping the tires in warm water in order to soften them before stretching them around the wheels. Use HOT water. It took me a few tries, with increasing warm/hot water to get the tires onto the wheels, and I managed to damage a few spokes. Using very hot water from the start would probably avoid any damage.
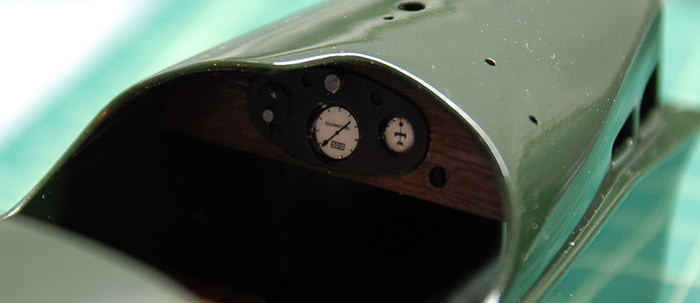
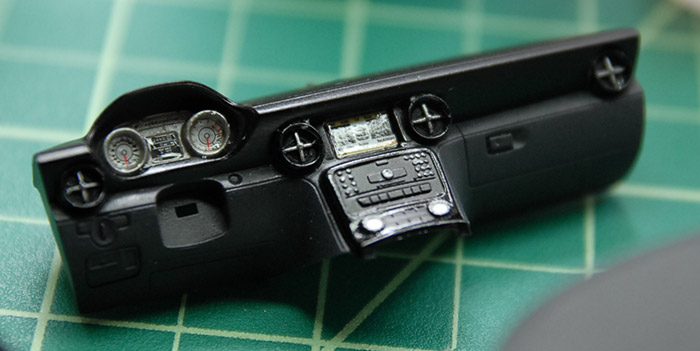
Below you can see the fairly simple dash board, with decals applied. The kit came with some very thick lenses for these gauges, but I decided to just use some clear parts cement to coat them instead, so that the graphics could still be seen.
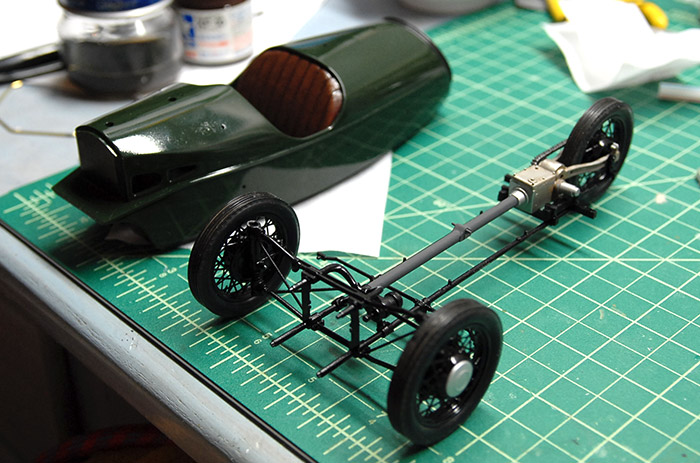
Below you can see the frame all together, and the body painted with the interior painted and attached.
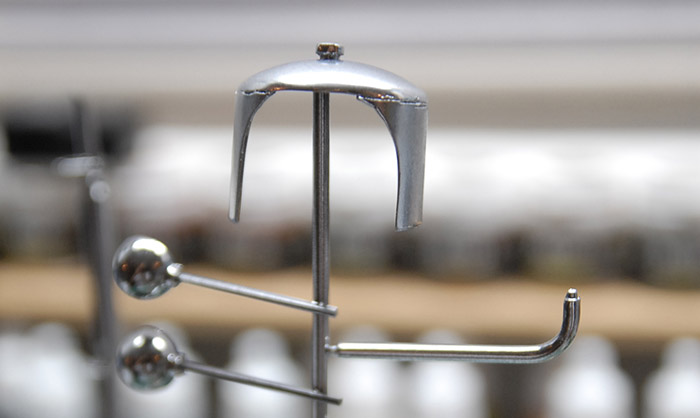
Here I'll touch upon something that will be addressed more in the next blog post: conversion from an air-cooled engine to a water-cooled one. The first part of that involved reshaping the front cowl a bit. The model part also had a very large raised band where there should have been a barely sunken weld bead. I reshaped the front opening a bit to give some curve to the sides and then cut off the raised ridge and used a heated sewing pin to carve a bit of a weld bead. Below you can see the reshaped cowl along with a few other parts after getting a coat of primer, black gloss and Alclad chrome paint.
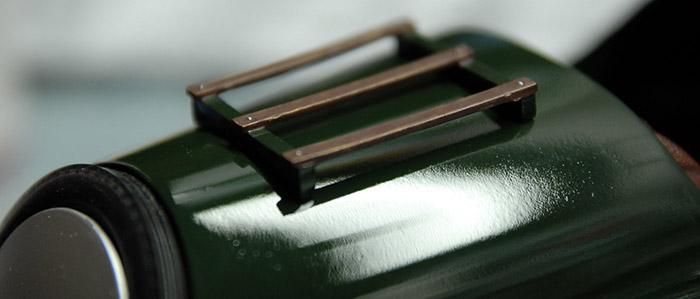
Finally, below you can see the rear rack mounted and a general indication of the quality of the paint job on this one. It's generally better than the SLS model, but still not quite what I was hoping for. This one is Tamiya british green and clear paints right from the can. I've decided that after this model is done, I'm just going to get a bunch of cheap car kits and just spend some time practicing my painting techniques on the bodies of those models.
Thanks for reading, and tune in for the next post, which will have some interesting new developments in model building!
Often, when I pick out kits to build, I do so because of the difficulty and complexity of the kit. I look for well-engineered kits, with lots of extras like photo-etch, metal parts, great decals, etc. This kit, on the other hand, I picked out because I really like the Morgan Three Wheeler. I've seen a few in person and always though that they were just really cool vehicles.
As a result of that method of kit selection, this one ended up taking quite a bit of extra work to make it acceptable. Below you can see the parts as they came out of the box: A few trees of a fairly soft grey plastic, some hard-ish rubber tires, some clear parts, a length of tubing for the engine and one tree of thickly-coated chrome parts.
First and foremost, I knew that the chrome parts were just not going to cut it. The varnish/primer that they use under the chrome was on there pretty thick, and in combination with the chrome paint, was filling in many of the details on the parts. That's not evening mentioning the fundamental problem with parts that are painted on the trees: The spots that are left unpainted on the parts once they are cut off the sprue. I decided to give a technique a try that I had read about online and in magazines: de-chroming the parts with Bleche-wite. Bleche-wite is a cleaner that is meant to whiten the whitewalls of tires. It's a pretty aggressive cleaner, so should be handled with care, in a well-ventilated area. I used a baking dish, with the bottle of cleaner emptied into it. I dropped the chrome sprue in there and covered it with plastic wrap. I found that it took a couple multi-hour sessions to get all the chrome off, but because this solvent isn't as aggressive as something like lacquer thinner, I didn't have to worry about the plastic itself dissolving. If you are going to try this yourself, I recommend giving it a few hours in the cleaner and then giving it a light scrubbing with a toothbrush (don't use the brush afterward, despite the tooth-whitening potential), and repeat that process until all the chrome and underlying varnish is all gone.
With that out of the way, I should probably mention something about this kit: It is a mess. Compared to many of the other kits that I have built, from the likes of Tamiya, Hobbyboss and Dragon, this one is of markedly lower quality. There is heaps of flash, the registration between the mold halves is not very good, there are ejector pin marks and sinks all over the place and it just requires a great deal of work to get into shape.
That said, I began by getting the body into a state that is ready for primer and paint. There were sinks on the exterior of the body in every place where there were structural braces on the inside. I ended up thinning some green Squadron putty with some lacquer thinner and spreading that over these areas. After that, I worked my way through various grits of sandpaper, wet sanding until it was smooth enough to be primed. Below you can see the exterior has been sanded, but the rear tire area still needs to be cleaned up.
Also, while consulting some reference, I determined that the way the instructions wanted me to put the wheel halves together would have resulted in wheels that didn't really look like the real things. The 1:1 car's wire wheels look to have an offset pattern, making for a much more visually-dense criss-cross pattern. The way the parts aligned resulted in all the spokes lining up, making for a much simpler look. I wanted the more complex look, so I shaved off the locator pins and offset the halves a few degrees. Below you can see the stock and offset locations of the wheel halves.
Some thing unusual about this kit is that it is constructed very much like the real car, with an underlying frame that the body sits on top of. While I'm not sure if this was the best idea, since the plastic that this kit is made of is pretty soft and not the best structural material, that is how it is made, so that is what I had to work with. While assembling the front end, I did notice that one of the bracing bars was cast out of scale, so I just replaced it with some extra brass rod that I had laying around, bent to match.
Below you can see a painted wheel, tire mounted, attached to the rear drive assembly. This whole assembly ends up being covered by the body, though, so there were some things here that I would usually fix, but decided not to bother with in this case. As a side note, to anyone else who may attempt this kit: The instructions mention dipping the tires in warm water in order to soften them before stretching them around the wheels. Use HOT water. It took me a few tries, with increasing warm/hot water to get the tires onto the wheels, and I managed to damage a few spokes. Using very hot water from the start would probably avoid any damage.
Below you can see the fairly simple dash board, with decals applied. The kit came with some very thick lenses for these gauges, but I decided to just use some clear parts cement to coat them instead, so that the graphics could still be seen.
Below you can see the frame all together, and the body painted with the interior painted and attached.
Here I'll touch upon something that will be addressed more in the next blog post: conversion from an air-cooled engine to a water-cooled one. The first part of that involved reshaping the front cowl a bit. The model part also had a very large raised band where there should have been a barely sunken weld bead. I reshaped the front opening a bit to give some curve to the sides and then cut off the raised ridge and used a heated sewing pin to carve a bit of a weld bead. Below you can see the reshaped cowl along with a few other parts after getting a coat of primer, black gloss and Alclad chrome paint.
Finally, below you can see the rear rack mounted and a general indication of the quality of the paint job on this one. It's generally better than the SLS model, but still not quite what I was hoping for. This one is Tamiya british green and clear paints right from the can. I've decided that after this model is done, I'm just going to get a bunch of cheap car kits and just spend some time practicing my painting techniques on the bodies of those models.
Thanks for reading, and tune in for the next post, which will have some interesting new developments in model building!
Repairing a few Older Projects
01 - December - 2013 - 13:55
Before I move on to the next model build, I wanted to put up a quick post that had some updates from previous projects.
Repair #1:
So, after I completed the Panzer and BMW motorcycle models, I put them together into one display case, and took them to my office at work for display. I was bringing various other models in at the same time, in various other display cases. Some of those cases had the plastic tops that snapped to the bases and some had the tops that just sat on the bases. Unfortunately, when I picked up the case that held the tank and motorcycle, I THOUGHT it was one that snapped together, but it wasn't. This resulted in the lower half of the case dropping to the table and then bouncing onto the floor, doing a bit of damage to both models, which were wired to the base.
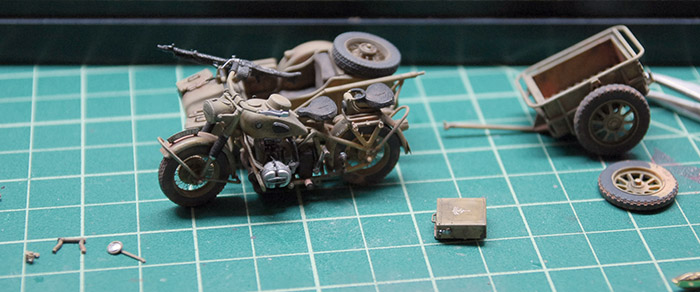
I was pretty mad at myself for making such a mistake and, after a great deal of cursing, decided to put the models and all the broken pieces back in the case, and the case back into its box, to be fixed later. Fast forward a year or two and I finally felt like I was able to open the box up and see how hard it would be to repair the models. Fortunately, it turned out to be pretty easy! Below you can see the two models and their detached parts all spread out, ready for fixing.
The tank lost a few hatches, some road wheels and some chunks of track. A bit of time with some plastic cement and it was good as new. I also took the opportunity to repose some of the hatches into a more natural position, but forgot to take a picture of the finished project. Just imagine that those engine hatches are no longer sticking straight up :)
The motorcycle just needed a few small parts reattached.
Repair #2:
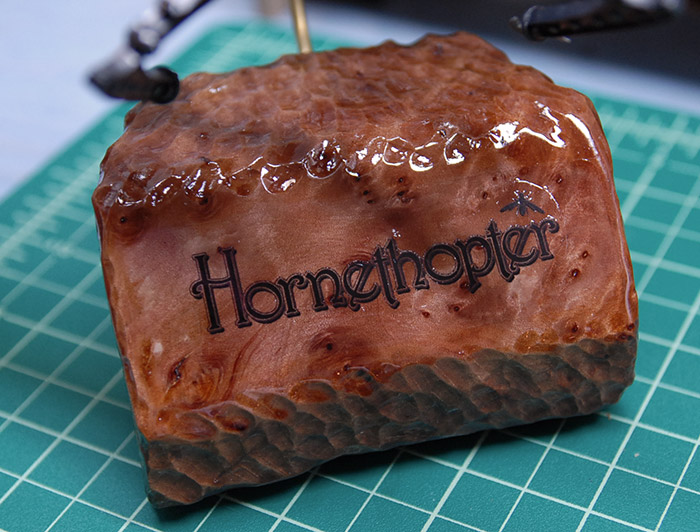
The Hornethopter model itself wasn't damaged, but the base that I built for it ended up throwing me for a loop. I have since learned that the chunk of wood that I bought for the base, which was a 'turning block', was actually pretty wet wood. The turning blocks come with a wax coating, which keeps the moisture in the wood, presumably making it better for turning on a lathe. When I prepared the block, I burned off the wax, cut the shape that I needed and carved it a bit. I put some polyurethane on there, attached the brass name plate, tube for the model and some felt dots on the bottom and called it done.
Fast forward a few months, after the model had been sitting under a bell jar at work, and the moisture had all evaporated from the block of wood. As the wood lost its moisture, it also shrunk. It shrunk enough to significantly buckle the brass name plate. I brought the model home, thinking that I could pop the plate off, and re-glue it into place. Unfortunately, the plate didn't really want to flatten out properly, so I decided to go a different route. I scanned the hornethopter logo and printed it out onto clear decal sheet. I sanded the glue off of the front of the wood block, made it smooth again and gave it a coat of gloss polyurethane. Then I put the decal on there, where the plate used to be, and gave it a few more coats of gloss polyurethane. Good as new!
Repair #1:
So, after I completed the Panzer and BMW motorcycle models, I put them together into one display case, and took them to my office at work for display. I was bringing various other models in at the same time, in various other display cases. Some of those cases had the plastic tops that snapped to the bases and some had the tops that just sat on the bases. Unfortunately, when I picked up the case that held the tank and motorcycle, I THOUGHT it was one that snapped together, but it wasn't. This resulted in the lower half of the case dropping to the table and then bouncing onto the floor, doing a bit of damage to both models, which were wired to the base.
I was pretty mad at myself for making such a mistake and, after a great deal of cursing, decided to put the models and all the broken pieces back in the case, and the case back into its box, to be fixed later. Fast forward a year or two and I finally felt like I was able to open the box up and see how hard it would be to repair the models. Fortunately, it turned out to be pretty easy! Below you can see the two models and their detached parts all spread out, ready for fixing.
The tank lost a few hatches, some road wheels and some chunks of track. A bit of time with some plastic cement and it was good as new. I also took the opportunity to repose some of the hatches into a more natural position, but forgot to take a picture of the finished project. Just imagine that those engine hatches are no longer sticking straight up :)
The motorcycle just needed a few small parts reattached.
Repair #2:
The Hornethopter model itself wasn't damaged, but the base that I built for it ended up throwing me for a loop. I have since learned that the chunk of wood that I bought for the base, which was a 'turning block', was actually pretty wet wood. The turning blocks come with a wax coating, which keeps the moisture in the wood, presumably making it better for turning on a lathe. When I prepared the block, I burned off the wax, cut the shape that I needed and carved it a bit. I put some polyurethane on there, attached the brass name plate, tube for the model and some felt dots on the bottom and called it done.
Fast forward a few months, after the model had been sitting under a bell jar at work, and the moisture had all evaporated from the block of wood. As the wood lost its moisture, it also shrunk. It shrunk enough to significantly buckle the brass name plate. I brought the model home, thinking that I could pop the plate off, and re-glue it into place. Unfortunately, the plate didn't really want to flatten out properly, so I decided to go a different route. I scanned the hornethopter logo and printed it out onto clear decal sheet. I sanded the glue off of the front of the wood block, made it smooth again and gave it a coat of gloss polyurethane. Then I put the decal on there, where the plate used to be, and gave it a few more coats of gloss polyurethane. Good as new!
Mercedes-Benz SLS AMG
01 - December - 2013 - 12:14
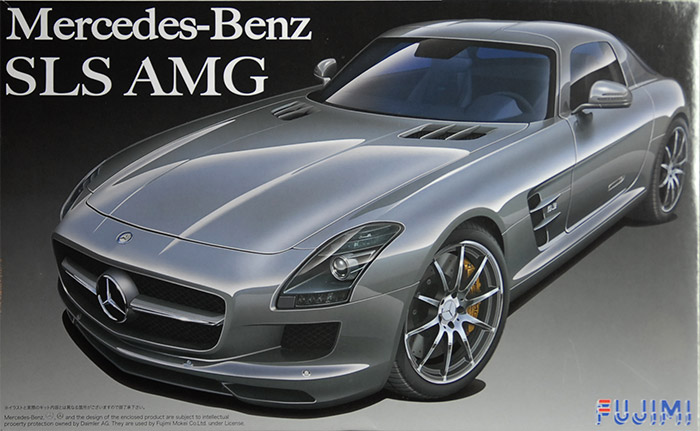
In an effort to get better at shiny car paint finishes, I've decided to do a number of cars in a row. The first in this line of increasingly-shiny vehicles is this Mercedes-Benz SLS AMG.
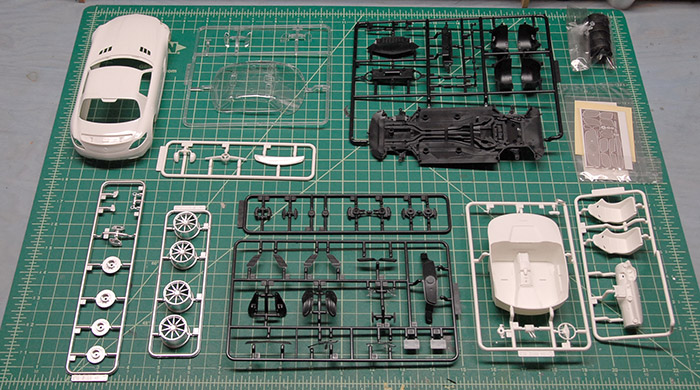
Below, you can see the various trees of parts. The body is a single piece, with no opening panels. There are a few parts (wheels, brakes, ducts) that are pre-painted in a satin metal that looks decent. There is also a bit of photo-etch that provide for replacing some of the plastic grills.
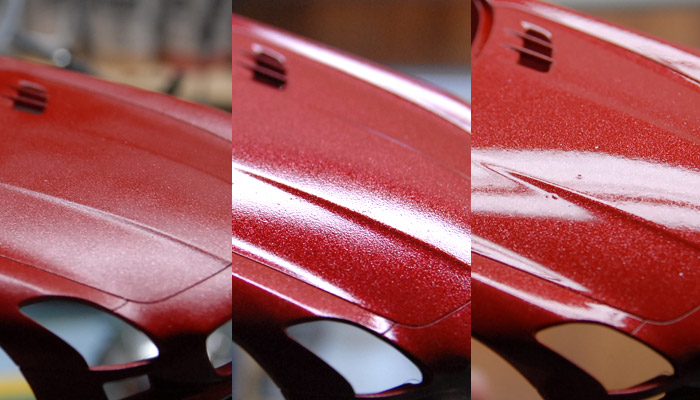
Since the goal of this project is practicing my car paint finishing, let's just right to that. I had been doing some reading on various scale modeling forums (Fine Scale Modeler forums, mostly) and had read good things about Testors one-coat lacquer, so I decided to give that a try. I bought one of their metallic red colors and some of their clear coat. After sanding out some seams and priming, the body and spoiler were ready for paint. In the image below, you can see how it looks after a few coats of the red paint (first image), after one coat of the clear coat (middle) and after two coats of the clear coat (third image). As you can see, I had a good deal of trouble trying to get the paint to go on glossy, always ending up with a pebbly finish. When the clear went over that, it smoothed it out a bit, but was still not the best.
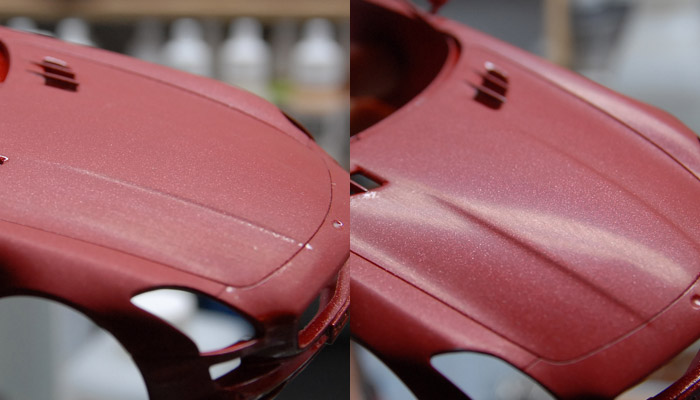
In an effort to get a better finish, I took a series of sanding pads to the surface, smoothing out the orange peel texture and trying to get a better surface to spray more clear coat on to. Below you can see a few stages in the sanding process.
The problem I was having with this metallic paint was that as I sanded it, the metal flakes would come to the surface, and be silver spots, instead of the red-tinted flakes that they were when deeper in the paint. I suppose that is the nature of metal flake paint, but it definitely made things a bit more difficult as far as getting a nice consistent look.
After some more clear coat, the paint finish was definitely better, as you can see in the final images, but still not as good as I would like, as it still had a little bit of orange peel.
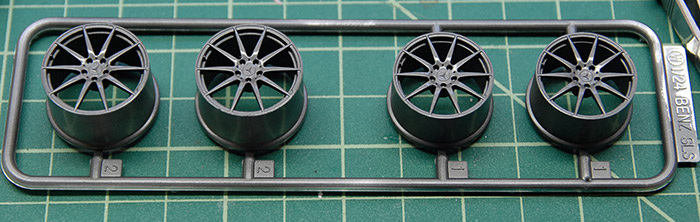
In reference that I found, the wheels also were available in a gunmetal color, which I think goes much better with the metallic red paint. Below you can see the wheels after being sprayed with some Alclad gunmetal paint and a couple coats of clear gloss.
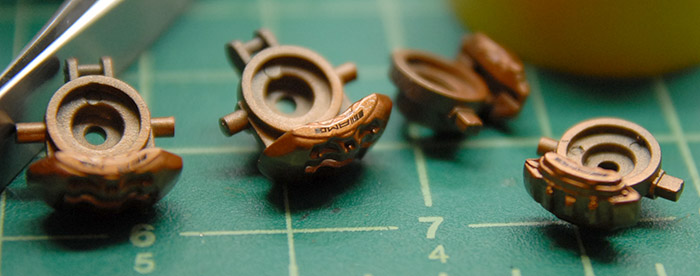
The brake calipers, after some paint, decals, and clear.
The chassis, after being painted black, masked for spraying of the various metal bits (exhaust, braces, engine, etc).
After the painting:
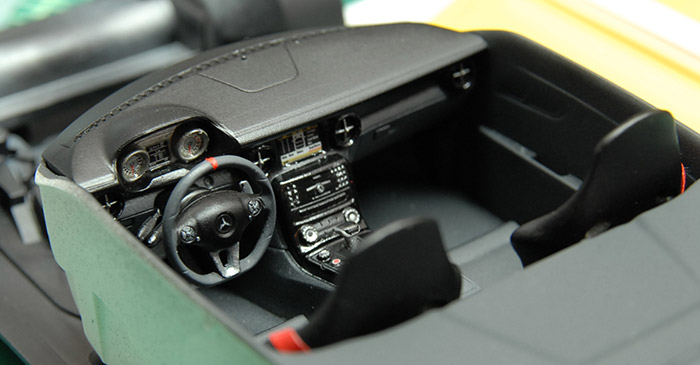
The interior of the real car looks to have a two-tone black/grey scheme (it may be black leather and Alcantara). I made an effort to replicate that scheme with black and grey paint and some selective application of some gloss varnish (from Vallejo). The dash after painting, and decals:
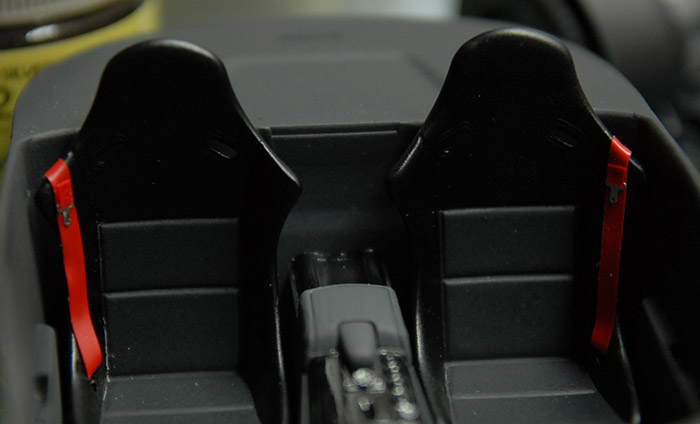
Since the kit didn't come with any seat belts, I used a bit of masking tape to make some, and added some buckles that I already had.
Below you can see the completed interior, before the top and bottom of the car was put together.
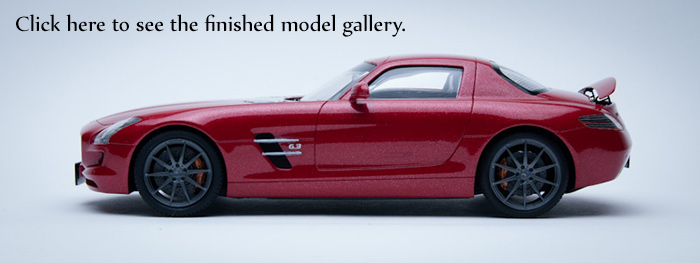
And finally, everything was put together and a bit of Tamiya model wax applied to clean and shine things up. Click on the image below to see the gallery of photos of the finished model:
Below, you can see the various trees of parts. The body is a single piece, with no opening panels. There are a few parts (wheels, brakes, ducts) that are pre-painted in a satin metal that looks decent. There is also a bit of photo-etch that provide for replacing some of the plastic grills.
Since the goal of this project is practicing my car paint finishing, let's just right to that. I had been doing some reading on various scale modeling forums (Fine Scale Modeler forums, mostly) and had read good things about Testors one-coat lacquer, so I decided to give that a try. I bought one of their metallic red colors and some of their clear coat. After sanding out some seams and priming, the body and spoiler were ready for paint. In the image below, you can see how it looks after a few coats of the red paint (first image), after one coat of the clear coat (middle) and after two coats of the clear coat (third image). As you can see, I had a good deal of trouble trying to get the paint to go on glossy, always ending up with a pebbly finish. When the clear went over that, it smoothed it out a bit, but was still not the best.
In an effort to get a better finish, I took a series of sanding pads to the surface, smoothing out the orange peel texture and trying to get a better surface to spray more clear coat on to. Below you can see a few stages in the sanding process.
The problem I was having with this metallic paint was that as I sanded it, the metal flakes would come to the surface, and be silver spots, instead of the red-tinted flakes that they were when deeper in the paint. I suppose that is the nature of metal flake paint, but it definitely made things a bit more difficult as far as getting a nice consistent look.
After some more clear coat, the paint finish was definitely better, as you can see in the final images, but still not as good as I would like, as it still had a little bit of orange peel.
In reference that I found, the wheels also were available in a gunmetal color, which I think goes much better with the metallic red paint. Below you can see the wheels after being sprayed with some Alclad gunmetal paint and a couple coats of clear gloss.
The brake calipers, after some paint, decals, and clear.
The chassis, after being painted black, masked for spraying of the various metal bits (exhaust, braces, engine, etc).
After the painting:
The interior of the real car looks to have a two-tone black/grey scheme (it may be black leather and Alcantara). I made an effort to replicate that scheme with black and grey paint and some selective application of some gloss varnish (from Vallejo). The dash after painting, and decals:
Since the kit didn't come with any seat belts, I used a bit of masking tape to make some, and added some buckles that I already had.
Below you can see the completed interior, before the top and bottom of the car was put together.
And finally, everything was put together and a bit of Tamiya model wax applied to clean and shine things up. Click on the image below to see the gallery of photos of the finished model: