
January 2013
New project: F-84e Thunderjet
13 - January - 2013 - 18:28
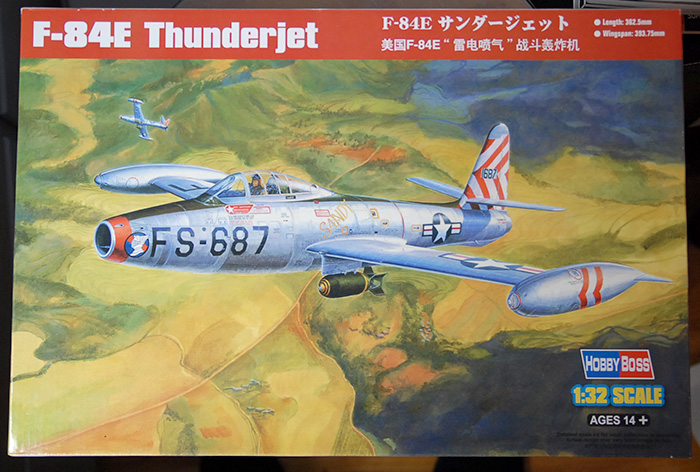
With the Hornethopter wrapped up, it was time to move along to the next project. I bought this kit a year or so ago for a few different reasons. First, the kit looked well made and came with a number of things that you usually have to pay extra for and order separately, such as metal landing gear. It also was 1:32 scale, which is on the larger side for aircraft, allowing for more detail and a little room to work. I had bought this with the intention of learning more about natural metal finishing, since that wasn't something I had done much of previously. Finally, I haven't made a plastic aircraft model since I was maybe 13 years old, so it seemed like it would be a fun change of pace.
This one is made by HobbyBoss and is of the Korean-war-era F-84E Thunderjet.
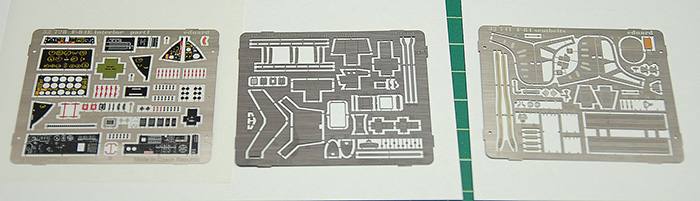
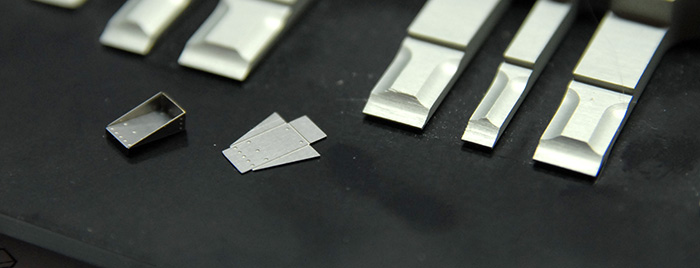
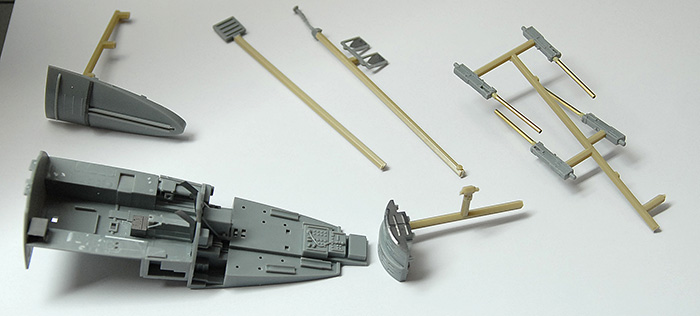
Since I don't seem to be able to leave well enough alone, I also ordered the 'Big Ed' kit of detailing parts from Eduard. It consists of four sets of photo-etched metal (seat belts, cockpit details, exterior details, and remove-before-flight tags) and one set of pre-cut canopy masks. Below you can see, from left to right, the canopy masks, exterior detail kit and remove-before-flight tags.

Below you can see the two frets of photo-etch for the cockpit details (left two) and one (partially used at this point) fret for the seat belt and ejector seat upgrades.
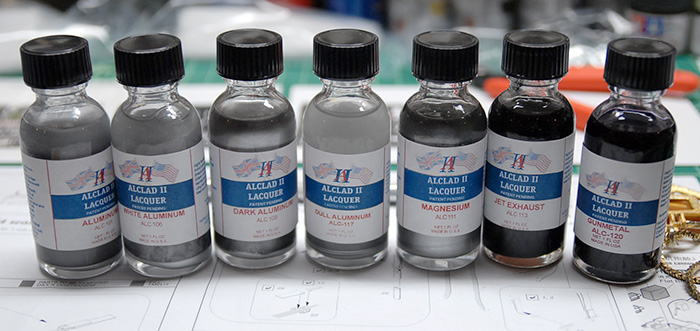
While I was ordering things, I expanded my collection of Alclad metallic paints by ordering a few more. These were chosen to provide a few similar shades of aluminum for the main aircraft skin as well as a few other colors that I thought would be handy (gunmetal, jet exhaust)
With the addition of all of the upgrade parts, I found that I needed to be much more careful of the order in which things are assembled. In addition, there was quite a bit of work that had to be done to the plastic parts, in order to shave off raised details that were to be replaced by photo-etched parts. To start, though, I put together the seat belts, since they were not replacing any kit part, making them safe to build without worry. The parts are pre-printed photo-etched metal, which is pretty cool, but also a little shinier than I would prefer and a bit tricky to bend without the paint flaking off. Here are the belts after being assembled but before bending them into final shape on the seat.
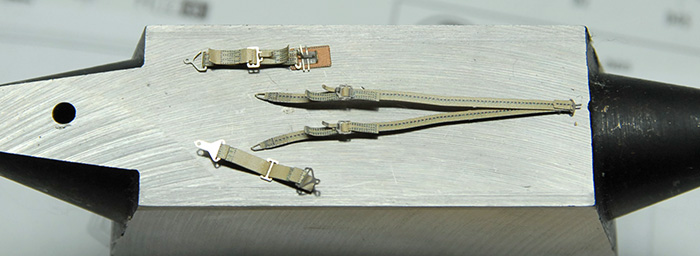
Here is a close-up of the little foot-rest-looking things for the seat in bent and unbent form. They are on a Hold-and-Fold bender (very handy!).
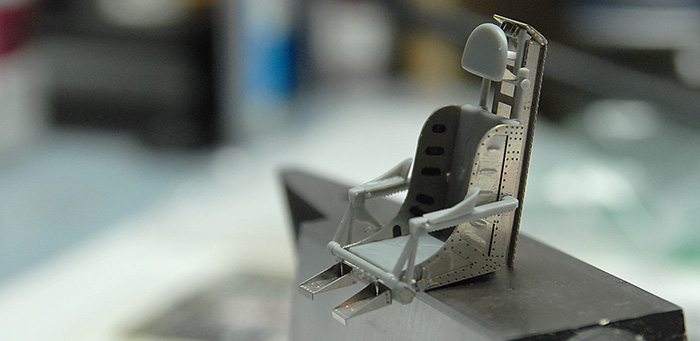
Here is the seat, pretty much all assembled with kit and upgrade parts mixing. Although, as I discovered later on, the upgrade parts seem to actually be for the F-84G seat rather than the F-84E (at least so I have read, as I wouldn't know for sure myself, and have had a hard time finding good reference). What this meant, though, was that the seat, with the new frame behind it, sat quite a bit further forward in the cockpit that the kit seat. This required a little bit of trimming and planning in order to get everything to fit again. Mostly just taking a bit out of the center pillar and moving the control stick forward. Also, I made a few modifications to the kit part that helps align the seat in the cockpit, so that it would fit in there securely.
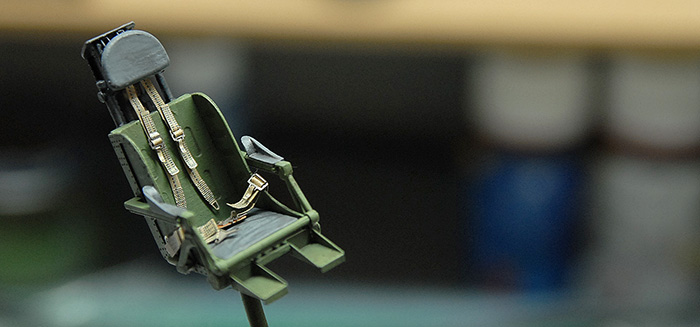
Here is the seat with paint. I also had a hard time finding good reference of this cockpit as far as color goes. Most of the reference is of the F-84G, and most of THAT is of planes that have long since been decommissioned, been repainted, and have been sitting in museums for a while. Even checking other models that have been built, the colored ranged from all black, to all green to a mixture of both. Since my seat was already a bit mismatched version-wise, I decided to just go with a mixture of black and interior green. If I was a stickler for historical detail, I'd probably rebuild the seat to remove the back structure. But I'm not a stickler like that, and I like the way it looks, so I suppose this one will never win any IPMS awards ;)
Next up was to start putting together the cockpit tub. This is where is started to get a bit trickier, as there were many kit parts that were being replaced by the upgrade parts and many kit parts that just needed altering. The kit parts had many of the controls molded into the plastic, but since those were being replaced by more pre-printed etched parts, I had to shave off much of the raised details. There were also a few boxes and cylinders that either needed to be cut off and replaced with folded etch or needed to be cut off and saved to be put back on top of the printed etch parts later.
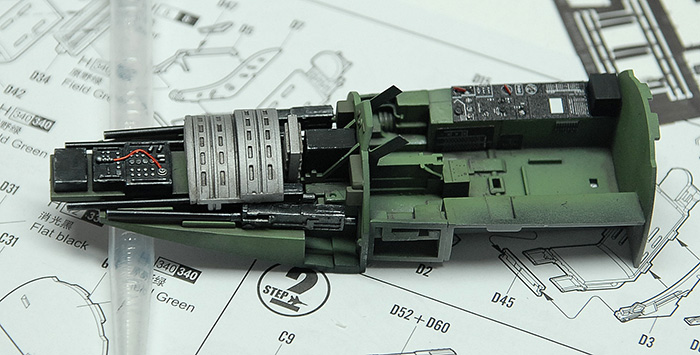
Directly connected to the front of the cockpit tub is the gun bay, with four machine cannons. Looking at the kit parts, the gun barrels were not looking so good. They were a little soft around the edges, didn't have a hole in the end, and had a mold seam that I would have to clean up. I had seen various articles in Fine Scale Modeler magazine where people used fancy turned brass gun barrels that looked just fabulous. Not having anything like that, I instead dug into a bag of scrap metal bits that I got at the local Ace Hardware, and found some lengths of 1/16" brass tubing that I could cut down and use instead. With a bit of careful cutting (I put the tube on the desk, put a sharp x-acto on top and slowly rolled back and forth, letting the knife cut through the soft metal with only light pressure), I ended up with four 1" long gun barrels that looked much better than the kit versions.
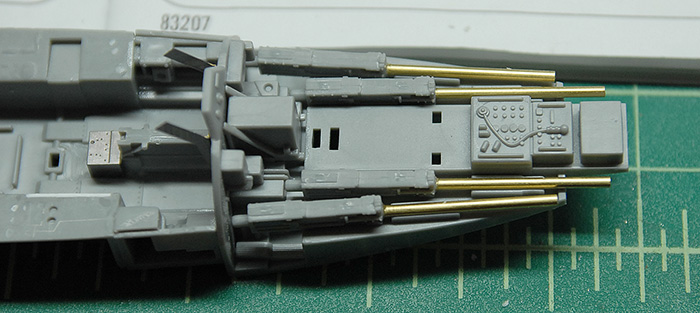
Below you can see the various cockpit and gun bay parts attached to scrap plastic and ready for painting.
Below is the current state of the cockpit and gun bay. The gun bay parts are not glued yet, but just put in there to demonstrate how they go together. Also, only a few bits of the pre-printed etch have gone into the cockpit so far, and they will get touched up a bit later and possibly sprayed with a matte medium overcoat in order to dull them down a bit (pending a paint interaction test, to avoid any possible mishaps).
The painting was made up of a base coat of Mr Surfacer 1200, then a layer of Tamiya Dark Green (XF-61) followed by an overcoat of Tamiya Cockpit Green (XF-71), all sprayed with my Paasche Talon airbrush. On the lighter green, I avoided the corners a bit, to let them stay a bit darker. The gun bay parts are Alclad Gunmetal and Dull Aluminum. Everything got a light wash of Abteilung Dark Mud in order to pick out some details and make it all a bit less clean. It still needs some selective dry-brushing of highlights, and much more of the photo-etched details, but that's for next time!
Thanks for reading!
This one is made by HobbyBoss and is of the Korean-war-era F-84E Thunderjet.
Since I don't seem to be able to leave well enough alone, I also ordered the 'Big Ed' kit of detailing parts from Eduard. It consists of four sets of photo-etched metal (seat belts, cockpit details, exterior details, and remove-before-flight tags) and one set of pre-cut canopy masks. Below you can see, from left to right, the canopy masks, exterior detail kit and remove-before-flight tags.
Below you can see the two frets of photo-etch for the cockpit details (left two) and one (partially used at this point) fret for the seat belt and ejector seat upgrades.
While I was ordering things, I expanded my collection of Alclad metallic paints by ordering a few more. These were chosen to provide a few similar shades of aluminum for the main aircraft skin as well as a few other colors that I thought would be handy (gunmetal, jet exhaust)
With the addition of all of the upgrade parts, I found that I needed to be much more careful of the order in which things are assembled. In addition, there was quite a bit of work that had to be done to the plastic parts, in order to shave off raised details that were to be replaced by photo-etched parts. To start, though, I put together the seat belts, since they were not replacing any kit part, making them safe to build without worry. The parts are pre-printed photo-etched metal, which is pretty cool, but also a little shinier than I would prefer and a bit tricky to bend without the paint flaking off. Here are the belts after being assembled but before bending them into final shape on the seat.
Here is a close-up of the little foot-rest-looking things for the seat in bent and unbent form. They are on a Hold-and-Fold bender (very handy!).
Here is the seat, pretty much all assembled with kit and upgrade parts mixing. Although, as I discovered later on, the upgrade parts seem to actually be for the F-84G seat rather than the F-84E (at least so I have read, as I wouldn't know for sure myself, and have had a hard time finding good reference). What this meant, though, was that the seat, with the new frame behind it, sat quite a bit further forward in the cockpit that the kit seat. This required a little bit of trimming and planning in order to get everything to fit again. Mostly just taking a bit out of the center pillar and moving the control stick forward. Also, I made a few modifications to the kit part that helps align the seat in the cockpit, so that it would fit in there securely.
Here is the seat with paint. I also had a hard time finding good reference of this cockpit as far as color goes. Most of the reference is of the F-84G, and most of THAT is of planes that have long since been decommissioned, been repainted, and have been sitting in museums for a while. Even checking other models that have been built, the colored ranged from all black, to all green to a mixture of both. Since my seat was already a bit mismatched version-wise, I decided to just go with a mixture of black and interior green. If I was a stickler for historical detail, I'd probably rebuild the seat to remove the back structure. But I'm not a stickler like that, and I like the way it looks, so I suppose this one will never win any IPMS awards ;)
Next up was to start putting together the cockpit tub. This is where is started to get a bit trickier, as there were many kit parts that were being replaced by the upgrade parts and many kit parts that just needed altering. The kit parts had many of the controls molded into the plastic, but since those were being replaced by more pre-printed etched parts, I had to shave off much of the raised details. There were also a few boxes and cylinders that either needed to be cut off and replaced with folded etch or needed to be cut off and saved to be put back on top of the printed etch parts later.
Directly connected to the front of the cockpit tub is the gun bay, with four machine cannons. Looking at the kit parts, the gun barrels were not looking so good. They were a little soft around the edges, didn't have a hole in the end, and had a mold seam that I would have to clean up. I had seen various articles in Fine Scale Modeler magazine where people used fancy turned brass gun barrels that looked just fabulous. Not having anything like that, I instead dug into a bag of scrap metal bits that I got at the local Ace Hardware, and found some lengths of 1/16" brass tubing that I could cut down and use instead. With a bit of careful cutting (I put the tube on the desk, put a sharp x-acto on top and slowly rolled back and forth, letting the knife cut through the soft metal with only light pressure), I ended up with four 1" long gun barrels that looked much better than the kit versions.
Below you can see the various cockpit and gun bay parts attached to scrap plastic and ready for painting.
Below is the current state of the cockpit and gun bay. The gun bay parts are not glued yet, but just put in there to demonstrate how they go together. Also, only a few bits of the pre-printed etch have gone into the cockpit so far, and they will get touched up a bit later and possibly sprayed with a matte medium overcoat in order to dull them down a bit (pending a paint interaction test, to avoid any possible mishaps).
The painting was made up of a base coat of Mr Surfacer 1200, then a layer of Tamiya Dark Green (XF-61) followed by an overcoat of Tamiya Cockpit Green (XF-71), all sprayed with my Paasche Talon airbrush. On the lighter green, I avoided the corners a bit, to let them stay a bit darker. The gun bay parts are Alclad Gunmetal and Dull Aluminum. Everything got a light wash of Abteilung Dark Mud in order to pick out some details and make it all a bit less clean. It still needs some selective dry-brushing of highlights, and much more of the photo-etched details, but that's for next time!
Thanks for reading!