Modeling A Car Tire in 3dsmax.
Disclaimer: This tutorial was written somewhere around 2002-2003. Things have changed a bit since then, but since this tutorial still gets a bit of traffic, I didn’t want to take it away, just in case someone finds it useful.
In this tut, i'm going to demonstrate a technique I learned off of Thomas Suurland's site, so don't think I made it up myself :) But i've had a few people ask me how i do tires, particularly the tread modeling, so i figured a little tut (with a bit more detail than suurland's description) couldn't hurt.
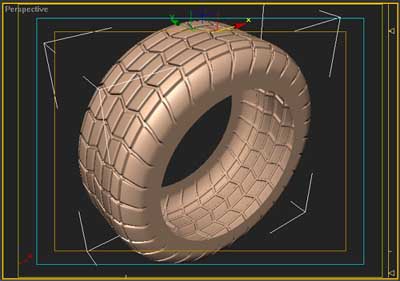
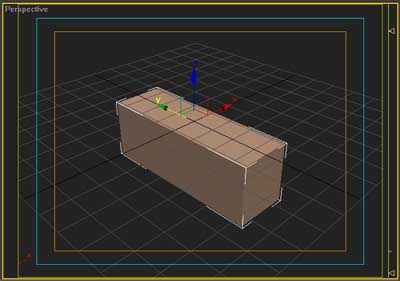
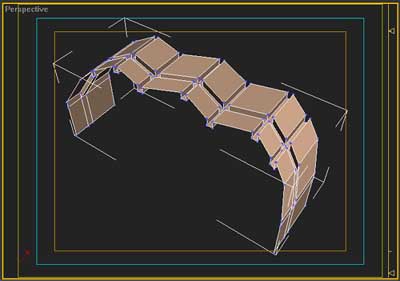
The idea in this tut is to go from this:
Disclaimer: This tutorial was written somewhere around 2002-2003. Things have changed a bit since then, but since this tutorial still gets a bit of traffic, I didn’t want to take it away, just in case someone finds it useful.
In this tut, i'm going to demonstrate a technique I learned off of Thomas Suurland's site, so don't think I made it up myself :) But i've had a few people ask me how i do tires, particularly the tread modeling, so i figured a little tut (with a bit more detail than suurland's description) couldn't hurt.
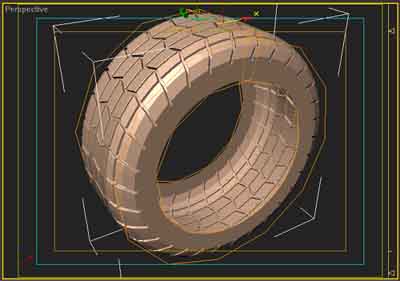
The idea in this tut is to go from this:
To this:

So, as you can see, i've created a box, with the approximate width of the tire i want to create. as a side note here, i generally don't give specific measurements for the various objects, changes etc, as they will really vary per scene etc. and my real goal is not to have you end up with a tire that looks exactly like mine, but rather a tire that you have created by the methods explained here, so feel free to make your own interpretations and changes to the sizes of things so that u end up with a tire that u like/can use.
1) create your box
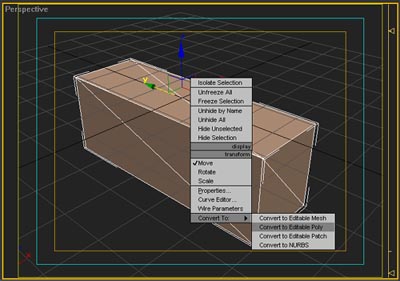
2) anyway, take your box and first convert it to editable poly, as this will give us access to all the fun poly tools in max 5 (note for non-max5 users here, you can still use all these poly tools, plus a few extra, but you will have to download and install Laszlo Sebo's meshtools script from scriptspot.):
1) create your box
2) anyway, take your box and first convert it to editable poly, as this will give us access to all the fun poly tools in max 5 (note for non-max5 users here, you can still use all these poly tools, plus a few extra, but you will have to download and install Laszlo Sebo's meshtools script from scriptspot.):
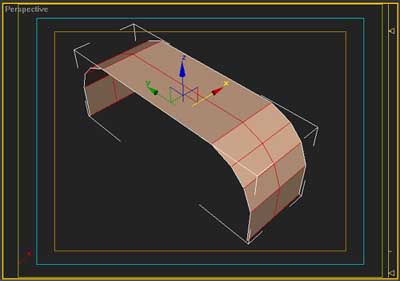
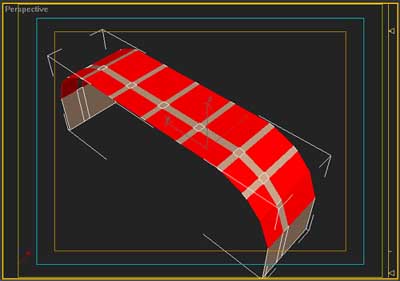
3) now, since we don't need the whole box, only just the outer 3 sides that will form the sides and top of our tire, go ahead and go to the face sub-object level and delete the two side faces and the bottom face, so that you are left with a sort of flat upside-down U shape:

4) next, go to the edge sub-object level and select the two corner edges. then, using the chamfer dialog, chamfer those edges a few times (i did twice in the pic) until the overall shape is a bit rounder. this is sort of like a cross-section of your tire. be sure not to chamfer too many times, as we will meshsmooth this whole thing a bit later, so you don't have to worry much about making everything perfectly round right now. optionally, this is also a good time to line the lowest edges up to a rim if u have one, so that the tire will fit inside the rim edges later on.

5) next, add another cross-wise edge to your tire segment by selecting all the length-wise segments and hitting the connect button. this edge will be our separation in tread blocks in a little while.
6) now, with that edge that you just created still selected, chamfer it a bit, so that you have two edges there instead of one. this is providing the separation between the tread blocks.

7) next, add a few more segments cross-ways, like you did to get the other long line in step 5.

8) now select a bunch of the cross edges and chamfer them, this will make the spaces between individual tread blocks around the tire.

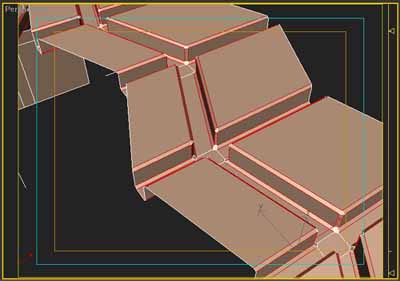
9) next, go to the face sub-object level and select the large faces. these faces will be the tread blocks themselves here in a few mins.
10) now extrude all those faces a bit (however deep you want your tread to be).
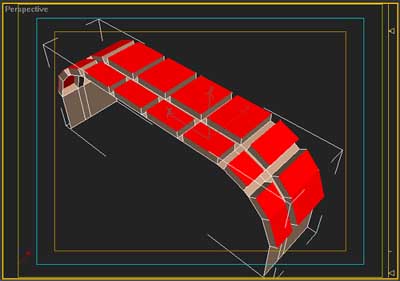
11) now, grab ahold of those faces towards the outsides, that extruded outwards and pull em in and up a bit so that they go straight up. this will help blend the tread into the sidewall of the tire once everything is smoothed at the end.

12) next grab ahold of those faces that were created on the sides when u extruded and delete them, as they are not needed.
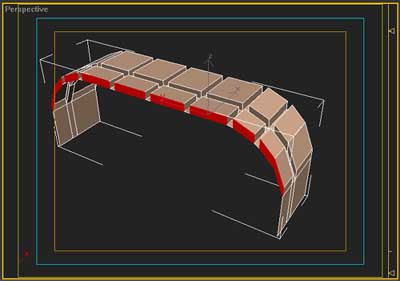
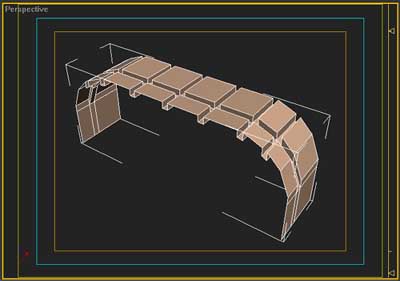
13) now to make the tread more like real tire tread. grab ahold of the verts in the center of the tire and pull them a bit. once you got that done, go ahead and do the same to the verts on the rest of the tread. the important thing to remember here is that you want to move the verts on the front and back edges of the tire at the same time, the same amount, because later on, when this segment is array'd to make a long piece of tread, those edges will need to line up.

14) next, select all the edges of the tread blocks themselves (but NOT the edges on the front/rear of the tire segment) and give em a little chamfer. the degree to which u chamfer will determine how smooth the edges are later on, when meshsmoothed. alternatively here, you could also crease those edges or set the faces to different smoothing groups and tell meshsmooth to work off the smothing groups... but i personally prefer the chamfering method, so that is what i recommend, based on my preference and bias ;)
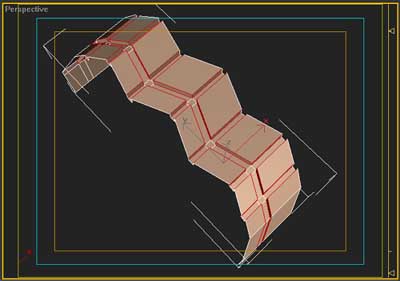
15) well that pretty much concludes the section modeling. next you will need to create an array of the tire segment ( i think i used 30 copies on mine, but this is really dependant on how big a tire u want). you want to set the offset amount of each object so that the leading edge of one object exactly lines up with the trailing edge of the next. a good way to determine the distance to offset is to, using the move tool, shift-drag a copy of the object, while zoomed in pretty far, and move it until the edges are overlapped properly. once the edges are overlapping and BEFORE you let go of the mouse button, simply check the numbers at the bottom of the screen, and you should know how far you moved the object, and then just use that number for your offset in the array :)

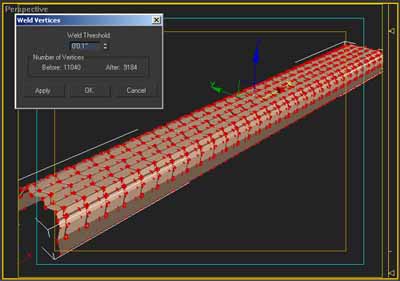
16) next just attach all the segments into one object. then, you need to weld all the overlapping verts together so its really one object. this is where it is important that your offset amount was correct, as if they are correctly aligned, then the weld will be nice and easy, but if they are offset too much then you may end up welding all your chamfers too. so if the offset was incorrect, you'll have to undo a few steps and change it so that everything works here.
17) and finally, apply a bend modifier and mess with the settings until the ends of the tire segment line up nicely. optionally here you can then collapse the stack back down to an editable poly and weld the verts of the ends of the segment, so that it is a true donut rather then a bent segment.
18) and finally, a little meshsmooth and VOILA! we've got a nice tire (although generally a pretty polygonally-heavy one)