
Modeling a Tank Track in 3dsmax
Disclaimer: This tutorial was written somewhere around 2002-2003. Things have changed a bit since then, but since this tutorial still gets a bit of traffic, I didn’t want to take it away, just in case someone finds it useful.
In this tut, i'm going to show a quick and easy way to make rotating tank treads. The technique isn't perfect, and sometimes there is a little bit of stretching in the treads, but there are some ways to minimize this, and in most cases it's hardly noticeable :)
okay, so the idea in this tut is to go from this:

To this:

Okay so you've got yourself a nice tank model that you've been working on all week and now you are ready to stick some treads on it and begin animating it driving over cars/robots/puppies or whatever. but now you find that while its possible to just take a section of tread that you've modeled and duplicate it along where the tread would be, that would a) take a long time and b) be a bit more difficult then you had hoped to animate.
so that's where this tut comes in! what we will do here is model one section of the tread, duplicate it a bunch using the array tool and then wrap it around the wheels of our tank using the path deform modifier. this will also provide us with a quick and easy way of animating the tread as well (yay), so on with the show:
Okay, so here is my starting point:
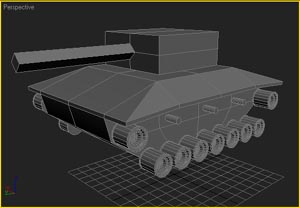
A quick little tank model that I whipped up in a few minutes. i'll be using this model for the tut, but you should be able to follow along on your own model, as I won't be using any model-specific measurements (hopefully ;).
As you can see, there are no treads on the model yet. First thing we will need to do is model ourselves a single section of the tread. I'll sort of breeze over this part, since this can be anything from a simple box to a complex detailed tread piece. the important thing here is that you end up with a single object. So if you added a bunch of boxes together for your piece of tread, be sure to convert one to editable poly and then add the other bits to it using the 'attach' button.
1) make your section of tread using the above guidelines. here's a few images of how i made mine:

As you can see, i just made a box, converted it to editable poly and then extruded and beveled a few faces, just to give it a little more of an interesting surface. your tread can easily be much more complicated, but keep in mind that by the end of the tut you may have over a hundred of these (depending on the length of the tread segment and the total length of the overall tread) all put together, so if your tread segment has 6000 faces now you may well end up with a 600000-face tread later. just a word of warning :)
2) okay, so now we've got our segment of the tread, so let's now create a spline for our tread to follow. the important thing to remember here is to try to keep the spline's vertices spaced fairly evenly. this may seem sort of wierd now, but it will help later in that it will reduce stretching in our tread.
2) okay, so now we've got our segment of the tread, so let's now create a spline for our tread to follow. the important thing to remember here is to try to keep the spline's vertices spaced fairly evenly. this may seem sort of wierd now, but it will help later in that it will reduce stretching in our tread.

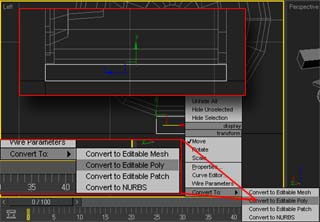
3) next you will want to center your spline to the pivot point of your tread piece (the center in my case, but it all depends on how you created your tread segment)

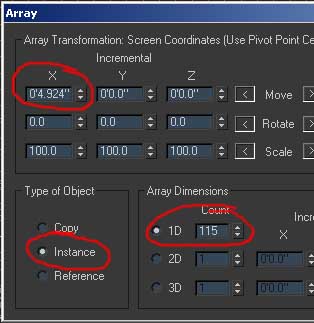
4) next you will need to gather a bit of information, so that you know how to configure the array tool in a few moments. so all you need to do is to shift-drag the section of tread to the side. align it to the original piece, so that there is a little bit of space between them. and before you let go of the mouse button, take note of the distance at the bottom, so you know how far the pieces are apart. now you can let go of the mouse button, and hit cancel when the clone options dialog comes up, as all we wanted was the distance, not the actual cloned object.
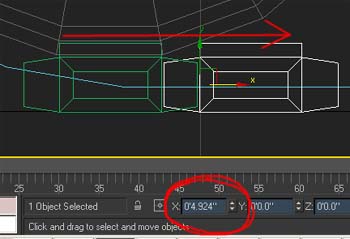
5) now, with your tread segment selected, go under the tools menu, and to 'array'. input the distance from the last step into the incremental X move transform box (this will determine the spacing of the objects). under type of object, be sure 'instance' is checked, as this way you can save a little bit of memory and if you decide you want to change your tread later they will all be affected. and under 'array dimensions' enter the number of segments it takes to wrap around your tread. 115 looks about right for me. if you are using a different model then my recommendation is to just kinda guess at the number. i personally use the scientific method of measuring with my fingers on the screen and then trying to match that in length with a few tries at arraying the segment. being exact here is not really needed here, as the path deform modifier can compensate for any small errors.

6) next, select all of your tread segments, and apply the path deform modifier. then poke the 'pick path' button and select your tread path that you made in step 2. now you will probably get something wierd here, as its probably working on the wrong axis. so try clicking on different axis buttons until the tread looks like its deforming correctly. the newly-wrapped tread will probably be floating out in the middle of nowhere too (seems to be a max bug/feature) as its not aligned to the original spline. you may also need to check the 'flip' box to get it oriented in the same direction as the original spline.
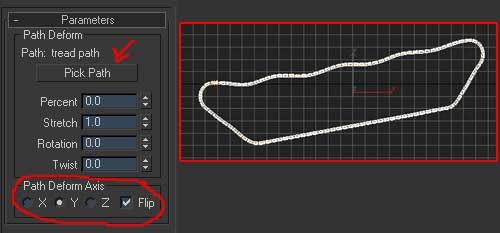
7) now here's where we correct for any error in the number of segments we used. adjust the stretch setting until the ends of the whole tread line up with each other properly. i had slightly too many segments, so i had some overlap, so a setting less then 1.0 had mine lined up. if you had too few segments, you should see a gap at 1.0 and you should stretch the segments out a tad to get them to line up.

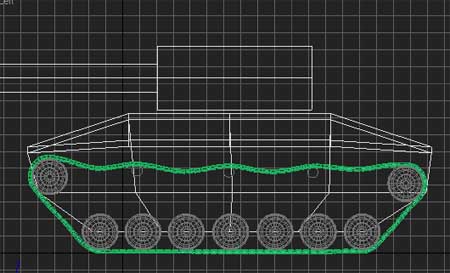
8) now all you need to do is move and rotate the tread back into its original place on the tank. i also find it handy, while you have everything selected, to type in a name for the tread in the selection set box, for easy selection later, since its made up of 100+ individual pieces.
9) and finally, as for animating, all you need to do is animate the percent spinner in the path deform modifier (if you select only one of the tread segments and make changes to it you can see how fast the tread is moving since that will be the only highlighted segment, but the changes made to it will affect all the other segments as well since the path deform modifier is instanced across them all) to get it to look like the tread is moving along its path.
10) optionally, consider applying a skin modifier to your original path spline, and then setting as its bones a number of dummy boxes places where your wheels are. then link the wheels to the boxes as well. wire the rotation of the wheels to the path deform modifier's percent spinner (this would require some math to figure out the proper ratio. i havn't tried this, it's just an idea). and then as you move the boxes and spin the percent spinner, you get some extra dynamic animation :D
10) optionally, consider applying a skin modifier to your original path spline, and then setting as its bones a number of dummy boxes places where your wheels are. then link the wheels to the boxes as well. wire the rotation of the wheels to the path deform modifier's percent spinner (this would require some math to figure out the proper ratio. i havn't tried this, it's just an idea). and then as you move the boxes and spin the percent spinner, you get some extra dynamic animation :D
